This guide will teach you how to sort emails in Outlook by date, sender, color, or read status and arrange folders in the way that suits you best.
Managing a crowded inbox can feel like trying to find a specific book in a messy library – things are there, but not where you expect them. Fortunately, Outlook provides a few easy ways to organize both your emails and folders.
How to sort emails in Outlook
By default, Outlook arranges your messages by Received date in descending order, so you can see the newest emails first. But you are free to sort your messages by any other column available in your current view such as Sender, Subject, Size, or Category.
There are two quick ways to sort emails in Outlook that work in any version, including classic Outlook (365 – 2010), the new app and web.
Sort Outlook mail list by column headers
The fastest and most visual way to sort messages in Outlook is this:
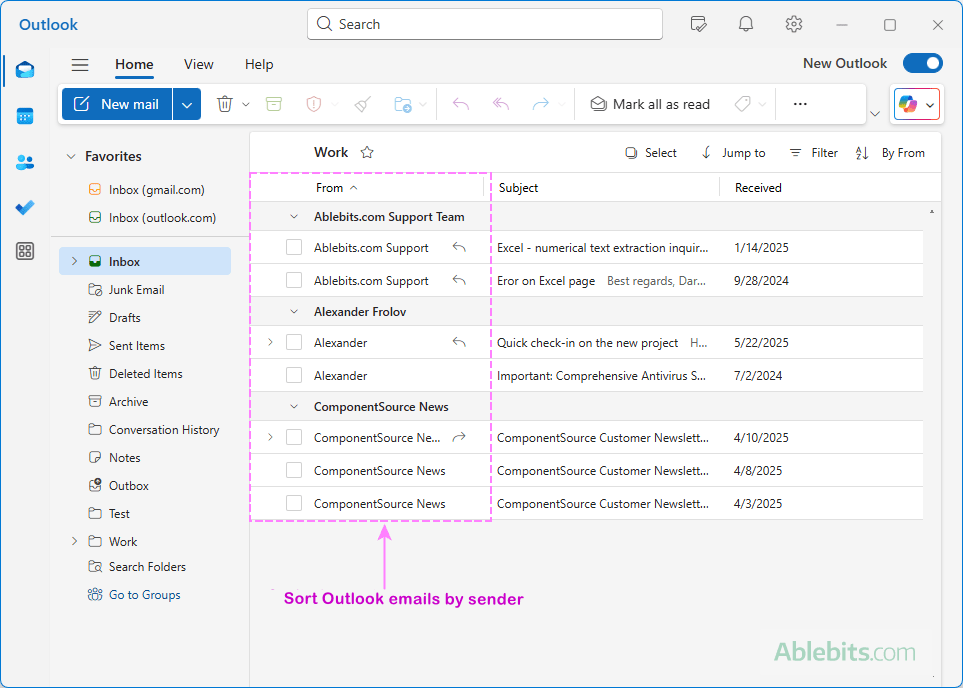
- At the top of the mail list, click a header to sort by that column, e.g. From, Subject, Size, or Attachment.
- Click the same header again to reverse the order, i.e. switch between ascending and descending sorting.
A small arrow on the column header shows the current sorting direction – pointing upward for ascending order and downward for descending order.
Arrange emails using Sort menu
Here is another quick way to change how your mail list is arranged, available in every Outlook version and app:
- In the upper-right corner above the message list, click the Sort button. Usually, it says By Date (the default arrangement) or shows your current sort option.
- Choose a sorting field. In the drop-down menu, look for Sort by (in the new Outlook and web) or Arrange by (in classic Outlook). From here, select the field you want to organize your emails by. Common options include:
- Date – sort emails by date to view newest or oldest messages first.
- From – group messages by sender.
- Subject – sort alphabetically by subject line.
- Size – arrange from largest to smallest, or vice versa.
- Category – organize by assigned color.
- Importance – bring high-priority emails to the top.
- Set the sort order. Decide how the email list should be arranged:
- Newest on top or Oldest on top for Date.
- Smallest on top or Largest on top for Size.
- A to Z or Z to A for text-based columns like Subject or From.
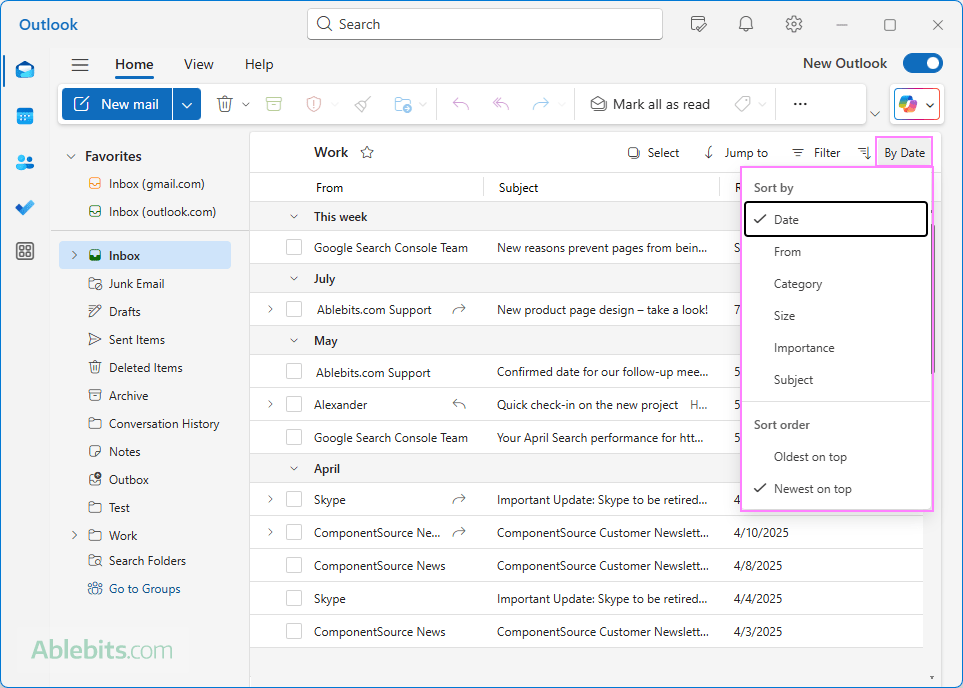
The name of the Sort button will change to your selected field, so you can see at a glance what kind of sorting is currently applied.
Tip. If your mail list suddenly looks "out of order", it's often because a wrong column header was clicked by mistake. Just check the arrow next to the column names to see which one is controlling your view.
Sort messages using the View tab (classic Outlook)
If you are using the classic desktop version of Outlook 365 - 2010, you can also sort your emails directly from the View tab on the ribbon. This method gives you quick access to the most common arrangements.
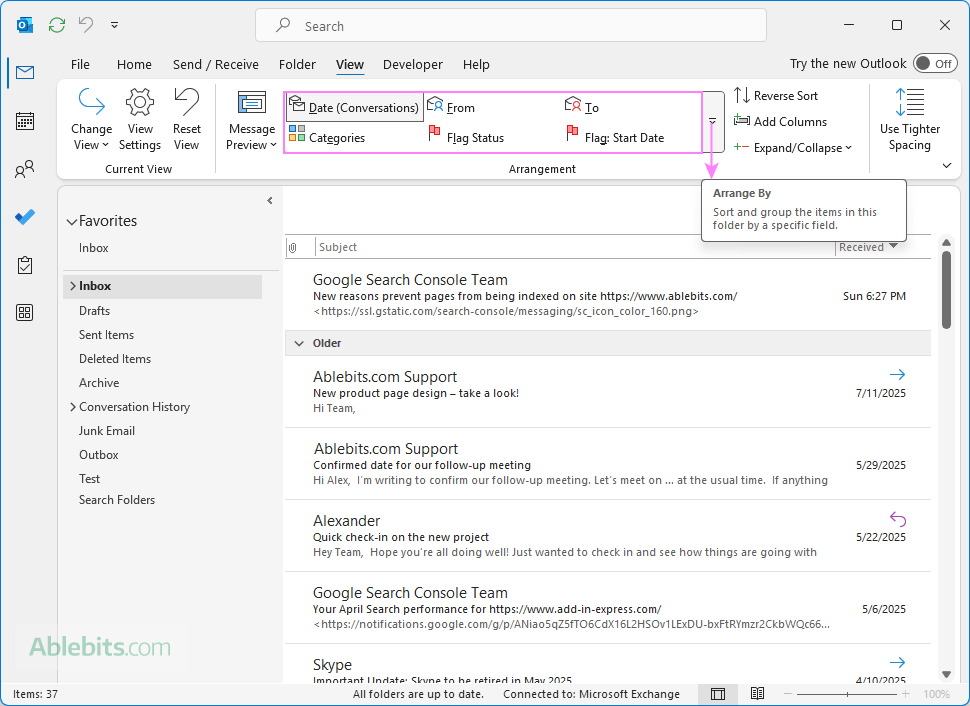
- Go to the View tab on the ribbon. In the Arrangement group, you'll see several options displayed, such as Date, From, To, Categories, or Flag Status. Click one to instantly rearrange your mail list.
- For the full set of choices, click the small downward arrow on the right side. This opens a menu where you can explore every available way to group and sort your emails.
Apply multi-level email sorting (classic Outlook)
In the classic desktop Outlook application, you can sort messages by more than one field. This is useful if you want, for example, to arrange messages by sender first, and then by date within each sender's group.
Here's how to set up multi-level sorting:
- On the View tab, in the Current View group, click View Settings.
- In the Advanced View Settings window, click Sort.
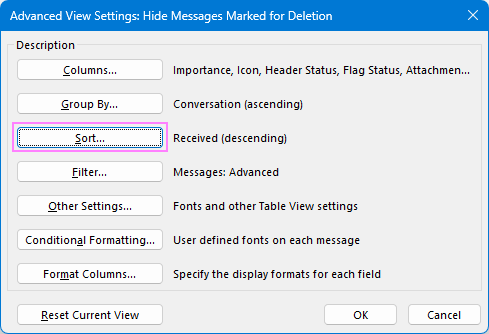
- Choose the primary field you want to sort by, then select Ascending or Descending.
- Add a secondary field. For example, you can sort by Received date first, and then by Sender (From).
- Add up to two more levels of sorting if needed, for a maximum of four.
- Click OK to apply the changes.
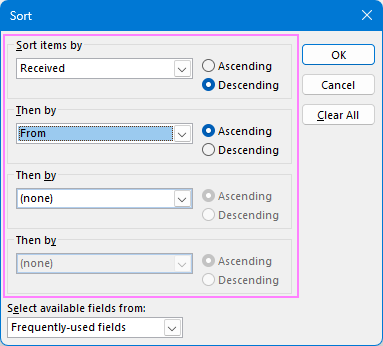
Tip. If you cannot find the sorting criteria you want, use the Select available columns from drop-down at the bottom to access additional sets of fields beyond the default Frequently-used ones.
Now that you know the different ways to sort emails in Outlook, let's explore a couple of practical use cases you may find useful.
Sort emails by color in Outlook
Outlook categories are a great way to visually group related messages by their assigned colors. For example, you can assign blue to client emails, red to urgent reports, or green to financial updates. Once messages are categorized, you can sort your inbox so that emails of the same color appear together.
Here's how to sort messages by color:
- Color-code your emails. Right-click a message, select Categorize, and then choose a color or create a new category.
- Sort by color. At the top-right of your message list, click the Sort button and select Category.
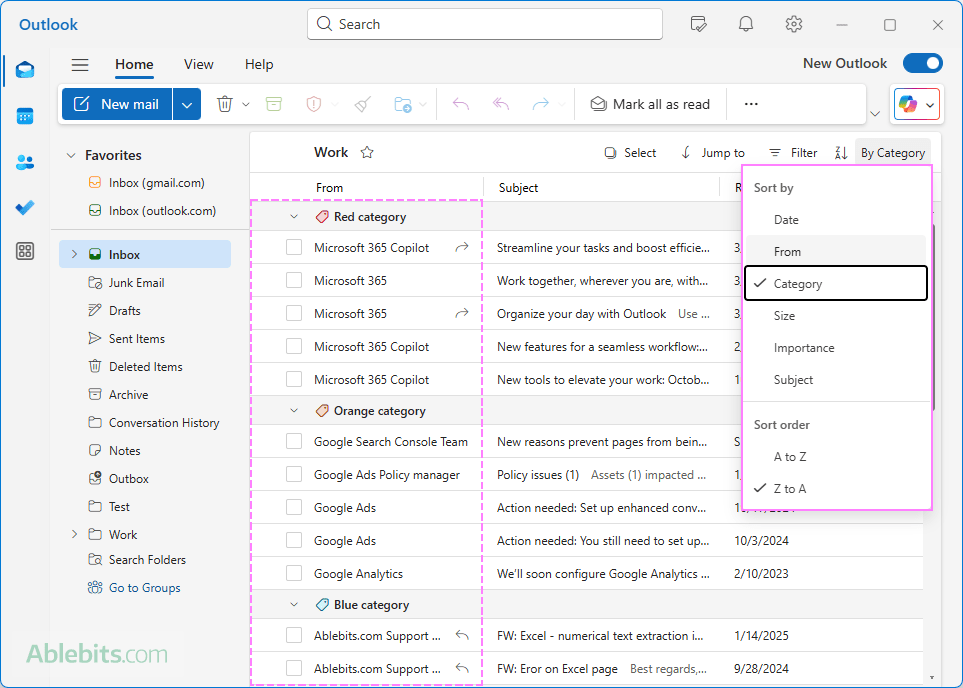
In classic Outlook, you can also:
- Click the header of the Categories column (if it is part of your current view).
- Select Categories on the View tab, in the Arrangement group.
Outlook will rearrange your selected folder, so all emails with the same color category are grouped together.
For step-by-step details, see:
Sort emails by read / unread
Sometimes you may want to focus only on messages you haven't opened yet. The problem is that Read/Unread field is not included in the Sort menu in any Outlook version. Even if you add the Read column to your Outlook view, you won't be able to sort the message list by it. The solution is to use Outlook's filters that let you quickly display only unread messages.
For full details, see how to:
How to sort folders in Outlook
If you use lots of custom folders to organize your emails, keeping them in an intuitive order can save time. Outlook offers a few simple ways to arrange folders.
Reorder folders by dragging
To keep your most-used folders at the top, you can manually rearrange them by dragging:
- Click and hold a folder in the left pane.
- Drag it up or down to a new position.
- Release the mouse button when you see a horizontal line indicating where the folder will be placed.
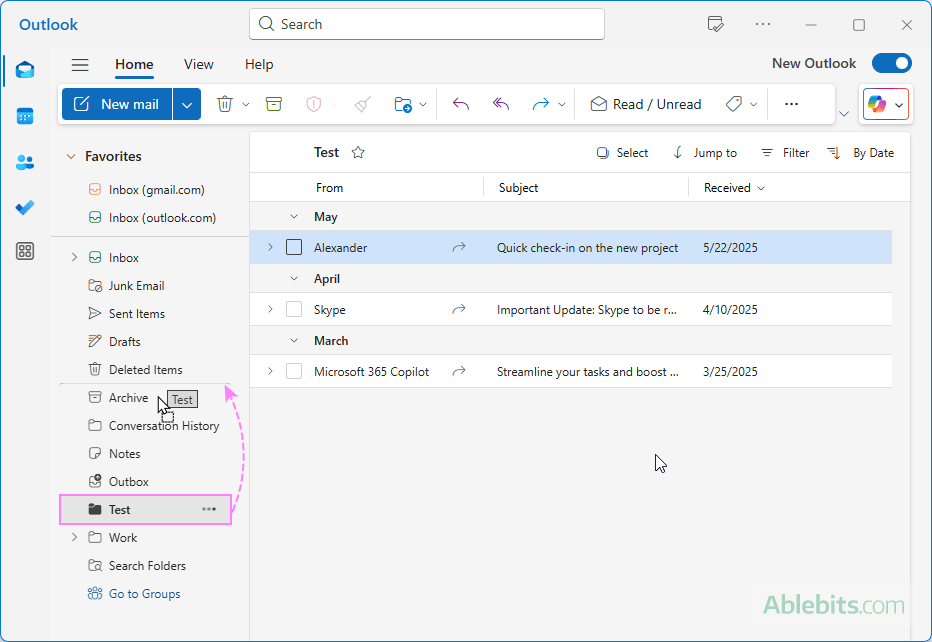
Move folders using Up and Down buttons
Another quick way to reorder folders is by using the context menu:
- Right-click the folder you want to move.
- From the context menu, select Move Up or Move Down.
- Repeat until all the folders are in the position you want.
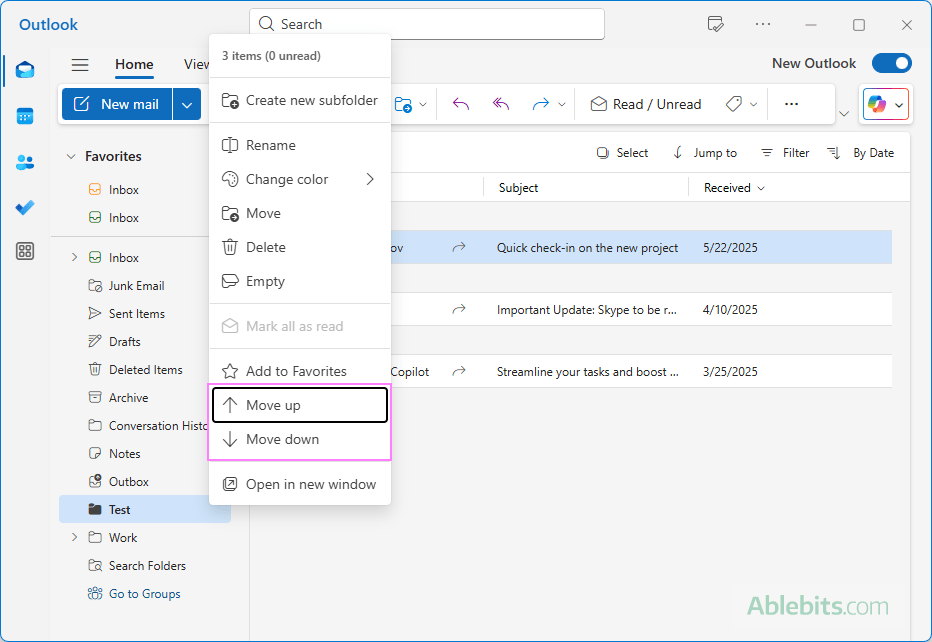
These two methods work nicely in all Outlook applications – classic, new and web.
Sort Outlook folders alphabetically
If you prefer alphabetic arrangement for your folders, Outlook gives you slightly different options depending on the version you use.
Sort folders alphabetically in classic Outlook
You can sort just one account's folders or apply alphabetical order to all accounts at once:
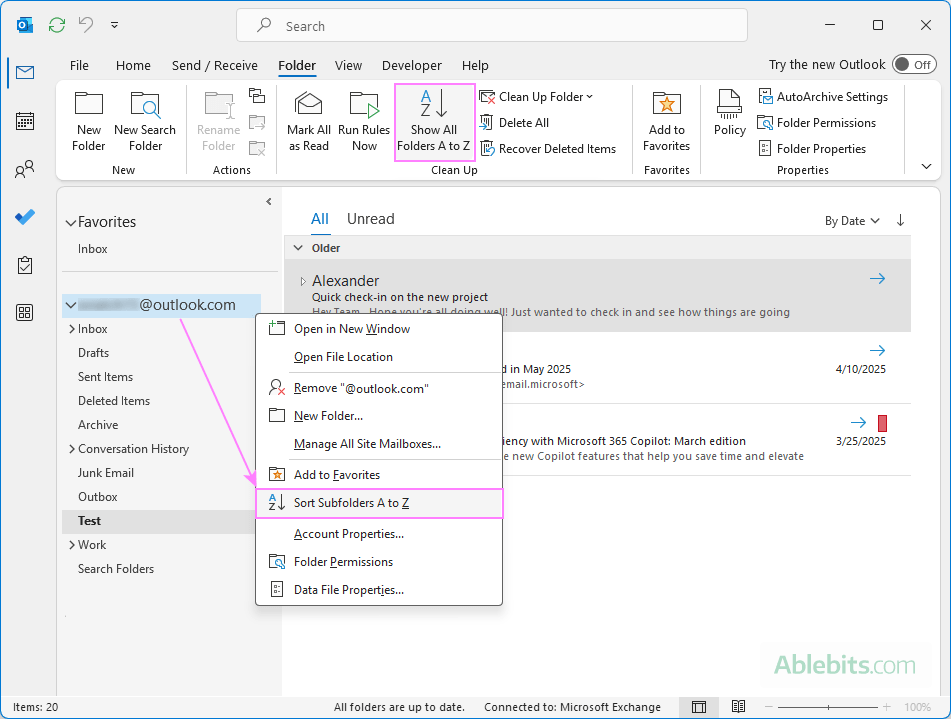
- To alphabetize folders in a specific email account, right-click its name in the Folder pane and choose Sort Subfolders A to Z. This reorders only that account's folder list.
- To alphabetize folders across all mailboxes, go to the Folder tab, and in the Clean Up group, and click Show All Folders A to Z.
Sort folders A to Z in new Outlook and web
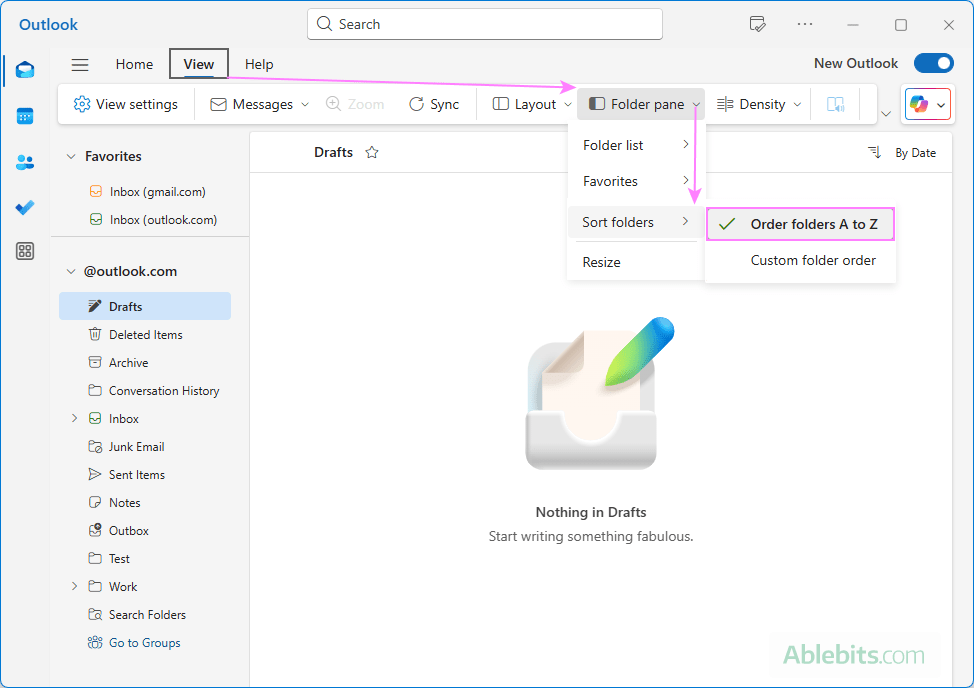
In the new Outlook and web app, the Sort option is not available in the folder's right-click menu, but you can find it in the ribbon. Here are the steps:
- Go to the View tab.
- Click Folder pane > Sort folders > Order folders A to Z.
Your folder list is immediately rearranged alphabetically.
Automatically sort email into folders in Outlook
If you often receive recurring emails like newsletters, invoices, or updates, you can set up rules to automatically move them into specific folders.
Auto sort emails into folders in classic Outlook 365 – 2010
You can create rules that sort incoming mail based on sender, subject, or other criteria:
- On the Home tab, in the Move group, click Rules > Manage Rules & Alerts > New Rule.
- Choose how to start:
- Select a ready-made template, such as Move messages from someone to a folder or Move messages with specific words in the subject to a folder.
- Or, start from a blank rule, then define your own conditions and pick Move to folder as the action.
- Save the rule and Outlook will begin automatically moving matching emails into the folder you specified.
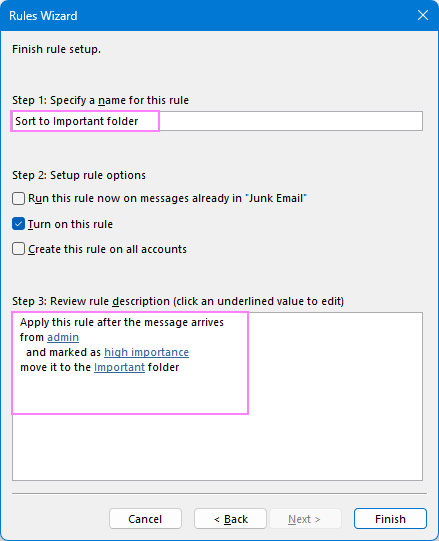
Find the full instructions in How to create rules in Outlook.
Auto sort messages into folders in new Outlook and web
In the new Outlook and web app, you can create a sorting rule in this way:
- Click the Settings gear icon in the upper-right corner.
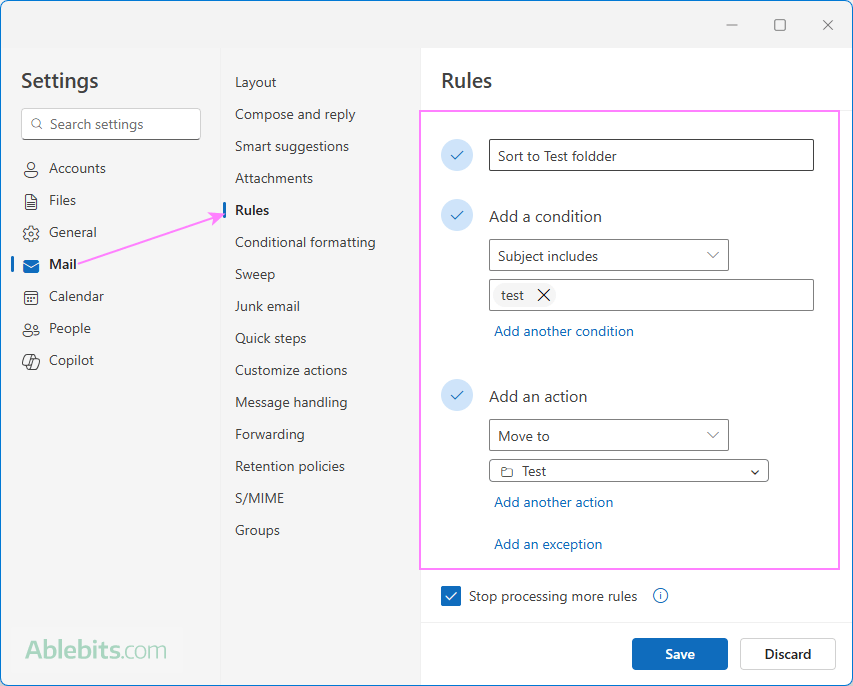
- In the Settings window, go to Mail > Rules.
- Add the conditions you want, for example, a specific sender or subject keyword.
- For the action, choose Move to folder, then select your target folder.
- Save the rule.
From now on, emails that meet your conditions will be automatically routed straight to the folder you picked.
For additional guidance, please check out How to set up rules in new Outlook and web.
Now that you've learned how to sort emails and folders in Outlook, you can create a system that works like a well-arranged library: everything has its place, and finding what you need becomes quick and effortless.
 by
by