In this tutorial, you’ll learn how to send your newsletters to multiple people. We'll look at the BCC method, a Mail Merge tool, and an Easy Mail Merge add-on. I'll also share my favorite tips for scheduling your sends and answer frequently asked questions on the topic.
Want to send a beautiful newsletter? Although it has limitations, your well-known Gmail account is a fantastic place to start. To find out how to send your newsletters and overcome the obstacles, read this article.
How to send a newsletter to multiple people in Gmail
You’ve created your perfect newsletter and are ready to send it to your readers? (Haven't created your newsletter yet? Check out our previous guide to build it first). However, sometimes sending a newsletter can seem more complicated than writing it. But no worries there, I'll guide you 🙂.
There are two built-in solutions for newsletter mailing in Gmail:
- The BCC field (for free users)
- Mail Merge (only available for paid Google Workspace plans)
For both methods, you can organize your newsletter recipients into a group for easy management first.
How to make a group email in Gmail
Gmail doesn't have a separate feature to form groups. Instead, you simply make contact labels and use them as email groups.
To create such a group, follow these steps:
- Go to your contacts list (contacts.google.com) or use this link for faster access to Google Contacts.
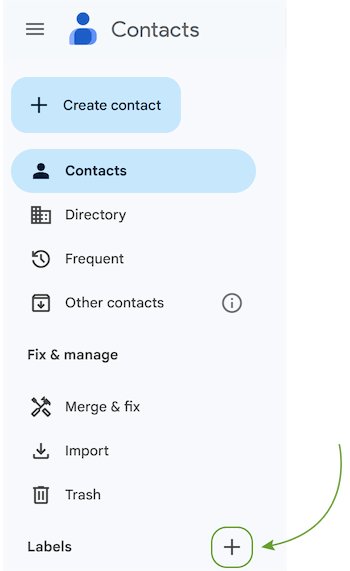
- Click the + icon next to Labels in the menu to create a new label.
- Give your label a name in the pop-up window and click Save.
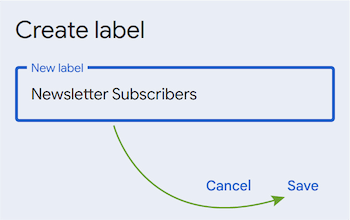
Treat this new label as your group of future recipients. The next step is to get contacts into this group.
To add your recipients to the group, you’ll need to:
- Go to the Contacts, Frequent, or Directory sections in Google Contacts.
- Check the boxes next to the contacts you want to add to your previously created group label.
- At the top, click the Manage labels icon > Select the group label you want > Click Apply.
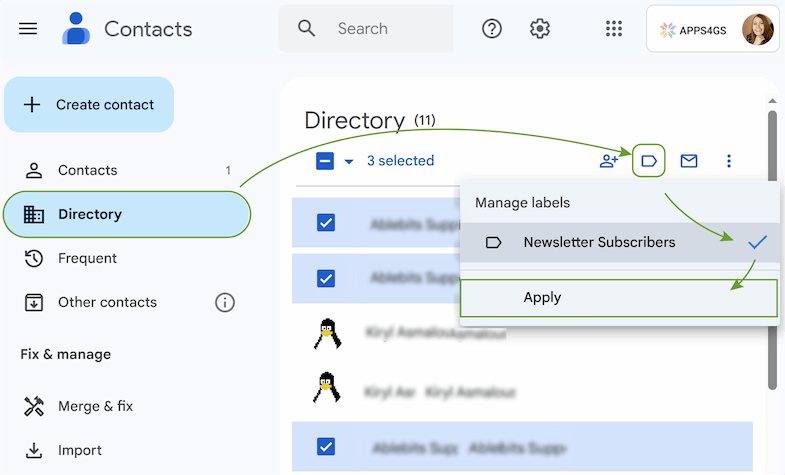
Now you have a group with a ready-to-go list of your future newsletter recipients!
Send newsletter as blind carbon copy email
The standard method for sending newsletters to multiple people in Gmail is to use Blind Carbon Copy (BCC). This feature sends a copy of the email to everyone on your list while keeping all recipient email addresses private from each other.
To send a BCC email, follow these steps:
- Click Compose to open a new email.
- Leave your To field blank to keep the recipients’ names confidential.
Note: In some email clients, it’s not possible to send emails without a To field being filled. To bypass this restriction you can include your own email address here.
- To open the blind carbon copy field, click BCC at the right side of the To field.

- Add all your newsletter recipients' email addresses. If you’ve created the group before, click BCC > My contacts > select your group > check the box Select All.
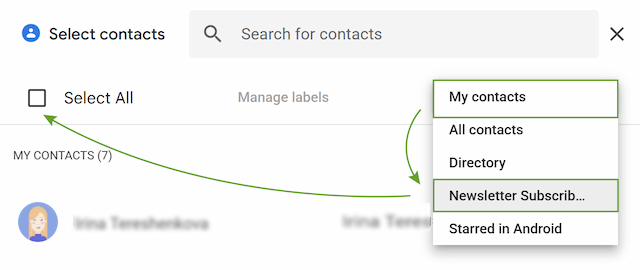
You may also just start typing the name of the group in the BCC field. Gmail will automatically suggest it.

As another option, you can copy and paste a list of email addresses next to the BCC field, or you can choose emails from your contacts.
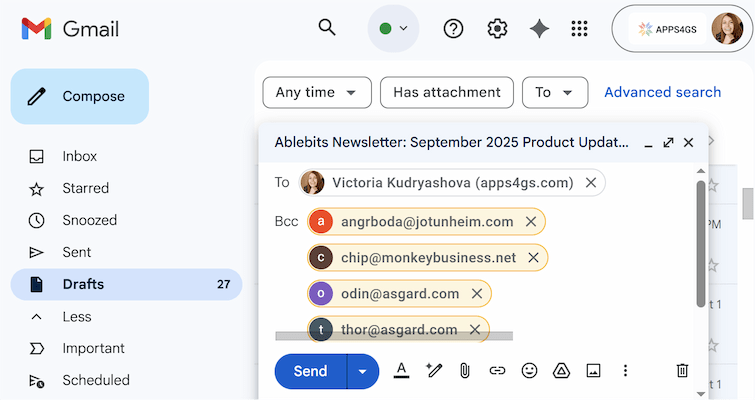
- Add your subject line and the body of your newsletter.
- Click Send.
While using BCC is fast and easy, it has its cons:
- ⚠️ Your newsletter can land in the Spam folder instead of the Inbox. It happens because sending one email to a large list of BCC recipients is a classic spammer tactic.
- Every recipient gets the exact same email.
- You have to manage your subscriber list manually.
- If you accidentally press CC instead of BCC, you may face legal action.
Send personalized emails with mail merge Gmail built-in feature
You can send customized bulk emails straight from the compose window with Gmail's built-in Mail Merge feature.
Use Mail Merge to send your newsletter by following these steps:
- Open Gmail and click Compose.
- Insert your newsletter and add a subject line.
- Click the Use mail merge icon in the toolbar. You'll notice that you're using Mail Merge when the compose window turns purple. There will also be a notification saying that you're using mail merge.
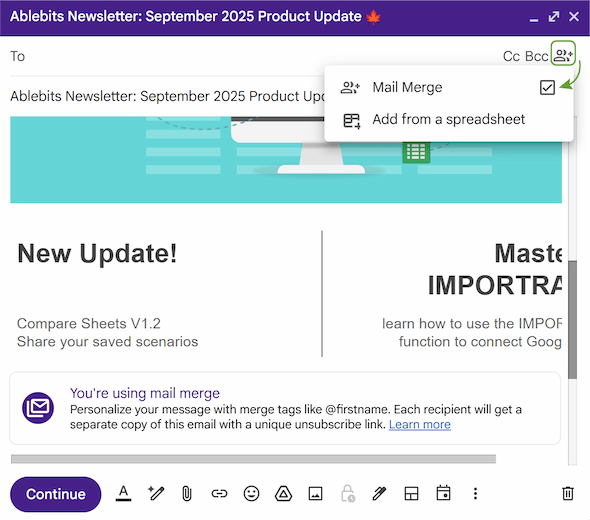
Note: Every newsletter will automatically include an unsubscribe link if you enable Mail Merge.
- Fill in the To field with your recipients. Almost the same as with BCC, you can type them in, paste a list of emails, or type the name of a group you've made.
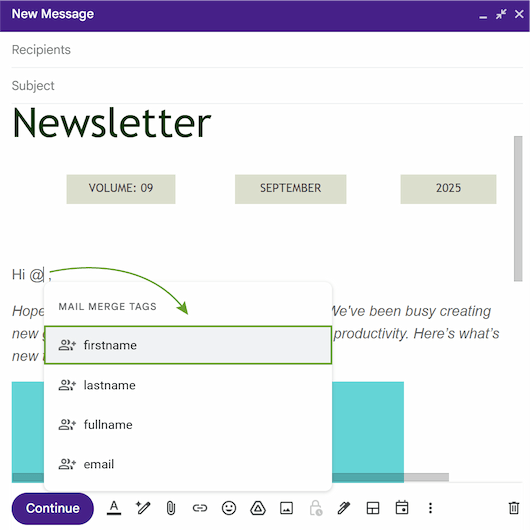
- Add merge tags to personalize your emails. It's a crucial step up from BCC. In Gmail, merge tags act like placeholders. When you send the email, each person receives a message tailored just for them, because each placeholder is updated with the recipient's unique information.
Available tags are:
- @firstname
- @lastname
- @fullname
Note: The merge tags pull data directly from your Google Contacts. If a recipient isn't in your contacts, the mail merge will use the name from the To field. If you have a recipient with missing information for a merge tag, you get an error message.
- For advanced personalization, you can link a Google Sheet with recipients’ data by clicking Add from a spreadsheet under the Mail Merge option.

Note: Your contact information needs to be on the first sheet and should consist only of plain text. The sheet also requires two must-have columns: one for email addresses and another for first or last names (You can include them both for more effective personalization).
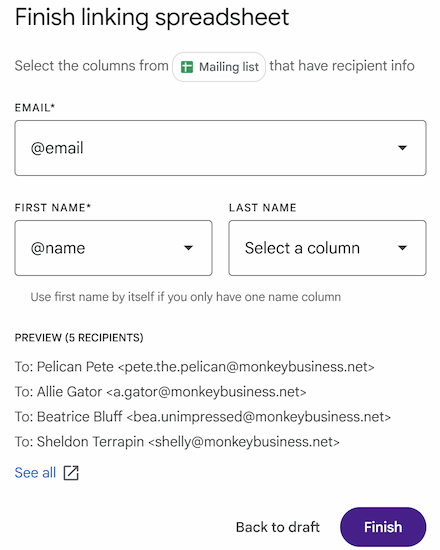
- The pop-up window will appear. Here you can use the dropdown menus to choose columns with emails, first and last names directly. Click Finish after choosing the spreadsheet's columns.
You can also turn any column into a merge tag by clicking @ inside your email body and selecting the option.
- Press the Continue button.
- In the pop-up window there will be an option to Send Preview. Use it to double-check your newsletter.
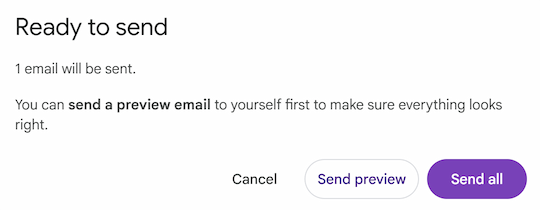
- Click Send all. Gmail will send individual emails personalized according to the merge tags.
Although Gmail's built-in merge function is a great tool for Google Workspace, it has certain drawbacks:
- Other standard Gmail features, such as replying, forwarding, scheduling a send, and using confidential mode, are incompatible with this feature.
- Because merge tags cannot be used in hyperlinked text or the subject line of an email, personalization is severely limited.
- There is no tracking for opens or clicks.
For more advanced personalization or analytics, a dedicated Easy Mail Merge add-on remains the more powerful choice.
How to make and send a newsletter with Easy Mail Merge add-on
The most effective method for creating and sending a customized newsletter from your Gmail account is to use Easy Mail Merge.
Before you start:
- Install the Easy Mail Merge add-on.
- Prepare a Google Sheet with your recipients’ information. Put their email addresses in one column, and info for personalization in other columns.
The next step is to create your newsletter template. With Easy Mail Merge, you can create your newsletter in a Google Doc or a Gmail draft.
To make and send a template in Google Docs, follow these steps:
- Open a new Google Doc.
- Design your newsletter.
Tip: Keep in mind that Gmail can sometimes break the formatting when you send the email. Learn how to compose the newsletter in Google Docs and preserve the structure in the previous article.
- To add personalized text, insert placeholders that exactly match your column headers from the Google Sheet.
Tip: Instead of tags, the format for placeholders is standard double curly brackets, e.g., {{Discount}}.
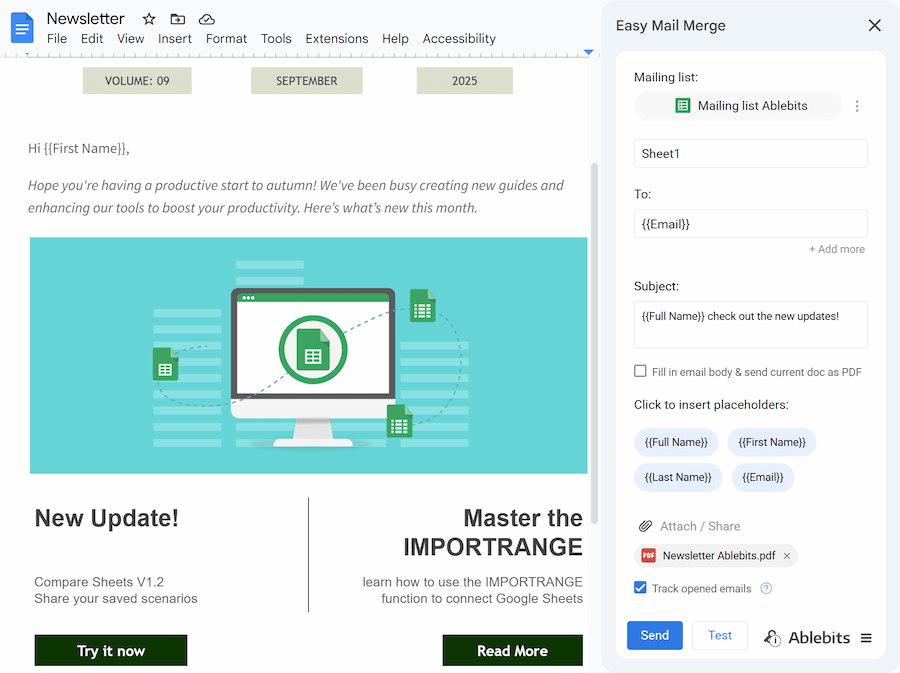
- Go to the menu and click Extensions > Easy Mail Merge > Email Merge. A sidebar will open on the right.
- Click Add list from spreadsheet to connect your spreadsheet to the newsletter.
- Specify settings for your campaign. See the full instruction for detailed steps.
- Click Test to send a test email to check for any errors. If everything is OK, click Send to start your campaign.
Sometimes Google Docs doesn’t fit, and you’d rather use your custom HTML for your newsletter and embed the code into Gmail. In this case, your Drafts will be your newsletter templates.
Tip: Read this article to learn how to make HTML emails.
To send a newsletter with a Gmail Draft template using Easy Mail Merge, you need to:
- Compose your newsletter in Gmail. Insert placeholders in the same way as in the Google Docs (e.g., {{Name}}).
Note: In HTML emails, you need to add placeholders straight into the code.
- Save the newsletter as a draft by simply closing the compose window.
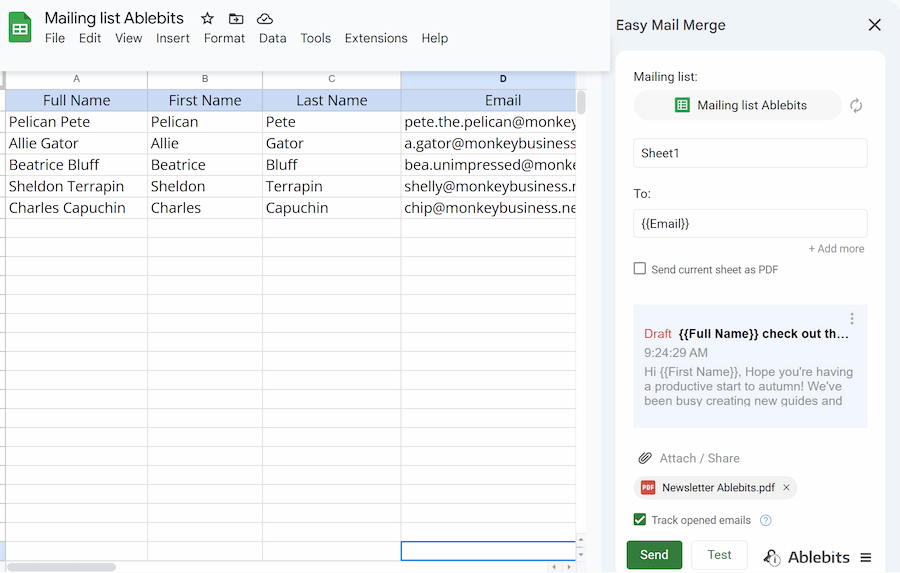
- Go to your mailing list in the Google Sheet.
- Click Extensions > Easy Mail Merge in the Google Sheet toolbar.
- The extension opens with your current sheet automatically selected.
- Choose your mailing list's email address column and add any attachments if needed.
Tip: Check the box Track opened emails to know when recipients open your emails.
- Click Test to send a preview and look for mistakes. Once you're satisfied, click Send to start your campaign.
After sending, the extension will add Email Status and Status Details columns to your Google Sheet. With these columns, you can track your email delivery to monitor campaign success. See the full instructions for details and get started with a free trial 😊.
Use Gmail mail scheduler for newsletters
Sending your newsletter at the right time can significantly increase your open rates. The problem is, your best writing time might not be your audience's best reading time. For these cases, there is a scheduling feature in Gmail. With a scheduler, you can write your newsletter whenever you're free and have it delivered later.
Note: You can't use a scheduler with Gmail's built-in Mail Merge feature.
To schedule your newsletter email in Gmail, follow this step-by-step guide:
- Open Gmail, click Compose, and create your newsletter.
- Add a subject line and recipients in the To (or BCC for bulk-send) field.
- Click the arrow to the right of the Send button, and then Schedule send.

- Gmail automatically recommends several sending times in the pop-up window, with typical choices such as Tomorrow morning or This afternoon.
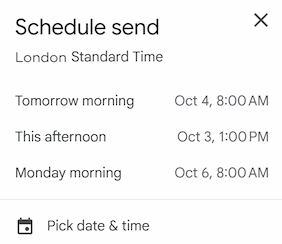
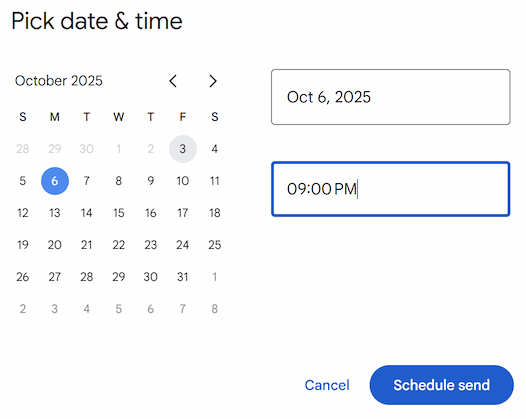
- Click one of these options, and your newsletter will be scheduled automatically for the selected time. Alternatively, you can choose the needed day and time manually: hit Pick date & time, select a date and time, and click Schedule send.
A brief pop-up will appear, confirming that the email was scheduled.
Instead of sending immediately, the email will be saved in your Scheduled folder. If you change your mind about sending out the newsletter, go to the Scheduled folder, select the newsletter (or several newsletters) you don’t want to send by checking the box, and click Cancel send.

I hope this guide was useful for you and that you've found the sending method that fits you best, whether it's the BCC method, the Mail Merge tool, or the Easy Mail Merge add-on. Happy emailing, and may all your newsletters land right in the inbox! 📧
FAQ
How do you format an email like a newsletter?
The way you create your email newsletter will determine how you format it. You can use custom HTML code, embed a Canva design, or use the built-in tools in Gmail or Google Docs.
How many pages is a newsletter?
You can include as many images as you want, but it's better to aim for a length that only requires a few scrolls on a mobile device to read completely. One or two digital pages would be ideal.
Can I track opens and clicks with Gmail newsletters?
You cannot track anything using standard Gmail features. To get full open and click tracking, you need to use the Easy Mail Merge add-on.
What is the Google Workspace email limit for newsletters?
Google Workspace accounts have a higher limit of 2,000 emails per day than standard Gmail accounts, which have a limit of 500. Within that Workspace limit, the built-in mail merge feature allows you to send campaigns to a maximum of 1,500 recipients per day. Gmail lowered the bulk sending cap to leave you a buffer for your regular email correspondence.
How to block a newsletter in Gmail?
Clicking the Unsubscribe link in an email is the simplest method. You can block the sender by clicking the three dots menu in the message and choosing Block if there isn't a link to unsubscribe. Consequently, any subsequent emails sent from that address will end up in the Spam folder.
 by
by