 by
by Ever been asked to send an email on behalf of your boss and suddenly felt like Outlook was testing your patience? In this guide, you'll learn exactly how to grant delegate access, add someone's mailbox to your Outlook profile, and fix common problems.
Microsoft Outlook has plenty of useful features hidden away in menus that seem determined to never be found. One of them is the ability to send emails on behalf of another person or shared mailbox. If this is your first time trying it, don't worry, the process is pretty simple. You just need the right delegate access permissions and a few settings in place, which we'll cover step by step.
What does "Send on behalf" mean in Outlook?
The Send on behalf feature in Outlook, also known as delegate access, allows one person to send emails representing another user or shared mailbox without fully impersonating them. Instead of hiding who actually sent the message, it clearly indicates that one person sent the email on behalf of another.
It is commonly used in workplaces where department or team members manage emails together. For example, a manager may allow an assistant to send meeting invites, or an HR officer may communicate on behalf of a company account.
When a message is sent this way, recipients can see both the sender's name and the mailbox they are working from. For example, Alex on behalf of Support Team.
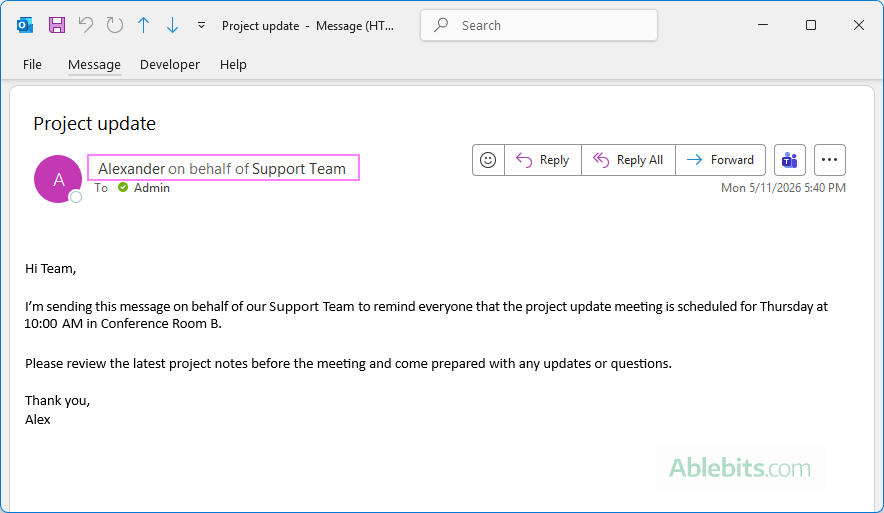
Notes:
- Delegate access is only available for Microsoft 365 work or school accounts and Exchange Online accounts.
- For shared mailboxes, "Send on behalf" permissions are usually authorized by your organization's Microsoft 365 or Exchange administrator.
- You can also share Outlook folders without delegate access. For example, you can assign another user write permissions for a shared folder so they can reply to messages stored there. In that case, the replies are sent from their own email account, not on behalf of the mailbox owner.
How to set up Outlook's send on behalf
Sending email on behalf of another person in Outlook requires actions from both users involved: the mailbox owner, who gives the permission, and the delegate, who receives access to the mailbox.
The setup process works like this:
- The mailbox owner grants delegate access to another user.
- The delegate adds the mailbox to their Outlook profile.
After both parts are completed, the delegate can start sending messages on behalf of the mailbox owner.
Note. The delegate access for email can only be provided in classic Outlook (365 – 2016). After that, the user can add the delegated mailbox to the new Outlook and Outlook on the web and send "on behalf of" emails from there. If you only need delegate access for calendars, it can be configured directly in the new Outlook.
How to grant delegate access (send on behalf permission) in Outlook
This part is performed by the mailbox owner, i.e. the person who wants to allow someone else to send emails on their behalf.
To provide delegate access to another user, follow these steps in classic Outlook:
- Navigate to File > Info > Account Settings > Delegate Access.
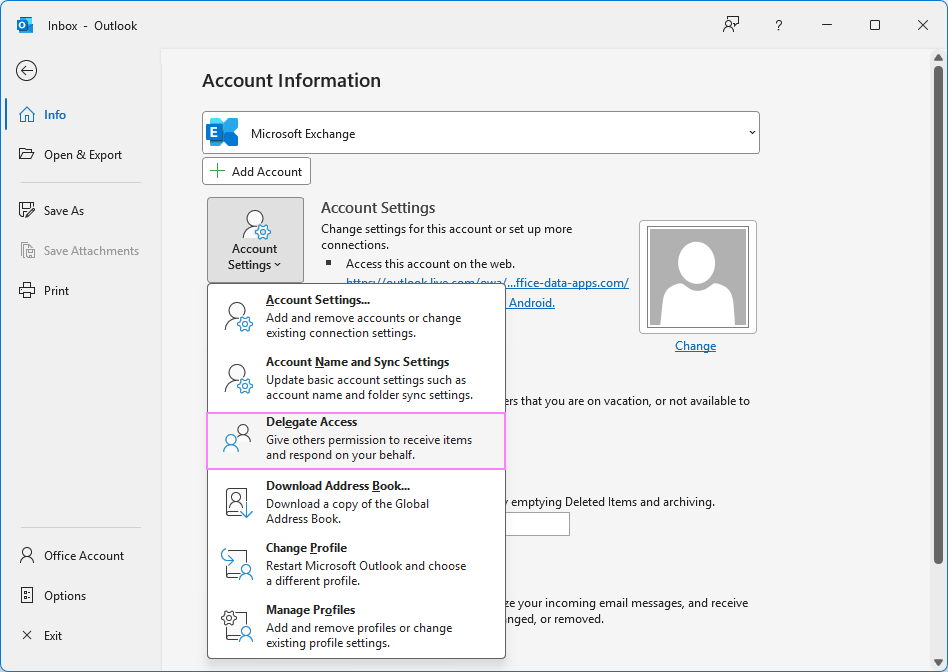
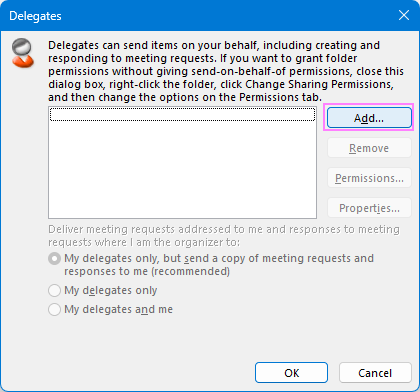
- In the dialog box that opens, click the Add button.
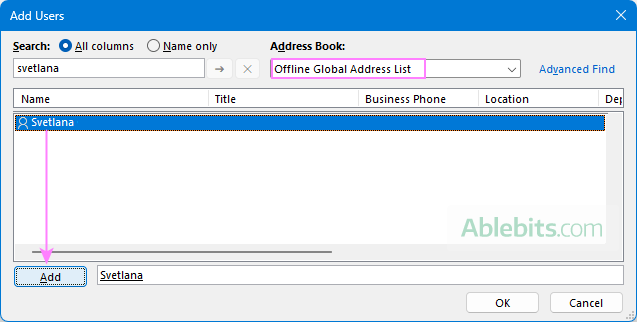
- Select the person from the Global Address List, click Add, and then click OK. You can use the Search box to find the contact quickly.
- In the Delegate Permissions dialog window, choose the permissions you want to grant for Calendar, Tasks, Inbox, Contacts, and Notes, and then click OK.
- To let the user send messages on your behalf, without giving any other access, set all permission levels to None.
- If needed, you can also provide additional permissions for specific folders:
- Reviewer – allows viewing items.
- Author – allows reading existing items and creating new ones.
- Editor – allows reading, creating, and modifying items.
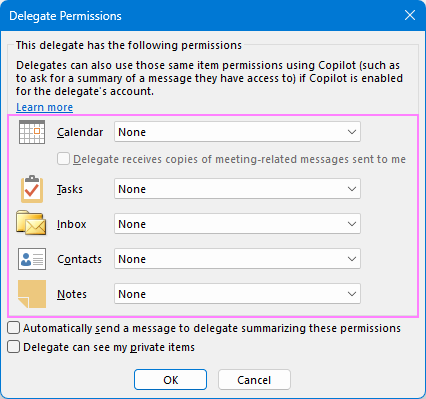
- To notify the delegate about the assigned permissions, select the Automatically send a message to delegate summarizing these permissions check box (usually enabled by default).
- If needed, select the Delegate can see my private items check box. Keep in mind that this setting applies to all Exchange folders, including Mail, Contacts, Calendar, Tasks, Notes, and Journal. There is no way allow access to private items for only selected folders.
- Click OK to apply the changes.
- Click the Back button in the upper-left corner to return to Mail view.
After the permission is added, Outlook may need some time to sync the changes.
How to add delegated mailbox to your Outlook
This part is performed by the user who received access to the delegated mailbox.
To be able to send emails on behalf of the mailbox owner, you need to add their mailbox to your Outlook profile. Depending on the permissions granted, you may also be able to read messages, manage folders, view calendars, and work with other items.
To add another person's mailbox in classic Outlook 365 – 2016, the steps are:
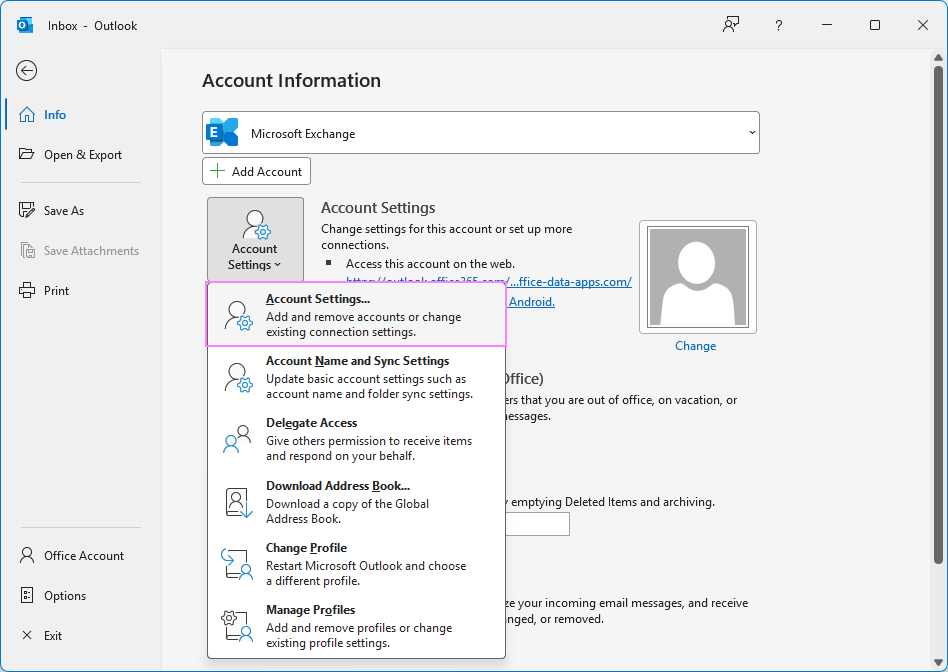
- Go to File > Account Settings > Account Settings.
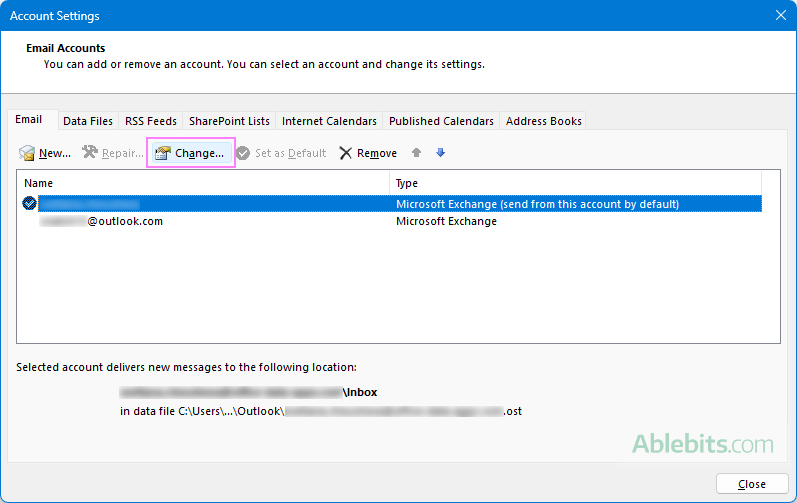
- In the Account Settings window, on the Email tab, select the account for which delegate access was provided, and then click Change.
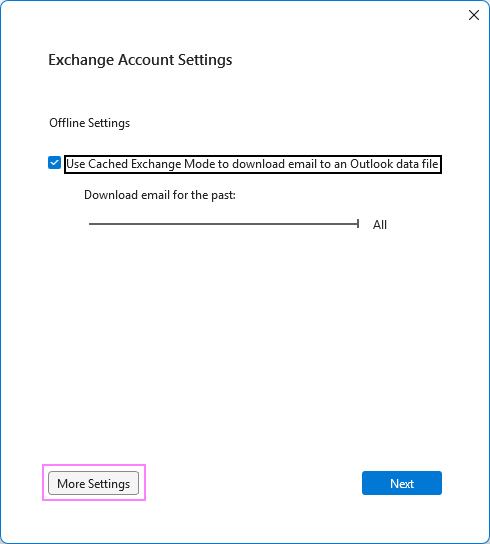
- In the Exchange Account Settings window, click More Settings.
- In the Microsoft Exchange dialog window, switch to the Advanced tab and click Add.
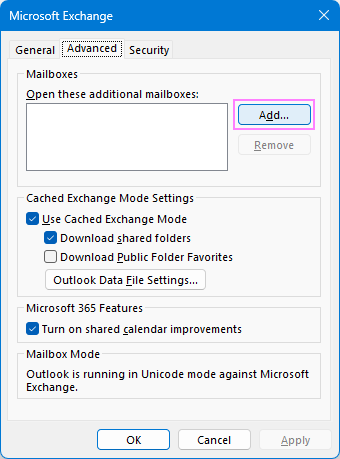
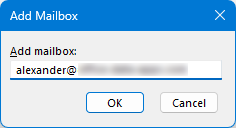
- In the small dialog box, type the email address or name of the mailbox you were granted access to, and then click OK.
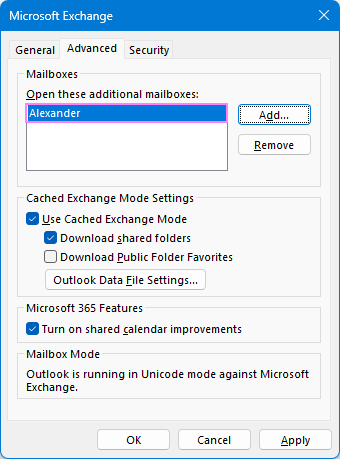
- Check that the delegated mailbox appears under Open these additional mailboxes, and click OK to close the dialog.
- Click Next, then Done, and finally Close to save your changes.
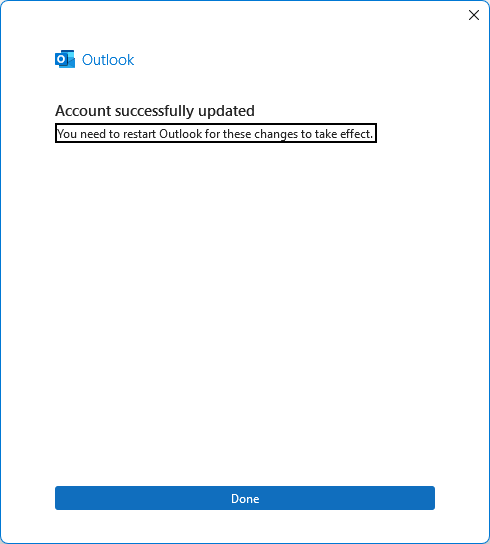
- Restart Outlook for the changes to take effect.
When Outlook reopens, the delegated mailbox should appear in your folder pane, and you will be able to send emails on behalf of that mailbox.
How to send emails on behalf of someone in Outlook
With the delegate permissions provided and the mailbox added to Outlook, the invitee can start sending emails on behalf of the other person.
In classic Outlook 365 – 2016, it is done in this way:
- Create a new email.
- Click the small dropdown arrow next to the From field and select the other person's email from the list.
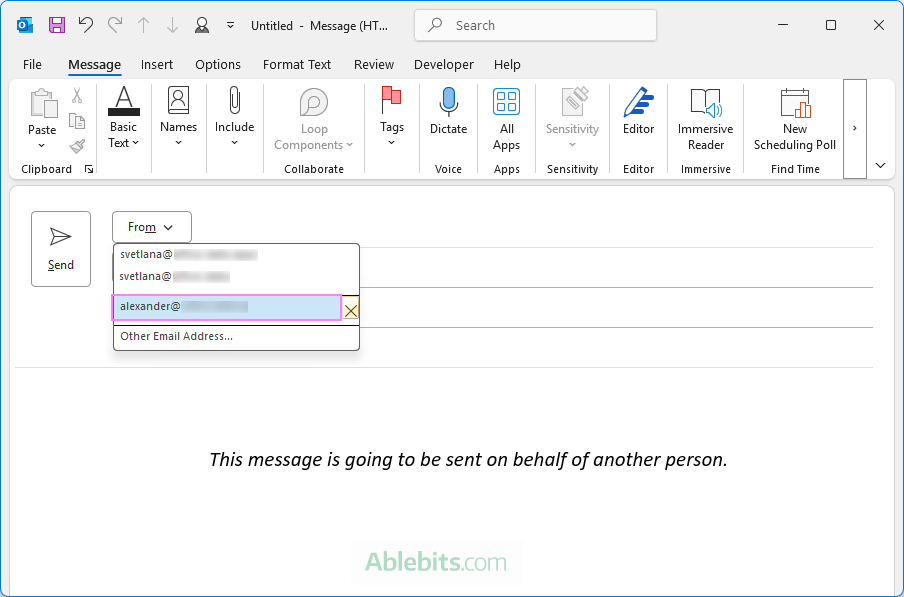
- If the delegated mailbox is not available in the From dropdown, click Other Email Address…, then type the address in the From… box and click OK.
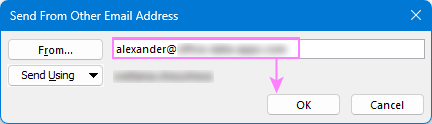
In most cases, you only need to enter the mailbox address once. After that, Outlook will remember it and automatically display it in the From dropdown when you send future emails.
- Compose your message as usual and click Send.
That's it. Your message will be sent on behalf of the selected mailbox.
How to send on behalf in new Outlook and Outlook on the web
Support for delegate permissions in the new Outlook is currently limited. While you can use shared mailboxes and send emails on behalf of another person, the delegate permissions themselves must still be configured in classic Outlook first.
Set up "On behalf" feature for new Outlook and web
Before you can start sending emails on behalf of someone in the new Outlook or Outlook online, two preparatory steps are required.
Step 1. Grants delegate access. The mailbox owner must assign delegate permissions in classic Outlook. Follow the instructions in How to grant on behalf permission.
Step 2. Add the delegated mailbox to Outlook. After delegate access is provided, the user should add the shared mailbox to their Outlook app.
To do someone's mailbox in the new Outlook or Outlook on the web:
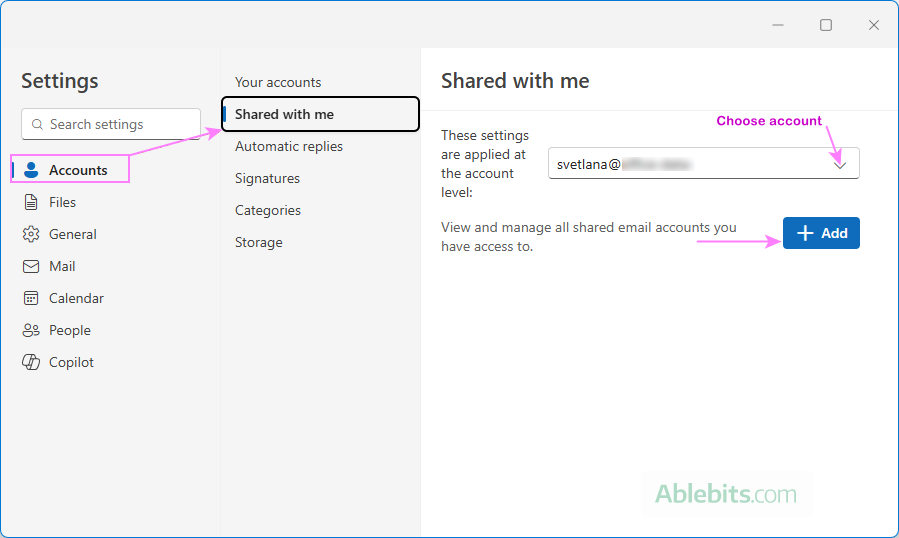
- Go to Settings > Accounts > Shared with me.
- If you have multiple email accounts connected to Outlook, select the correct one from the dropdown menu in the upper-right corner.
- Click the Add button.
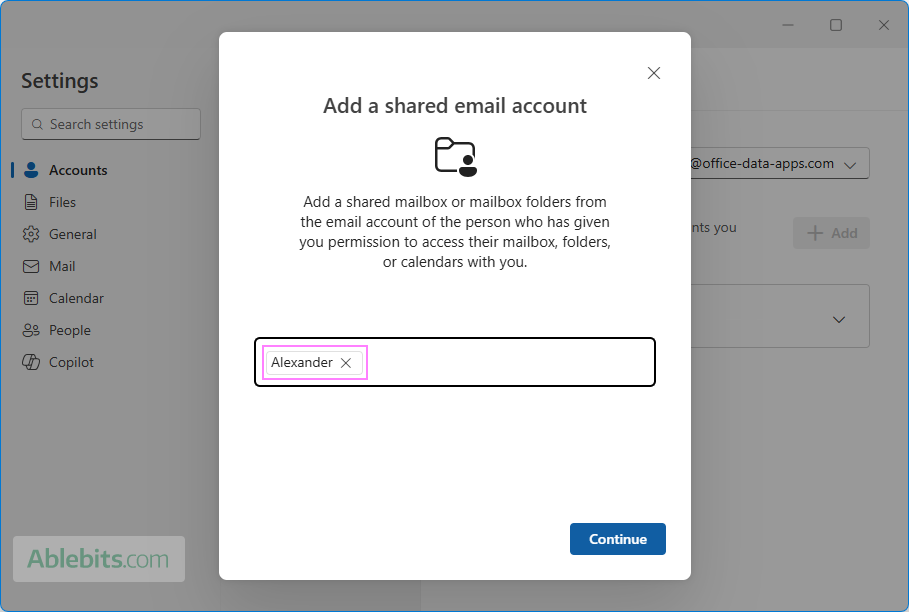
- In the dialog box that appears, start typing the name or email address of the mailbox owner. Then, choose the correct contact from the suggested results and click Continue.
- Allow Outlook a few moments to verify your permissions.
- With the mailbox added successfully, restart Outlook when prompted.
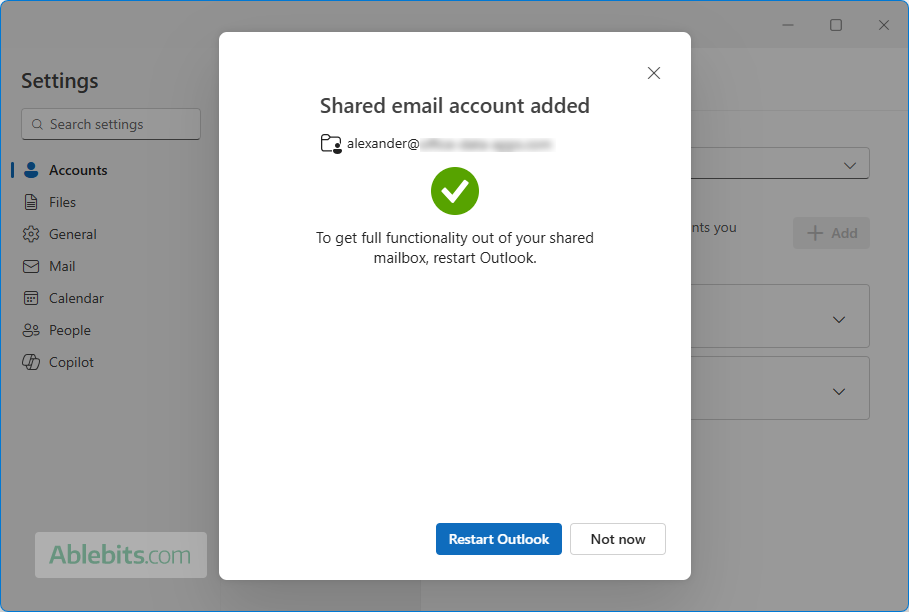
Send messages on behalf of another person in the new Outlook and web
After completing the setup, you are ready to send messages on behalf of the other person.
- In the message window, click the From field and select the delegated mailbox from the dropdown list. If the mailbox is not listed, choose Other email address, start typing the email, and then select it from the suggested matches.
- Compose your message and click Send.
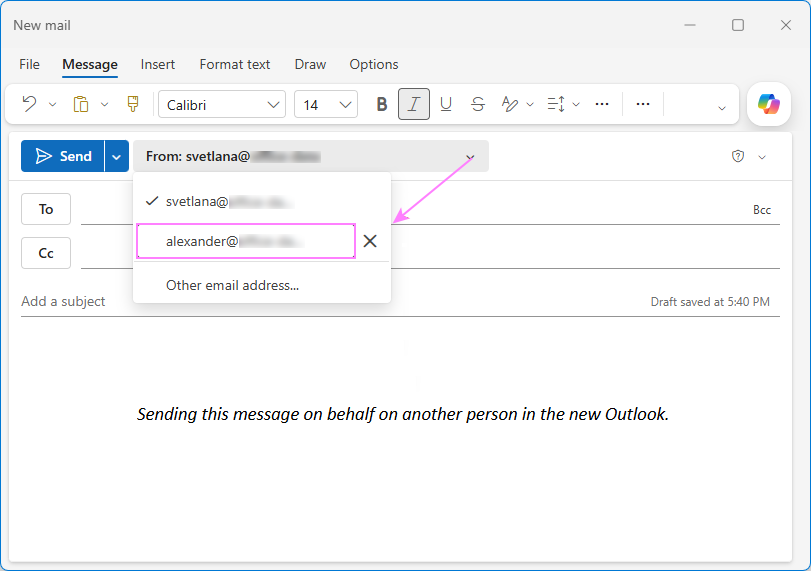
How to send on behalf of shared mailbox in Outlook
Sending emails on behalf of a shared mailbox works almost the same way as sending on behalf of another user. The main difference is that the required permissions are granted by a Microsoft 365 administrator instead of the mailbox owner.
Before you begin, make sure:
- You have been granted Send on Behalf permission for the shared mailbox. Shared mailbox access is usually configured by your organization's administrator in the Microsoft 365 Admin Center.
- The shared mailbox is added to your Outlook profile.
After that, you can send emails on behalf of the shared mailbox in any Outlook app.
- Create a new email message.
- In the message window, click the dropdown arrow next to the From field and select the shared mailbox.
- If the mailbox is not listed, choose Other Email Address, enter the shared mailbox address, and click OK.
- Compose your message and click Send.
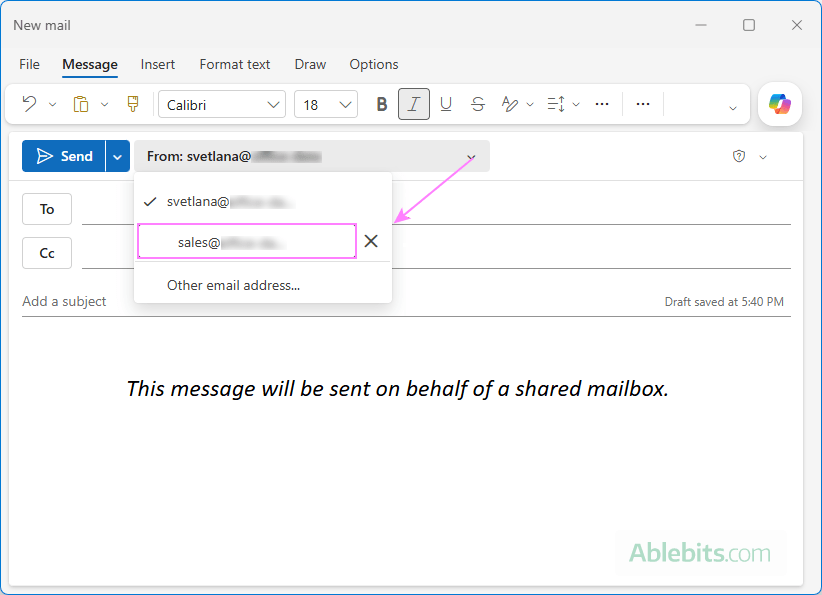
How "Send on behalf" emails look to recipients
Outlook's Send on Behalf feature was designed to make email delegation transparent by identifying both the actual sender and the mailbox they are representing. However, what recipients see can vary depending on the email client they use.
In all Outlook apps (including classic Outlook 365 – 2016, the new app, web version, and Outlook.com), the From field looks exactly as intended. For example, Mark Smith on behalf of Alex Wolf.
This makes it clear who sent the message and which account the email came from.
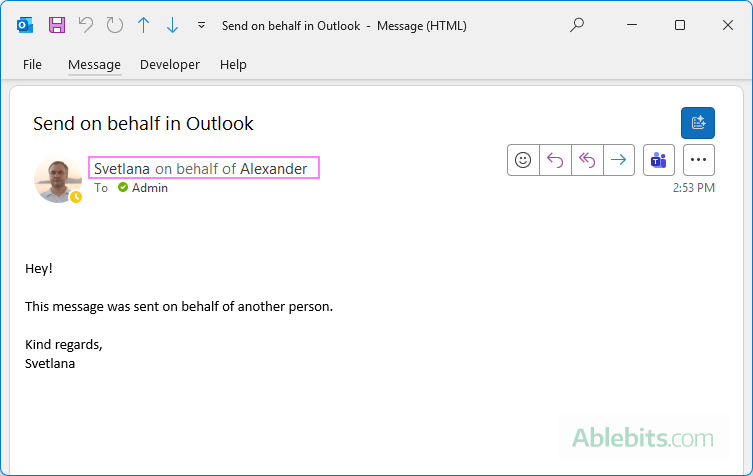
Third-party email clients, including Gmail and other non-Microsoft apps, may display only the mailbox owner's name. This happens because Send on Behalf is a Microsoft-specific implementation, and not all email software can interpret that information.
Note. If you decide to test this feature by sending an "on behalf of" email to yourself, the results may look a little odd. In my tests, classic Outlook always displayed the sender correctly, while the new Outlook showed only the mailbox owner's address. Whether that was a bug or Outlook having one of its "special moments" is hard to say :)
How to remove delegate access in Outlook
If you no longer want to allow someone to send emails on your behalf or no longer need access to someone else's mailbox, you can easily remove the delegate permissions or the mailbox from Outlook.
Mailbox owner: revoke delegate access
Delegate access is removed from the same place where it was originally enabled:
- Go to File> Info > Account Settings > Delegate Access.
- In the Delegates list, select the user whose access you want to revoke, and click Remove.
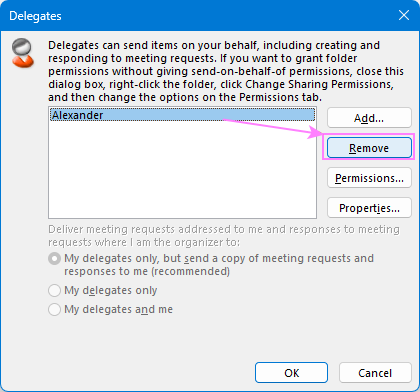
After the changes sync, the delegate will no longer be able to access your mailbox and send emails on your behalf.
Delegate: remove the other person's mailbox from Outlook
If you do not need access to the delegated mailbox anymore, you can remove it from Outlook using the same settings where it was originally added.
- In classic Outlook, go to File > Account Settings > Account Settings.
- Choose your email account and click Change > More Settings.
- On the Advanced tab, select the mailbox name and click Remove.
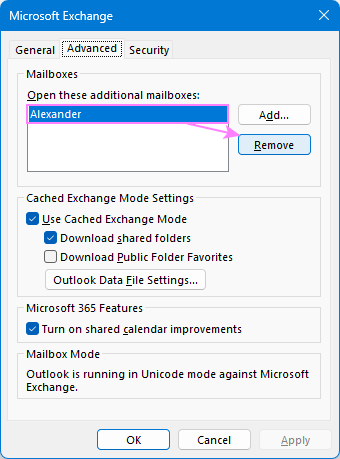
In a moment, the shared mailbox will disappear from your Outlook folder pane.
Delegate access / Send on behalf not working in Outlook
Sometimes delegate access in Outlook does not work immediately, even when everything seems to be properly set up. You may be unable to see the delegated mailbox in Outlook, open it, or send emails on behalf of another user.
When delegate access is missing or misconfigured, your "send on behalf" message may bounce back with the following error:
"This message could not be sent. You do not have permission to send the message on behalf of the specified user."
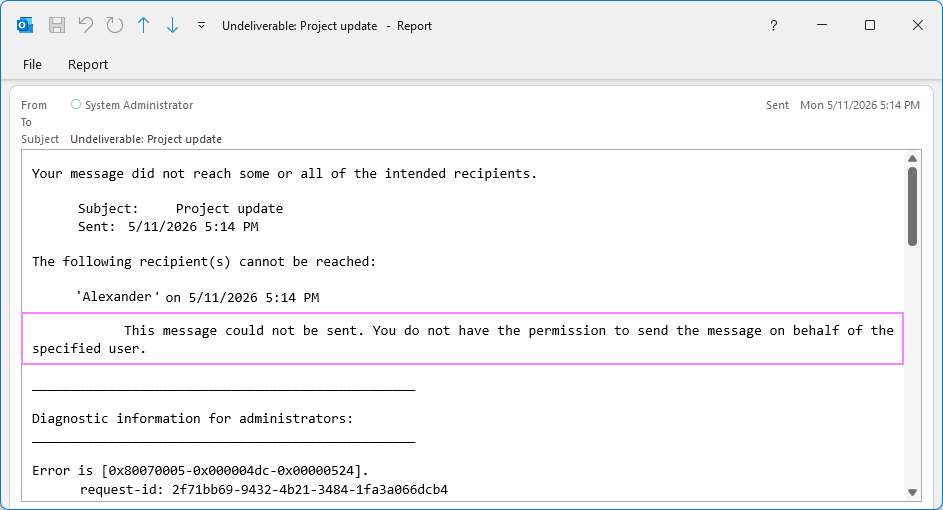
Below are the most common issues and how to fix them.
- Wait for Microsoft 365 to sync permissions. After delegate permissions are added or changed, Microsoft 365 may need some time to apply the updates. In many cases, waiting 15 – 30 minutes and restarting Outlook resolves the issue.
- Make sure the mailbox was added to your Outlook. Delegate permissions alone are not enough. The shared mailbox must also be added to your Outlook profile. If the mailbox does not appear in your folder pane, add it manually using the steps described earlier in this guide.
- Verify that delegate access is correctly configured. When granting delegate access, the mailbox owner must always choose the user from Outlook's Global Address List (GAL) instead of typing the email address manually. Even if the manually entered address is correct, Outlook may still fail to apply "Send on Behalf" permissions properly.
- Restart Outlook. Outlook does not always refresh mailbox permissions at once. After changes are made, close Outlook completely, wait a few minutes, and open Outlook again. Simple, but surprisingly effective :)
- Remove and re-add the delegated mailbox. If the mailbox is present in the folder pane, but behaves incorrectly, removing and adding it again can refresh the connection and fix permission issues.
- Contact your Microsoft 365 administrator. If nothing helps, ask your IT admin to check the assigned delegate permissions, mailbox configuration, and any organization policies that may restrict shared mailbox access.
Send on Behalf vs. Send As in Outlook
The two features have a similar purpose: allowing a user to send emails from someone else's account. However, they work differently and display different sender information to recipients.
For shared mailboxes, a Microsoft 365 administrator can assign either permission when configuring shared mailbox access in the Microsoft 365 Admin Center.
From the sender's perspective, both features work the same way. You simply select the shared / delegated mailbox in the From dropdown when composing a message.
From the recipient's perspective, the main difference is how the sender appears in the From field.
- With "Send As", recipients only see the shared mailbox name, as though the message was sent directly from that account. The actual sender's name is not visible to the recipients.
- With "Send on behalf", both the sender's name and the shared mailbox name are displayed. This reveals who actually sent the message and which mailbox they are emailing from.
That's how to send emails on behalf of another user in Outlook. The initial setup can feel a little buried under Outlook's menus, but once everything is configured properly, the actual sending part is refreshingly simple 😊