This article explains what Outlook's Reading Pane (preview pane) is and how to customize it to fit your preferred way of working.
The Reading Pane is one of those Outlook features that can quietly shape how you navigate your inbox each day. While it might seem like just another part of the interface, the way you use or don't use it can make a real difference in how quickly and effectively you handle your messages.
What is the Reading Pane in Outlook?
The Outlook Reading Pane (aka Preview Pane) is the area where you can view the content of an email without opening it in a separate window. It lets you read messages, respond, forward and take other actions while keeping the list of emails visible alongside. It helps you quickly decide which messages need immediate attention and which can be postponed for later.
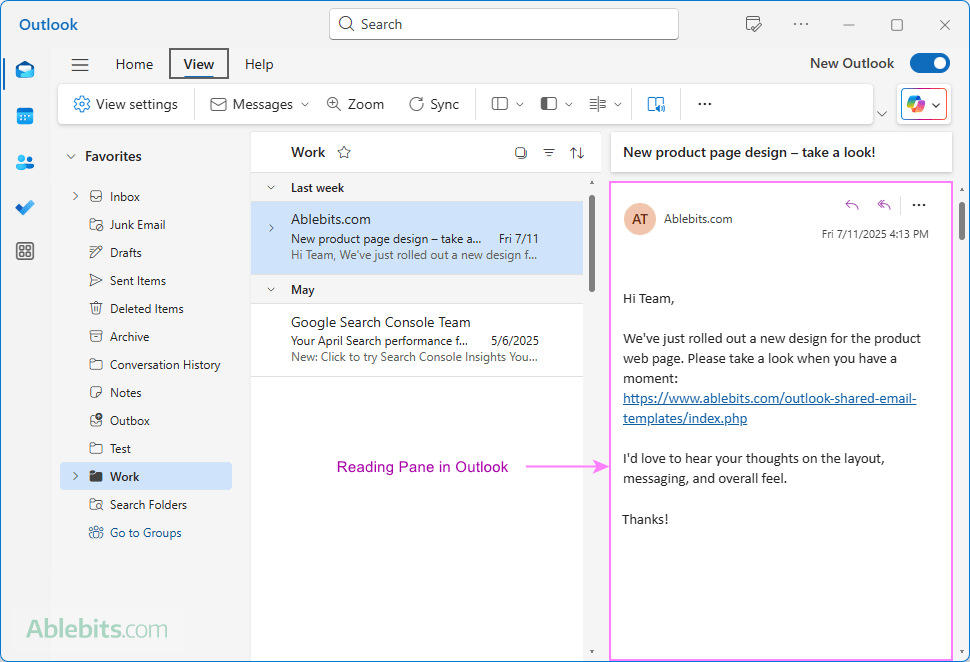
The Reading Pane is available for Mail views in all Outlook applications – classic, new and web.
Where is the Reading Pane in Outlook?
The Reading pane in Outlook can be positioned in one of three ways:
- Right – The message preview appears to the right of your message list. It's the default and most commonly used view.
- Bottom – The message opens below the list of emails. It is handy when working with narrow screens.
- Off – The Reading Pane is hidden entirely, and messages open in new windows.
You can easily change the Reading Pane location based on your personal preferences and screen size.
How to change Reading Pane position in Outlook
Outlook lets you choose the position where the Reading Pane appears. The steps vary slightly in the classic (old) and new app.
Move Reading Pane in classic Outlook
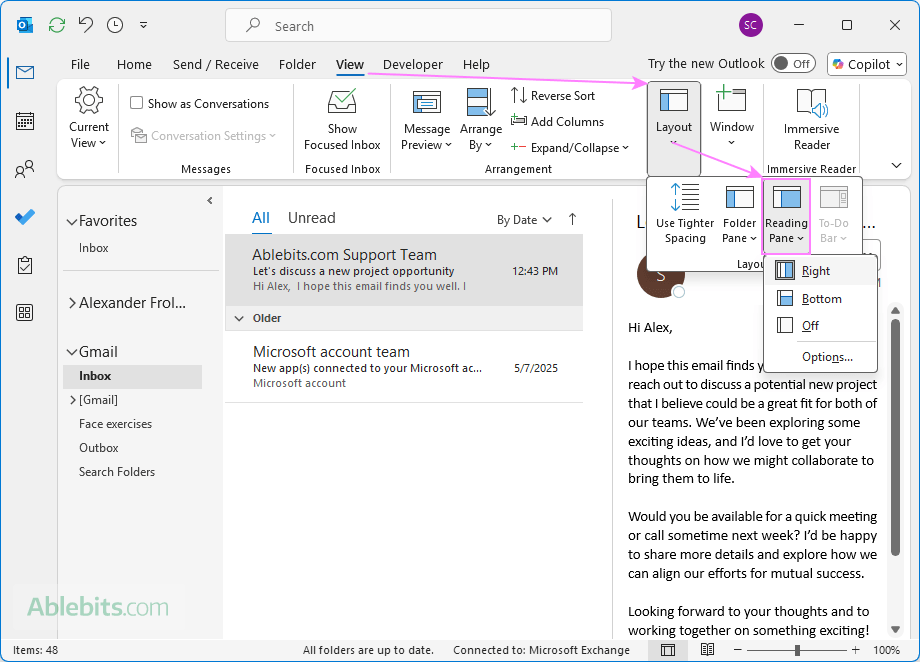
To change the location of the Reading Pane in the classic desktop Outlook app, the steps are:
- Go to the View tab > Layout group.
- Click the Reading Pane button.
- Choose either Right or Bottom.
Change Reading Pane location in new Outlook and web
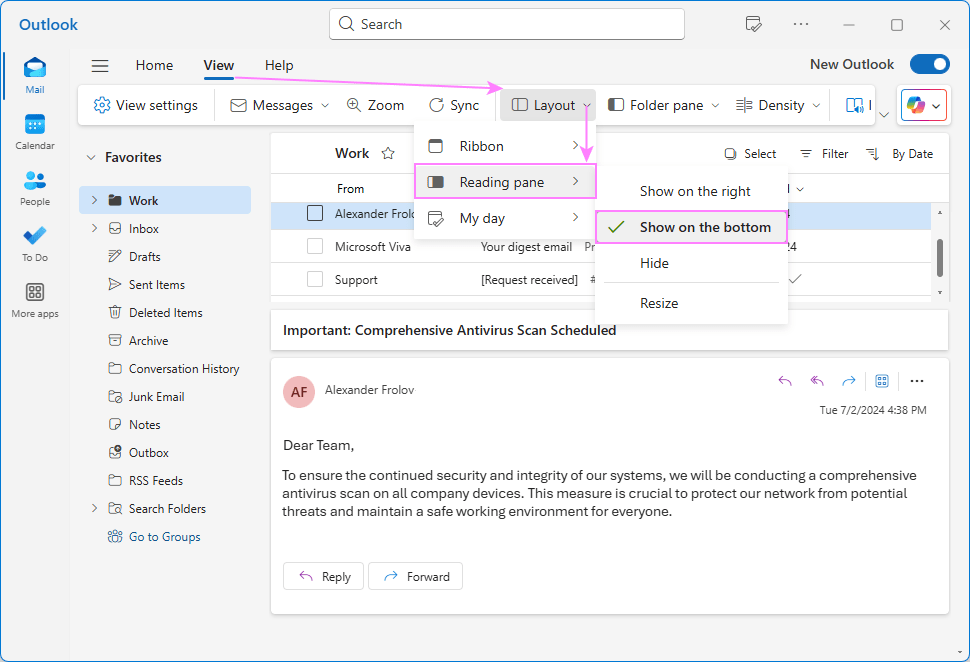
In the new Outlook app and Outlook on the web, you can move the Reading pane in this way:
- Go to the View tab.
- Click Layout, then select Reading Pane.
- Choose Show on the right or Show on the bottom.
If you are using the classic ribbon, then the steps are similar to the classic Outlook.
Note. In all Outlook applications (classic, new and web), changing the position of the preview pane applies universally across all folders.
How to hide Reading Pane in Outlook
If you don't use the Reading Pane to preview emails, you can turn it off completely for a cleaner folder view.
Turn off Reading Pane in classic Outlook
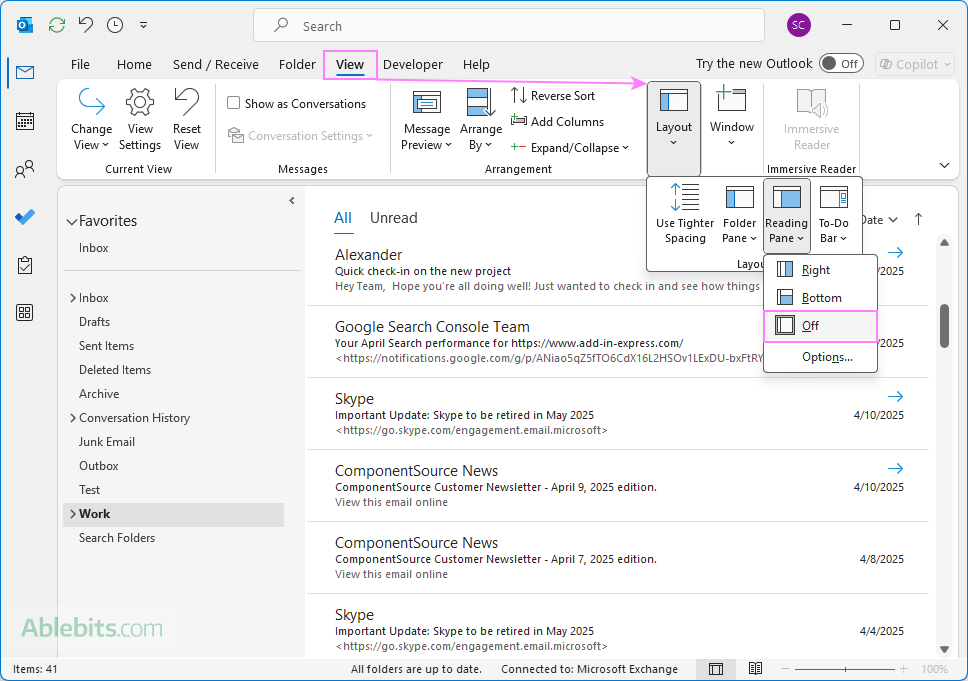
Here is how to hide the Reading Pane in classic Outlook:
- Go to the View tab.
- In the Layout group, click Reading Pane.
- Select Off to disable the pane.
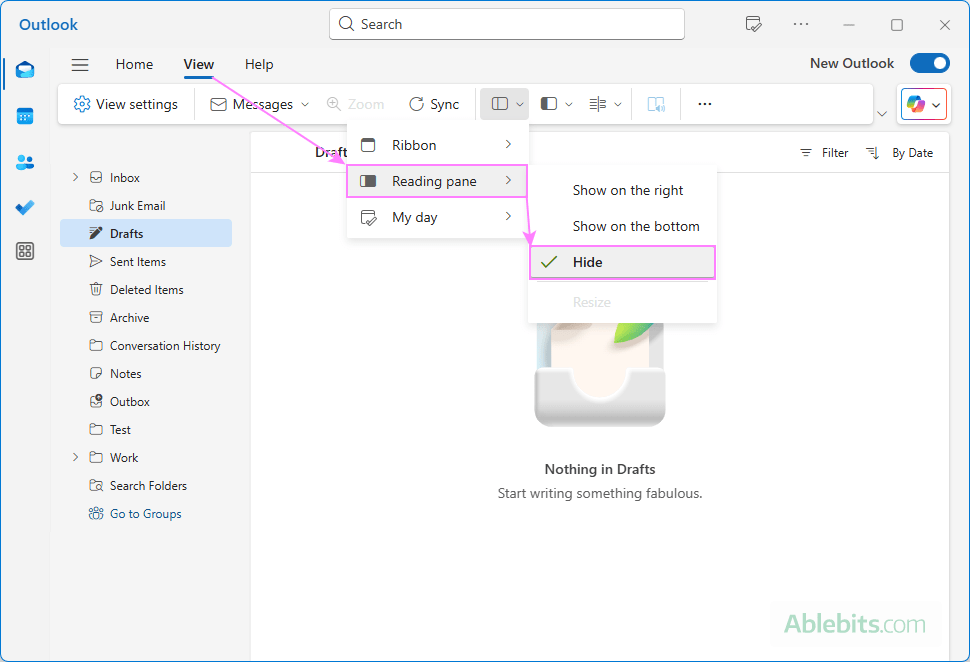
Hide Reading Pane in the new Outlook and web
In the new Outlook and web version, you can hide the Reading Pane for all folders at once:
- Go to the View tab.
- Click Layout, then Reading Pane.
- In the dropdown menu, choose Hide.
Turn off Reading Pane for all folders
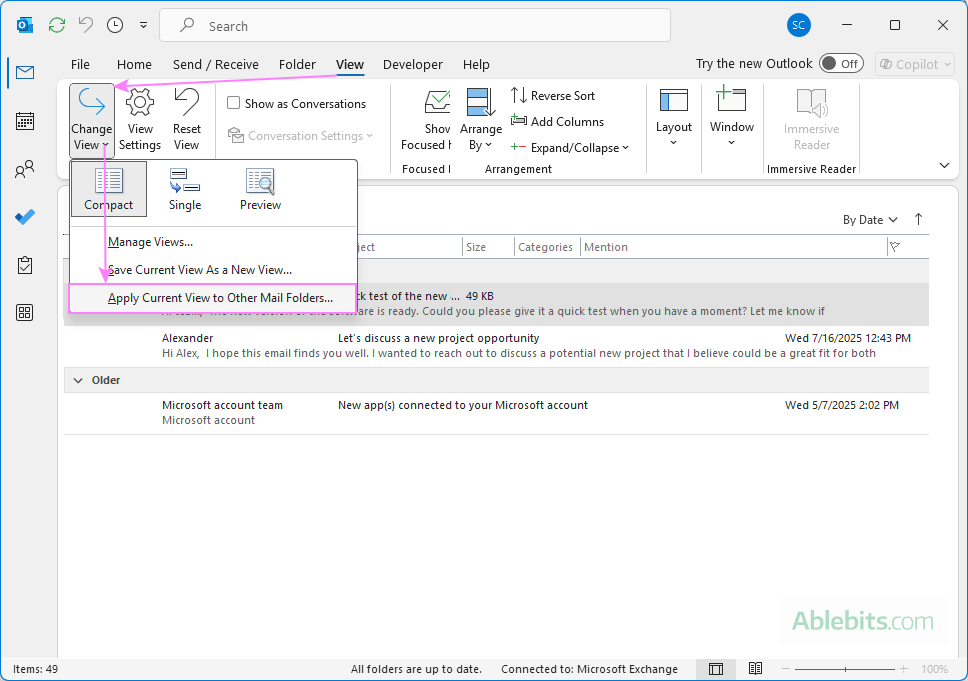
In classic Outlook, hiding the Reading Pane affects only the folder you're currently viewing. To turn it off for multiple folders, do this:
- Go to the View tab > Current View group.
- Click Change View > Apply Current View to Other Mail Folders.
- Choose the folders where you want to hide the reading pane.
Tip. To display the reading pane in Outlook again, go back to the same menu and choose where you'd like it to appear, on the right or bottom.
How to turn on Outlook Reading Pane for all folders
In modern versions of Outlook, this setting usually applies to all folders across all your email accounts.
To turn on the Reading pane for all folders, simply do this:
- On the View tab, click Layout > Reading Pane.
- Choose your preferred position: Right or Bottom.
The setting should apply automatically to all folders. If it doesn't:
- Restart Outlook to refresh the view.
- In classic Outlook, you can copy the current view to other folders: View tab > Change View > Apply Current View to Other Mail Folders. Keep in mind that this will apply all the settings from your current view to every folder, not just the Reading Pane settings.
How to resize Reading Pane in Outlook
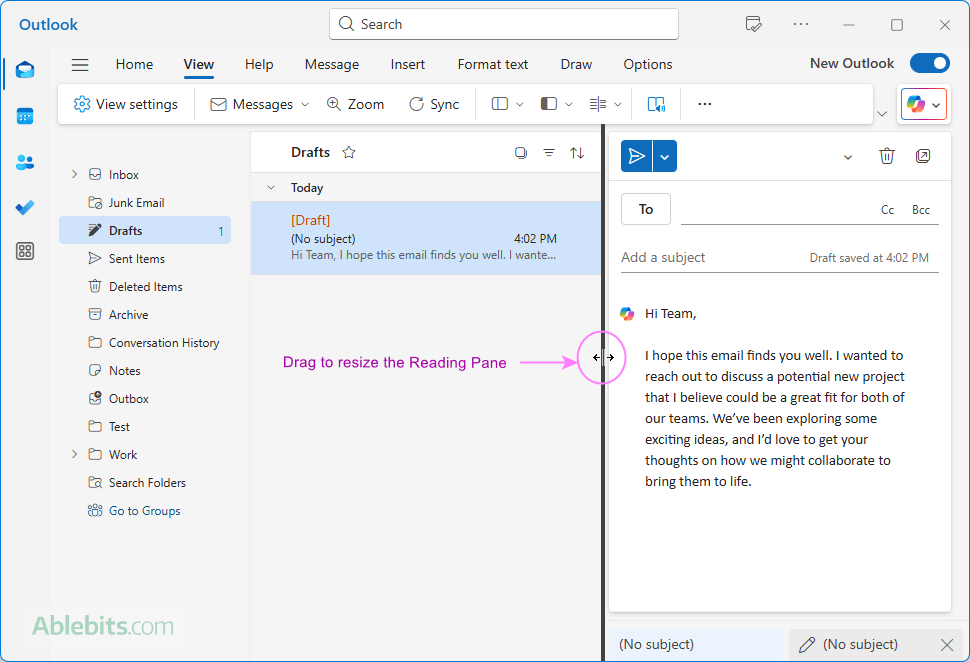
If the Reading Pane in your Outlook is too small, you can easily resize it to make reading messages more comfortable.
- Hover your mouse over the edge between the message list and the Reading Pane.
- When the cursor changes to a double-sided arrow, click and drag to make the pane bigger or smaller.
In the new Outlook and web app, there's an additional option that helps with resizing: View tab > Layout > Reading Pane > Resize. This adds a thick vertical border, making it easier to see and drag the edge of the Reading Pane.
How to change Outlook Reading Pane font size
If the text in the reading pane in your Outlook feels too small or too large, you can adjust it for better reading.
Quickest way to change Reading Pane font size in Outlook
The fastest way to change the reading pane font in any version, including Outlook 365, the new Outlook, and web app is this:
- Hold down the Ctrl key on your keyboard.
- Scroll the mouse wheel up to make the font bigger or down to make the font smaller.
Additionally, each Outlook app has its own way to change the font size.
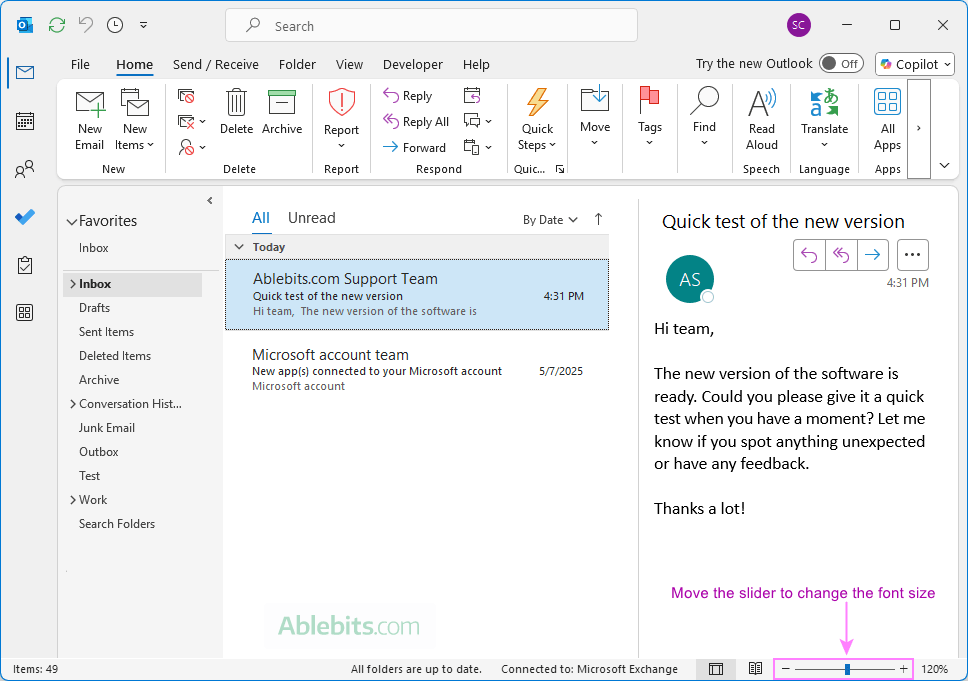
Adjust Reading Pane font size in classic Outlook
In the classic desktop Outlook app, you can use the Zoom slider at the bottom-right corner of the Reading Pane.
Increase font size in new Outlook Reading Pane and web
In the new Outlook app and Outlook on the web, zooming is available directly from the ribbon:
- On the View tab, click Zoom.
- Use the plus (+) button to increase the font size or the minus (-) button to decrease it.
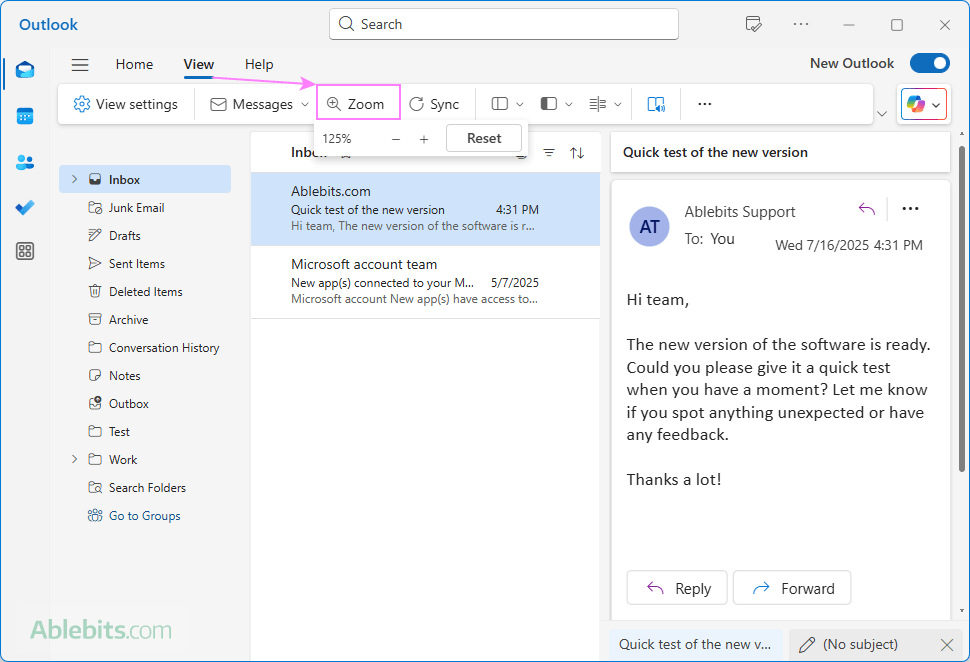
How different Outlook versions handle zoom settings:
- In classic Outlook, the font size change applies only to the message you're currently viewing.
- The new Outlook and web app remember your zoom setting and automatically apply it to other emails you open in the Reading pane.
Tip. To permanently change the font size for the reading pane in classic Outlook, click the percentage sign (%) next to the Zoom slider, set the desired zoom level, and select the Remember my preference check box.
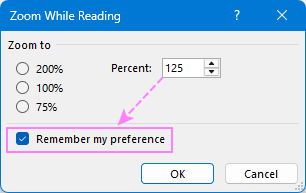
For more information, see How to change zoom in Outlook.
Customize Outlook Reading Pane
Microsoft Outlook provides some basic settings to customize the preview pane. The options are different in classic Outlook, the new app and web version.
Adjust Reading Pane in classic Outlook
To change how the Reading Pane works in classic Outlook, go to the View tab > Layout group and click Reading Pane > Options.
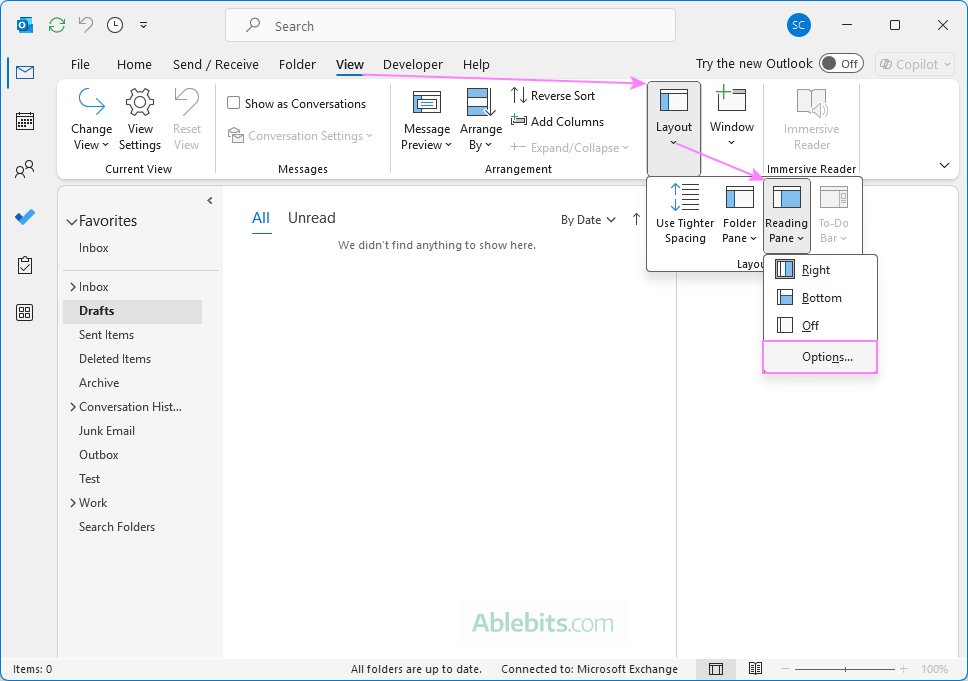
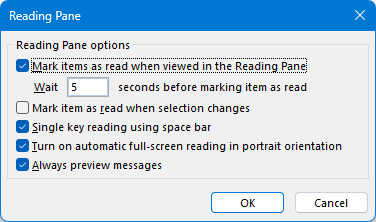
From there, you can customize the following settings:
- Mark items as read when viewed in the Reading Pane - automatically marks messages as read after being displayed for a specified number of seconds.
- Mark item as read when selection changes - marks a message as read as soon as you move to another message.
- Single key reading using space bar - pressing the Space key scrolls down one page within the current message in the Reading Pane. When you reach the end of the message, pressing the spacebar again opens the next message in the folder. This feature is enabled by default.
- Turn on automatic full-screen reading in portrait orientation - on smaller screens or tablets, this option opens messages in full-screen mode when the device is held vertically.
- Always preview messages - automatically shows the most recent message in the Reading Pane when switching to a different folder. If this is turned off, Outlook shows "Select an item to read" until you select a message.
Customize Reading Pane in new Outlook and web
To adjust the Reading Pane behavior in the new Outlook or Outlook on the web:
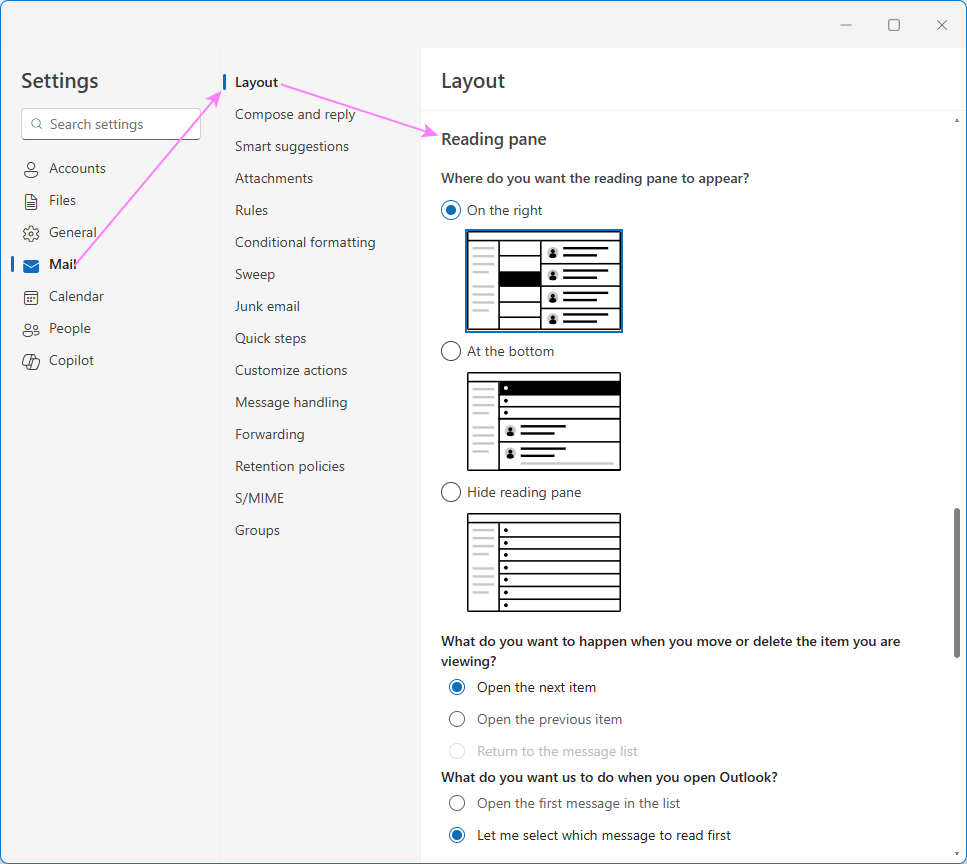
- Click Settings (gear icon) in the upper-right corner.
- Go to Mail > Layout.
- Scroll down to the Reading Pane section. Here you can customize:
- Reading Pane position - choose where the Reading Pane appears (on the right, below the message list, or hidden).
- Which item to open when moving/deleting messages - decide whether Outlook opens the next or previous message after you delete or move the one you're viewing.
- Which message to shown when Outlook opens - choose whether Outlook should automatically open the first message in the folder or wait for you to select one.
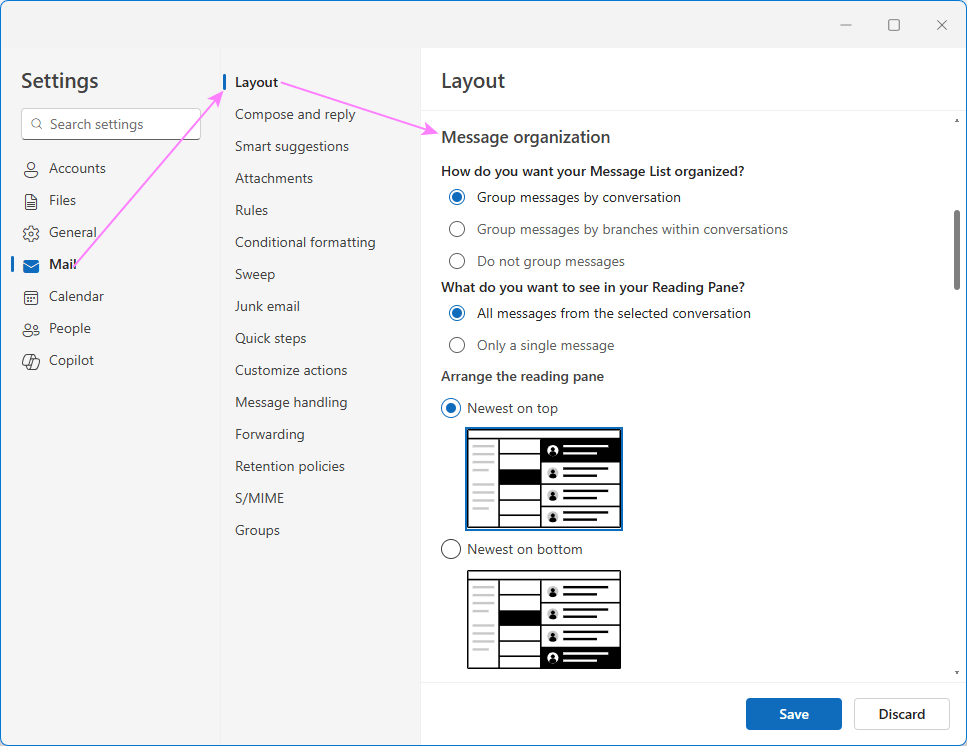
Additionally, you can control how messages appear in the Reading Pane using the Message organization settings.
- If you choose to group messages by conversation, you'll have the option to:
- Show all messages in the selected conversation, or
- Display just a single message at a time.
- If you choose to show all messages, you can also decide whether to arrange the newest messages at the top or at the bottom.
How to show calendar in Outlook Reading Pane
Some users find it convenient to view emails and calendar side by side, so they can stay on top of upcoming events while managing their inbox. Here's how you can add a calendar next to your Reading Pane in both the classic desktop app and the new Outlook.
Add calendar to Reading Pane in classic Outlook
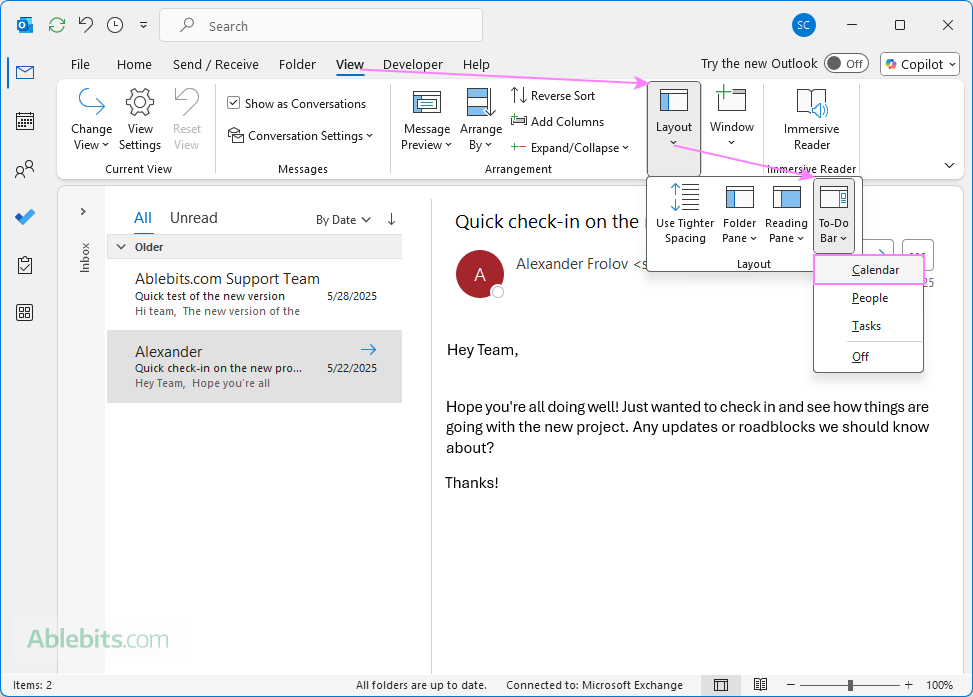
To display the calendar on the right side of your Reading Pane in classic (old) Outlook, this is what you need to do:
- Go to the View tab.
- In the Layout group, click To-Do Bar > Calendar.
The calendar will appear in a separate pane on the right side of the Outlook window beside the Reading Pane.
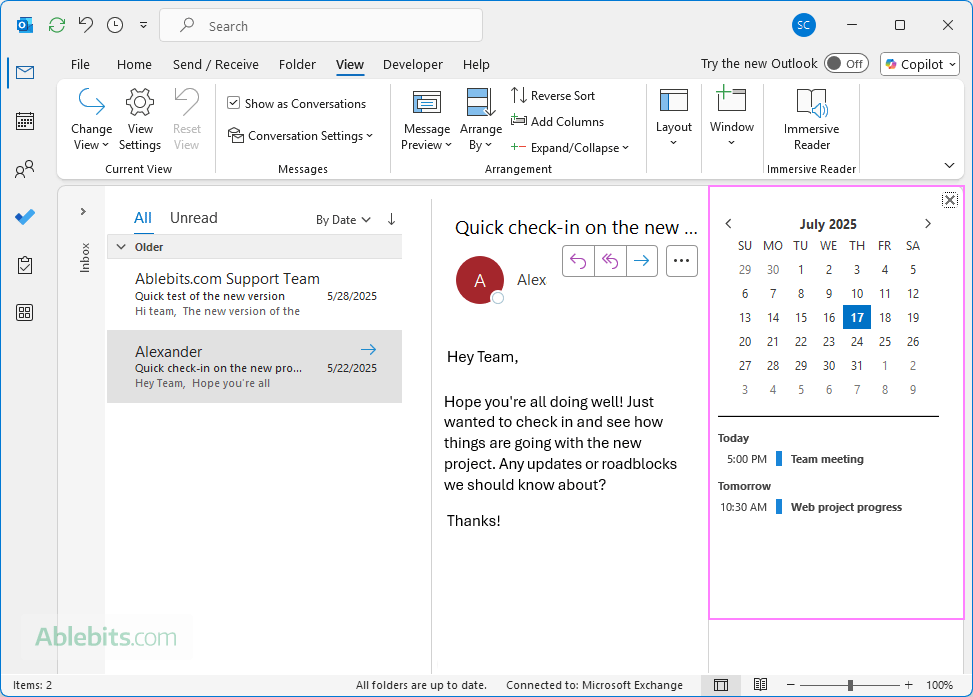
Tip. You can also show Tasks and People in the same To-Do Bar pane, depending on what you'd like quick access to.
Add calendar to Reading Pane in new Outlook and web
To display the calendar while reading emails in the new Outlook and Outlook on the web:
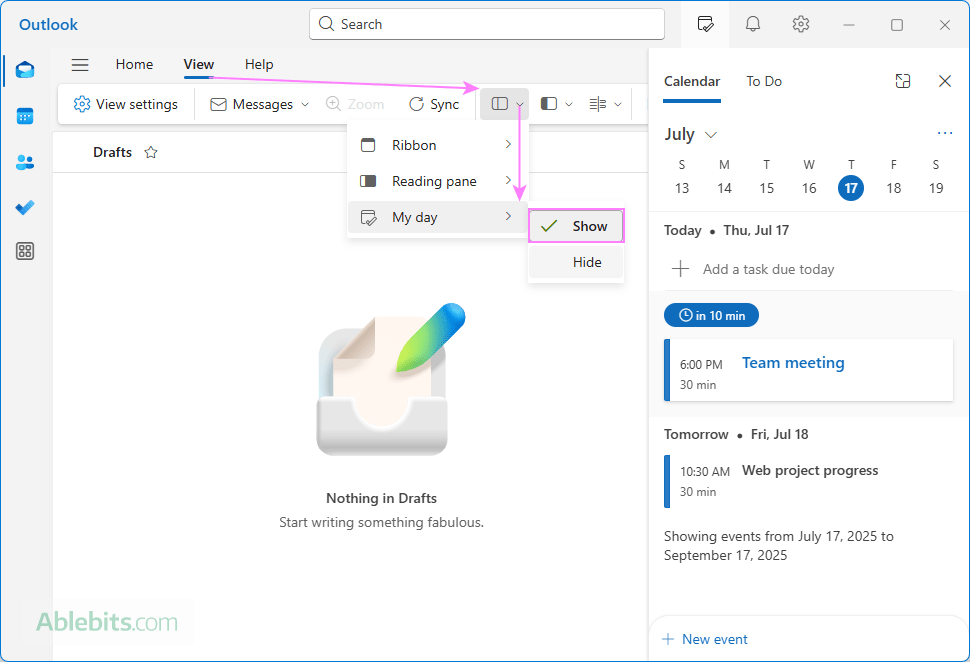
- Go to the View tab.
- Select Layout > My Day > Show.
This will open a calendar pane on the right side of your screen next to the Reading Pane, letting you view upcoming events without leaving your Inbox, Drafts, or another folder.
The new Outlook and web app let you switch between two calendar views:
- Click the three dots in the top-right corner of the calendar pane.
- Choose one of these views:
- Agenda – shows a list of upcoming events for the current month.
- Day – displays a detailed, hour-by-hour view of today's schedule.
This setup is especially useful if you frequently schedule meetings or reference your availability while responding to emails.
Tip. In the calendar pane, you can also view your task list by switching to the To Do tab.
This item cannot be displayed in the Reading Pane
If you are getting the error "This item cannot be displayed in the Reading Pane", Outlook is likely having trouble rendering the message. This can happen for a few different reasons. Here are some things you can try:
- Reset the folder view (classic Outlook). Corrupted view settings can prevent messages from displaying properly. To reset the folder's view to default, click the View tab > Reset View.
- Check for add-in or antivirus conflicts. Some add-ins or antivirus programs (especially those scanning email) can interfere with the Reading Pane. Try starting Outlook in safe mode to find the faulty add-ins.
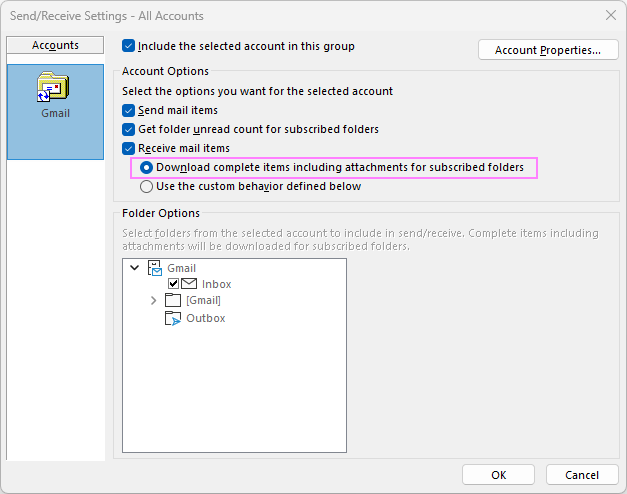
- Make sure entire emails are downloaded. If you're working in Cached Exchange Mode or using an IMAP account, partial downloads can cause display problems. To get classic Outlook to download complete emails from the server:
- On the Send/Receive tab, click Send/Receive Groups.
- Select Define Send/Receive Groups from the dropdown menu.
- In the window that appears, click Edit.
- Select Download complete items including attachments.
- Update Outlook. Bugs affecting message display are often fixed in newer versions, so be sure to install the latest updates.
- Repair the Outlook Data File. A damaged data file (.pst or .ost) may be the root cause. You can run the Inbox Repair Tool (scanpst.exe) or consider recreating your Outlook profile.
If none of these troubleshooting tips help, try opening the message in a new window as a temporary workaround. Consistent issues may also point to server-side problems or a corrupted Outlook profile.
Outlook Reading Pane disappeared
If all of sudden the Reading Pane disappears from your Outlook, this may be caused by an accidental setting change or a temporary glitch. Here are a couple of easy fixes to bring it back:
- Check if it is enabled. Go to the View tab > Reading Pane, and make sure it's set to Right or Bottom (not Off).
- Restart Outlook. A simple restart can often fix minor display issues.
If the Outlook Reading Pane keeps disappearing, try the following:
- Reset the folder view (View tab > Reset View) as a customized or corrupted view might be hiding the pane.
- Start Outlook in safe mode to check if some third-party add-in is causing the issue.
- Check for updates to ensure you're on the latest version.
- If the issue persists, try to repair your Outlook Data File.
If the Reading Pane continues to disappear after performing the above steps and restarting Outlook, it may be due to a profile issue. In that case, consider creating a new Outlook profile to test.
In conclusion, getting the Reading Pane working just the way you like can bring a sense of control back to your inbox routine. If it's not behaving as expected, remember that most issues have simple fixes and Outlook often needs a nudge (restart) to start working properly 😊
 by
by