 by
by Learn how to change and personalize the Outlook calendar view to match the way you work.
Everyone has their own way of planning the day. Some like to see a day schedule hour by hour, while others prefer a full month at a glance. Fortunately, Outlook gives you plenty of flexibility. This tutorial shows how to switch between different calendar views, customize the layout, and display multiple calendars in the way that suits you best.
Outlook calendar view
An calendar view determines how your appointments and events are displayed in Outlook.
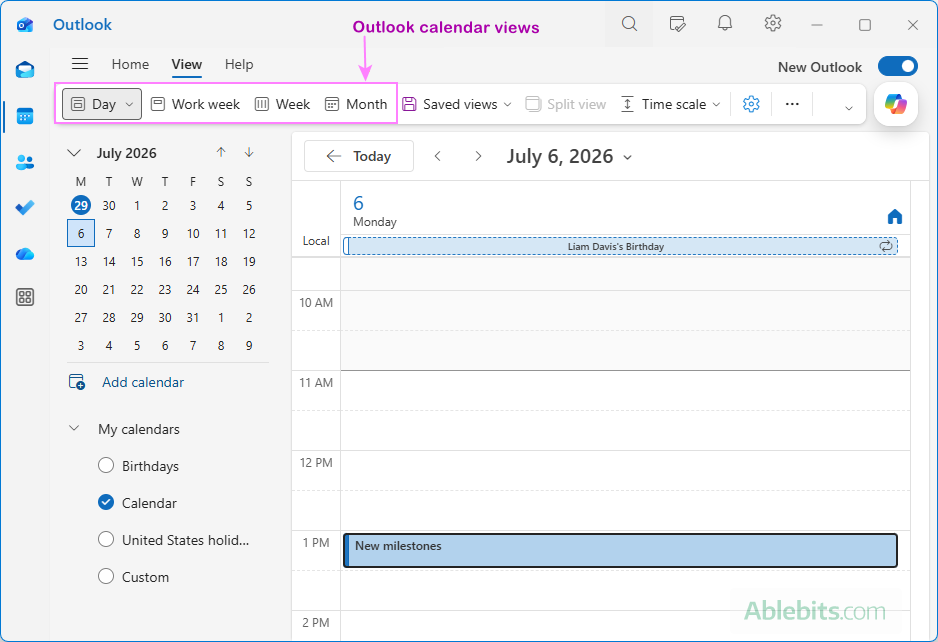
Microsoft Outlook offers several ways to display calendars that let you focus on a single day, see the week ahead, or get a broader overview of your schedule. The following calendar views are available in all Outlook versions:
- Day – shows a single day with detailed appointment times.
- Work Week – displays only working days.
- Week – shows all seven days of the week.
- Month – provides a high-level overview of events across an entire month.
In addition to these basic views, each Outlook app offers its own options:
In the new Outlook and Outlook on the web, the Day view lets you choose how many days to display, from 1 to 7 consecutive days.
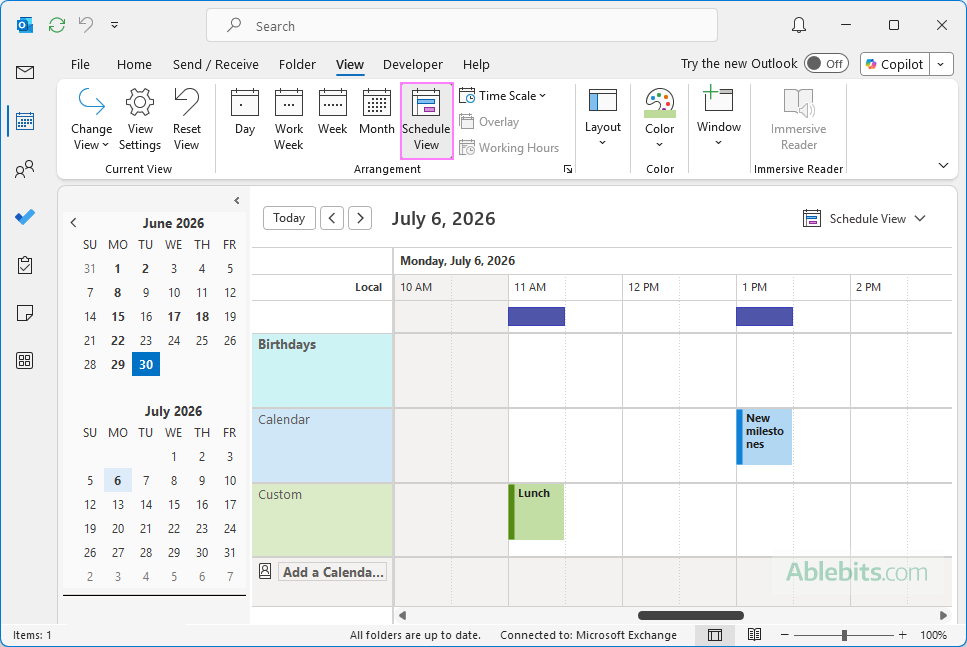
Classic Outlook (365 – 2016) offers the Schedule view, which lines up multiple calendars one below another on a shared timeline, so you can quickly see your busy and free times, and spot where appointments overlap.
How to change calendar view in Outlook
Switching between calendar views is quick in every Outlook version:
- On the navigation bar, select Calendar.
- On the Home or View ribbon tab, choose Day, Work Week, Week, or Month.
The calendar switches to the selected view immediately. Outlook remembers your choice and opens the calendar in the same view the next time you start the app.
You can also switch between calendar views using these keyboard shortcuts:
- Day: Ctrl + Alt + 1
- Work Week: Ctrl + Alt + 2
- Week: Ctrl + Alt + 3
- Month: Ctrl + Alt + 4
- Schedule: Ctrl + Alt + 5
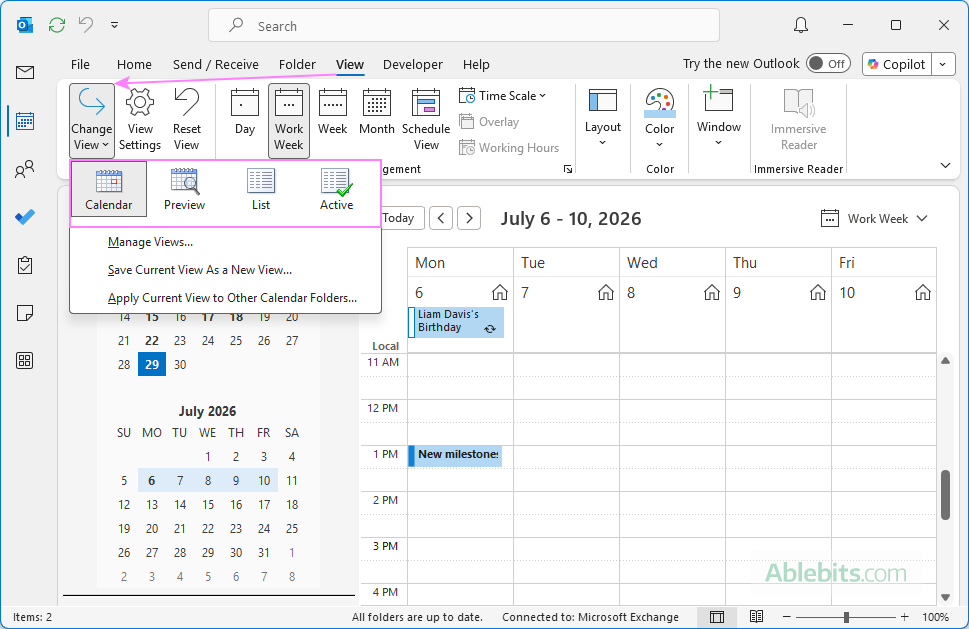
Classic Outlook (365 – 2016) includes additional options to control how calendar events are presented. On the View tab, in the Current View group, click Change View, and then choose:
- Calendar – the standard Day, Work Week, Week, or Month layout.
- Preview – intended to display calendar items with a preview of their contents. However, in current versions of Outlook, it appears identical to the Calendar view.
- List – shows events in a table, letting you choose which columns to display: Subject, Location, Start and End date, etc.
- Active – displays a list of current and future appointments, hiding past events.
While most of the time the standard Calendar view is all you'll need, these alternatives are worth knowing about when you want a different perspective.
How to customize Outlook calendar view
Besides switching between the standard Day, Week, or Month views, Outlook lets you customize how your calendar looks and what information it displays.
Calendar view settings in new Outlook and web
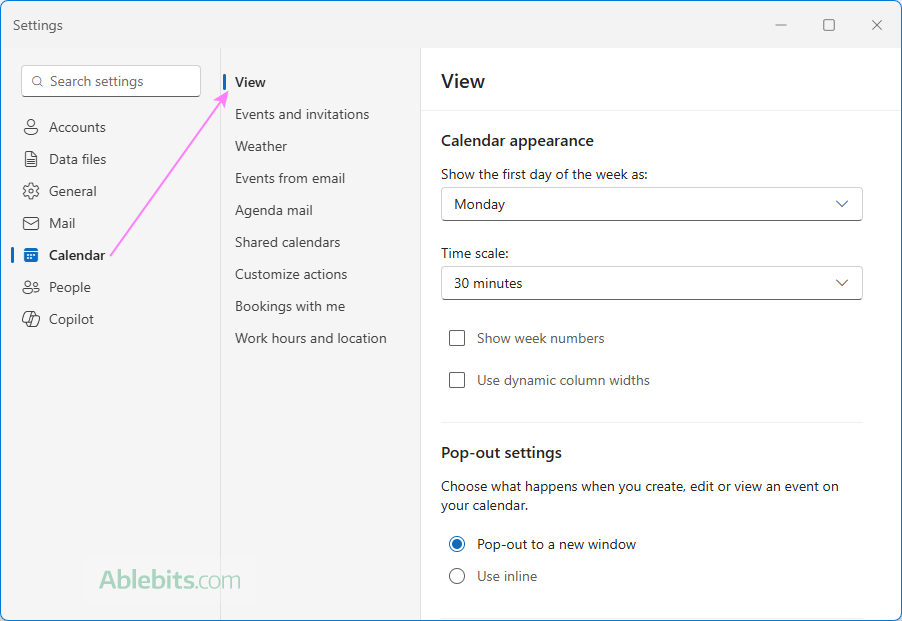
The new Outlook doesn't offer as many view settings as classic Outlook, but it still lets you customize several aspects of how your calendar looks and behaves. To access them, follow these steps:
- Open Calendar.
- Go to the View tab and click Calendar settings.
- This opens the Settings dialog, taking you directly to Calendar > View.
From here, you can customize things like:
- The first day of the week – choose whether your calendar starts on Monday, Sunday, or any other day.
- Time scale – change the time interval shown in Day and Week views.
- Week numbers – show or hide week numbers in the calendar.
- Dynamic column widths – automatically adjust the calendar grid columns based on the available space.
- Pop-out settings – choose whether calendar events open in a separate window or directly in the calendar.
- Time zones – add multiple time zones, choose whether to display it in the calendar, or update your primary time zone.
- Global calendar – allows you to display non-Gregorian calendar systems (such as the Chinese lunar, Islamic, or Indian calendars) alongside the default calendar.
When you're finished, click Save to apply your changes.
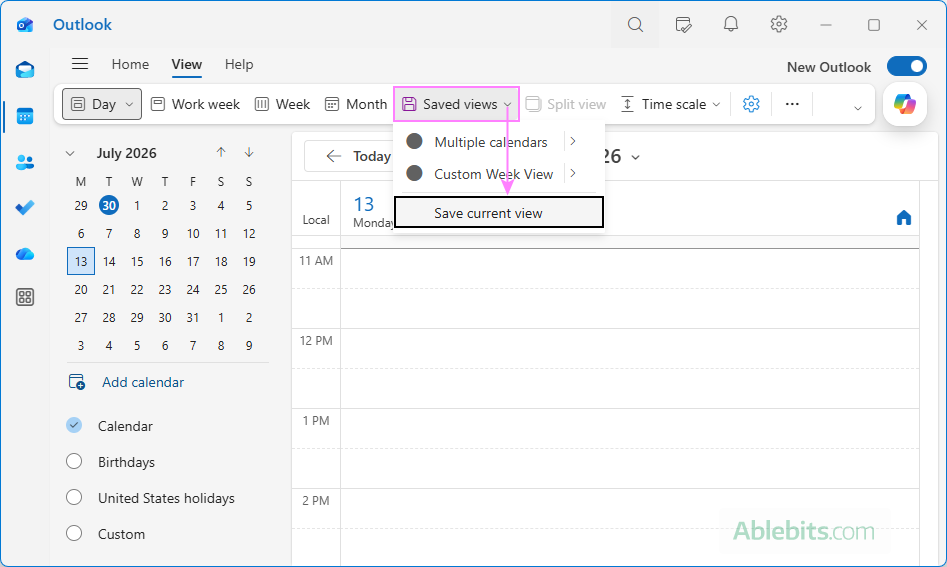
If you frequently switch between different layouts, the new Outlook lets you save your current view and apply it again whenever you need it. All your custom views appear in the Saved views menu. To switch to one later, simply select it from the dropdown list.
Save and reuse custom calendar views
Calendar view settings in classic Outlook (365 – 2016)
Classic Outlook lets you customize almost every part of your calendar view, from the columns and fonts to sorting, grouping, and filtering. To access these settings:
- On the View tab, in the Current View group, click View Settings.
- The Advanced View Settings dialog opens, where you can explore the available customization options.
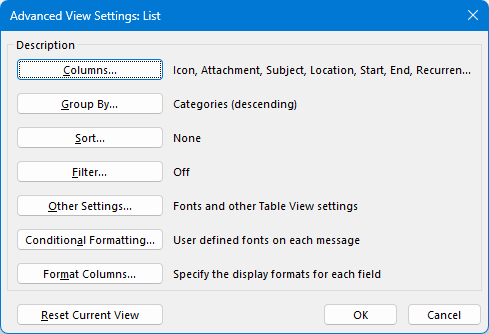
The Advanced View Settings dialog contains several groups of options. Here's a quick overview of what each one does:
- Columns – choose which information to display (such as subject, location, start and end dates) and arrange the columns in the order you prefer.
- Group By – organize a list of calendar items into groups based on a selected field.
- Sort – specify the order in which calendar items are displayed in List
- Filter – display only the items that match specific criteria, such as a category, attendees, or importance.
- Other Settings – customize the appearance of the current view, including fonts, grid lines, grouping, and other options.
- Conditional Formatting – automatically apply different fonts or colors to unread or overdue items, or to events that meet specific conditions you set.
- Format Columns – change how information is displayed in individual columns. For example, you can set the preferred date and time formats.
- Reset Current View – restore the current view to its default settings.
Save custom calendar view
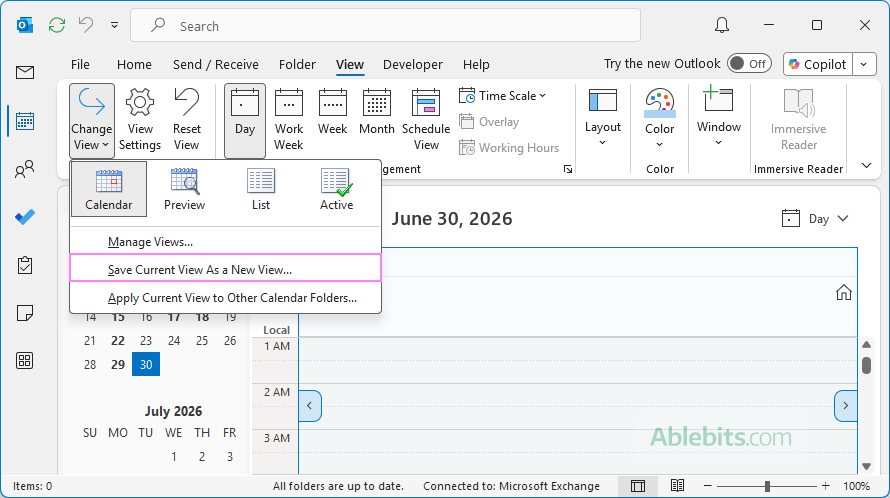
After customizing a view, you can save it and reuse at any time.
- On the View tab, click Change View > Save Current View As a New View.
- Enter a name for the view and click OK.
If you want to edit, copy, or delete saved views, choose Change View > Manage Views.
Multiple calendar view in Outlook
By default, Outlook displays only your primary calendar. To view additional calendars, simply select their check boxes in the Folder pane.
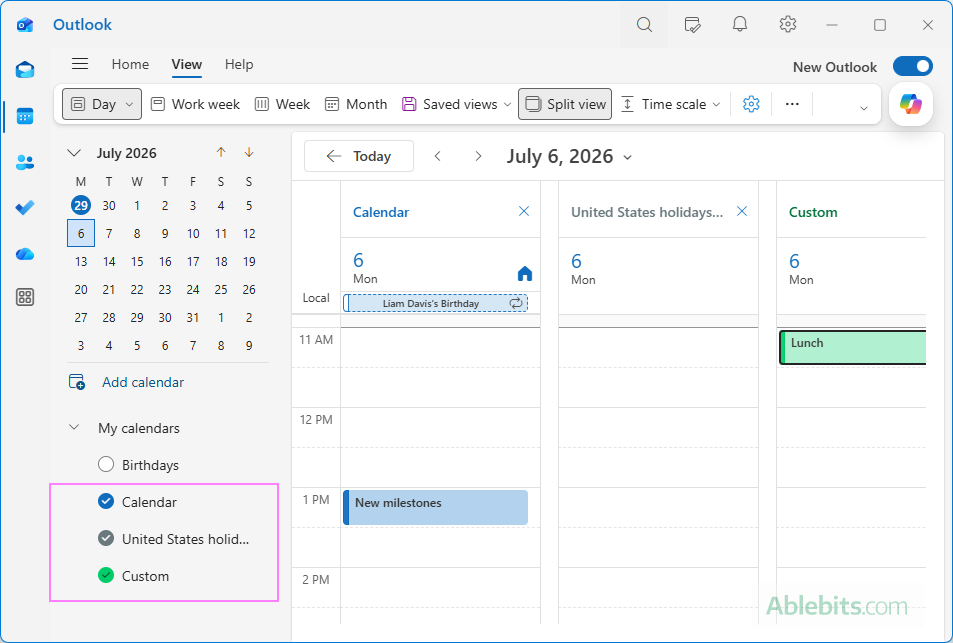
Once you have more than one calendar open, you can display them either side by side in Split View or combined into a single calendar in Overlay View. Outlook remembers your selection and opens the calendar in the same view on the next start.
Outlook calendar Split View
In Split View, each calendar is displayed in its own column side by side. This layout makes it easy to compare schedules, identify conflicts, and find available time across multiple people and rooms. Split View is the default layout when more than one calendar is selected.
Outlook calendar Overlay View
In Overlay View, multiple calendars are combined into a single one. Events from each calendar are displayed together and distinguished by color, so you can see the overall schedule at a glance.
Switch between Overlay and Split view in new Outlook and web
In new Outlook and Outlook on the web, switching between Split and Overlay view is straightforward. Simply click the Split view button on the ribbon to toggle between the two views.
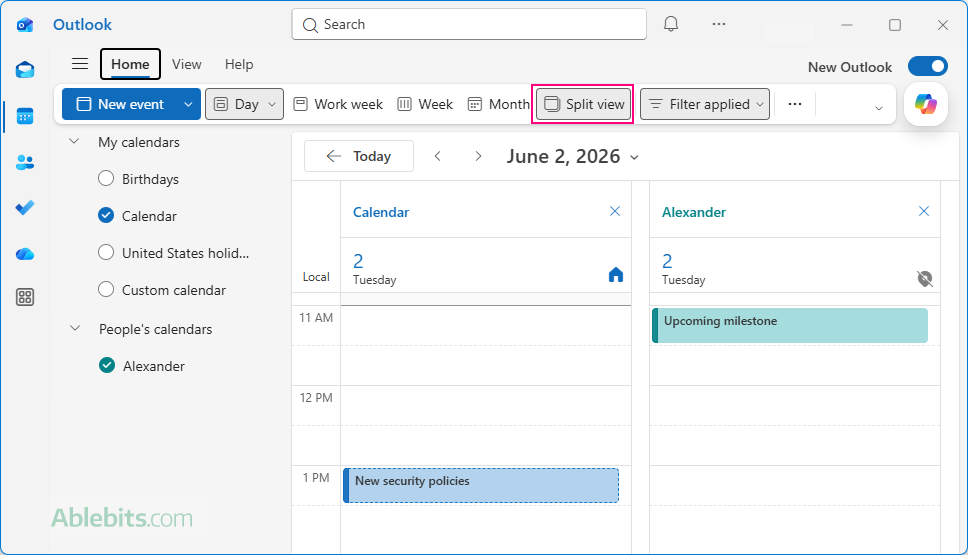
Change between Split and Overlay view in Outlook 365 – 2016
To change from Split to Overlay view in classic Outlook, you can either:
- Click the small left-pointing arrow in the upper-left corner of the additional calendar.
- On the View tab, in the Arrangement group, click Overlay.
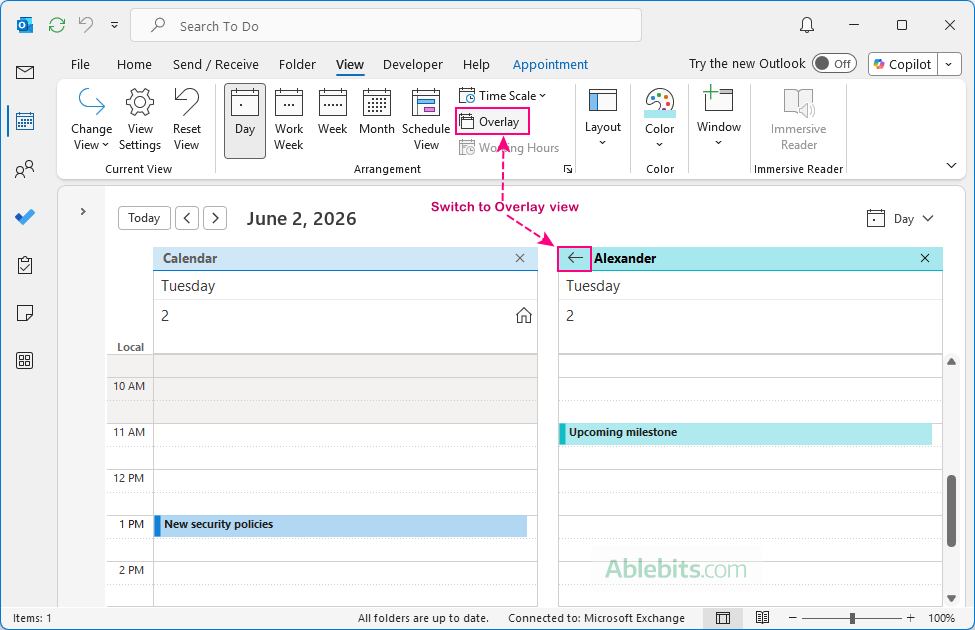
To return to calendar Split view:
- Click the right-pointing arrow on the calendar tab.
- Or click Overlay on the ribbon again to toggle it off.
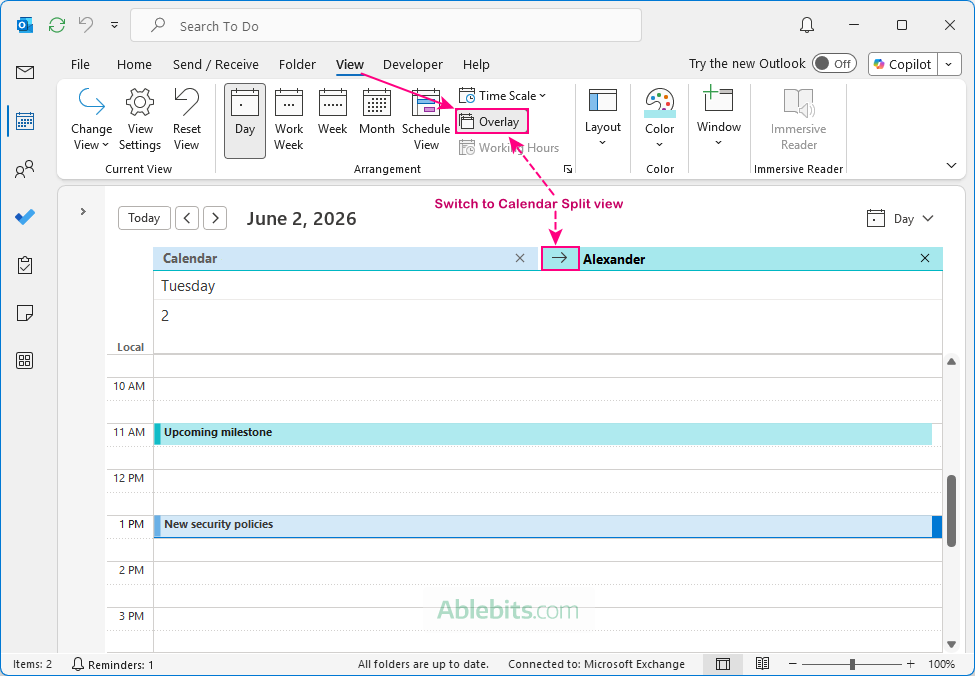
As you toggle between the two views, Outlook preserves the same calendars and date range, changing only how the calendars are displayed.
Note. When more than two calendars are open in classic Outlook, the Overlay button on the ribbon doesn't always switch views as expected. In that case, use the arrows on the calendar tabs to toggle between Split and Overlay views.
Change appearance of Outlook calendar
Outlook provides several ways to customize the appearance of your calendars. The available customization options depend on your Outlook version.
Customize calendar look in new Outlook and web
Each calendar can have its own color and icon to distinguish between work, personal, shared, and other calendars.
To customize a calendar's appearance:
- In the folder pane, click the More options button (three dots) next to the calendar you want to customize.
- Choose one of the following options:
- Color – select one of the predefined colors or click Custom to pick any color you like.
- Charm – choose an icon that will appear next to the calendar events.
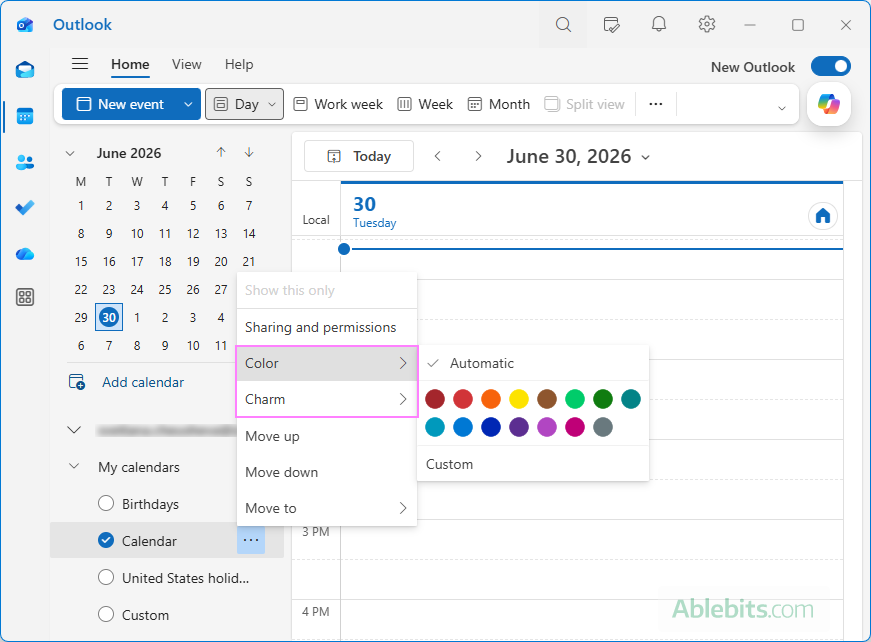
Change calendar color in classic Outlook (365 – 2016)
Classic Outlook lets you change the color of the current calendar as well as the default color used for all calendars.
Change the color of the current calendar
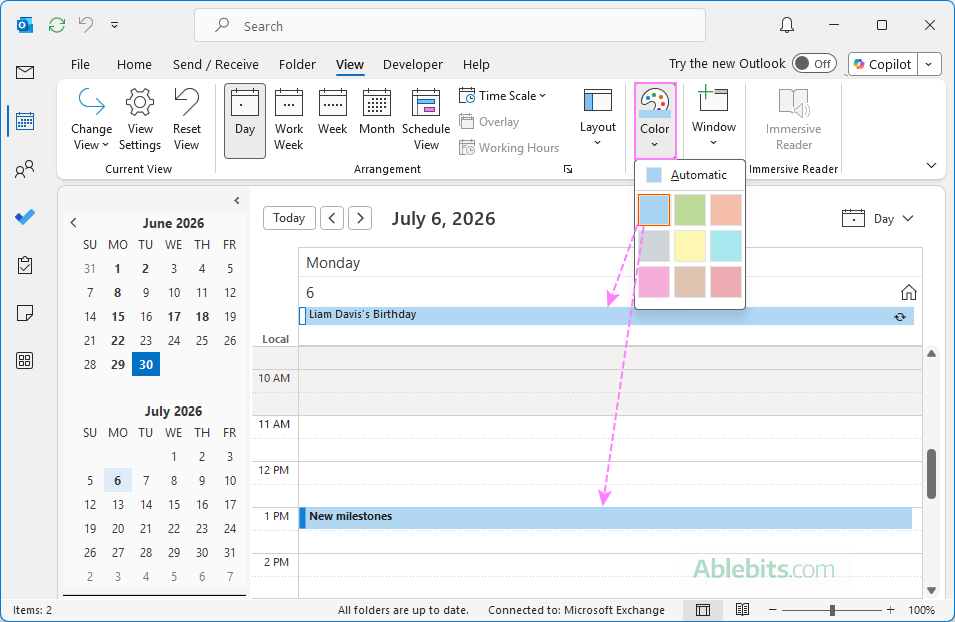
To change the background color of the events in the calendar you're currently viewing:
- Open the calendar.
- On the View tab, click Color.
- Select your preferred shade from the dropdown menu.
Change the default calendar color
To change the default background color for Outlook calendars:
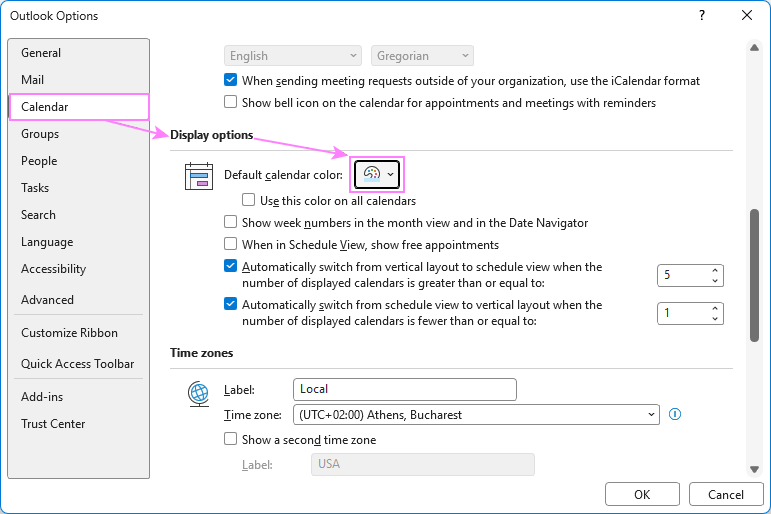
- Go to File > Options > Calendar.
- Under Display options, pick your preferred shade from the Default calendar color drop-down list.
- If you want a consistent look across all calendars, select the Use this color on all calendars check box.
- Click OK.
How to change Outlook calendar start day
Outlook lets you choose which day your calendar week begins with. If you prefer to see Monday first (or any other day), here is how to set this up.
Change the first day of the week in new Outlook and web
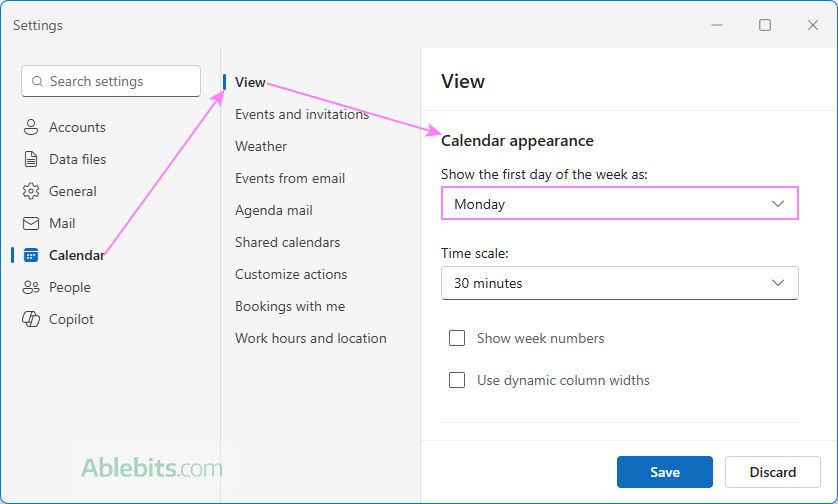
To choose which day your Outlook calendar week starts on, follow these steps:
- On the View tab, select Calendar settings.
- Under Calendar appearance, select the day you want from the Show the first day of the week as dropdown list.
- Click Save.
Set the first day of the week in classic Outlook (365 – 2016)
Classic Outlook also lets you choose which day your calendar week starts on. Here's how to change it:
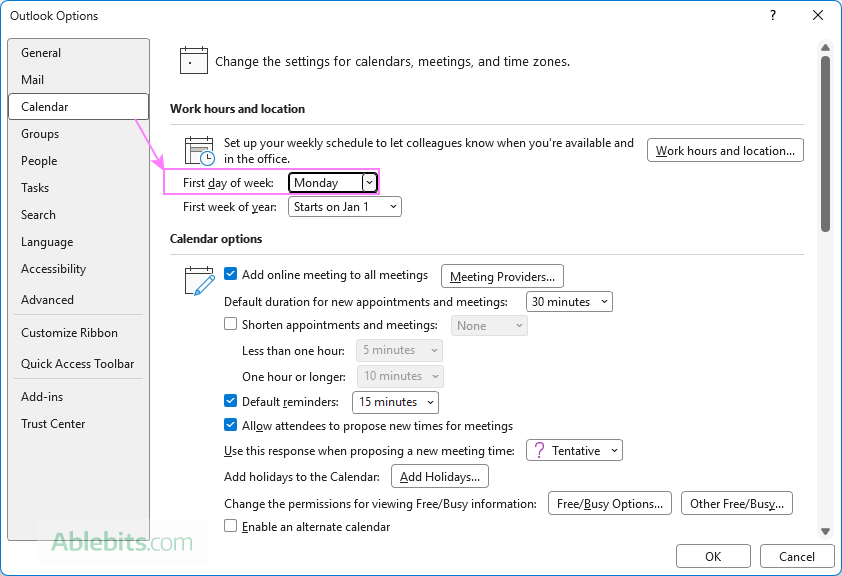
- Go to the File tab > Options > Calendar.
- Under the Work hours and location section, select the day you want from the First day of week drop-down list.
- Click OK.
Change workdays in Outlook calendar
If you don't work a standard Monday-to-Friday schedule, Outlook lets you customize your workdays and working hours to match your routine. Once configured, the Work Week view will display only those days and times.
Note. This feature is available only for Microsoft 365 work or school accounts.
Set working days and hours in new Outlook and web
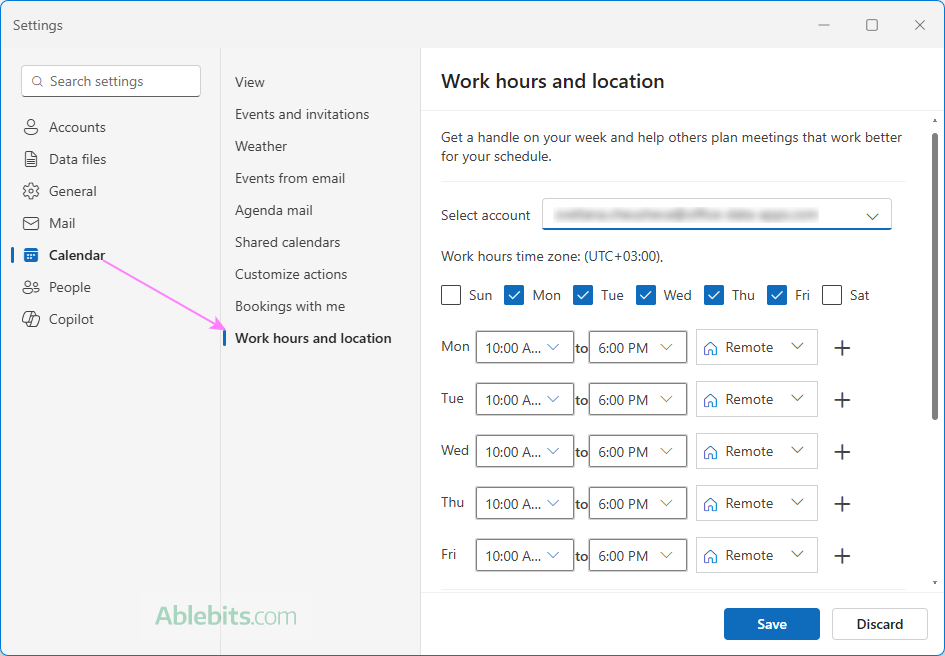
To customize your workdays and working hours, follow these steps:
- On the View tab, click Calendar settings.
- In the Settings window, go to Calendar > Work hours and location.
- Under Work hours and location, choose your working days and set your start and end times.
- Click Save.
Configure work hours in classic Outlook (365 – 2016)
Classic Outlook uses the same work hours settings, although they are accessed from a different place.
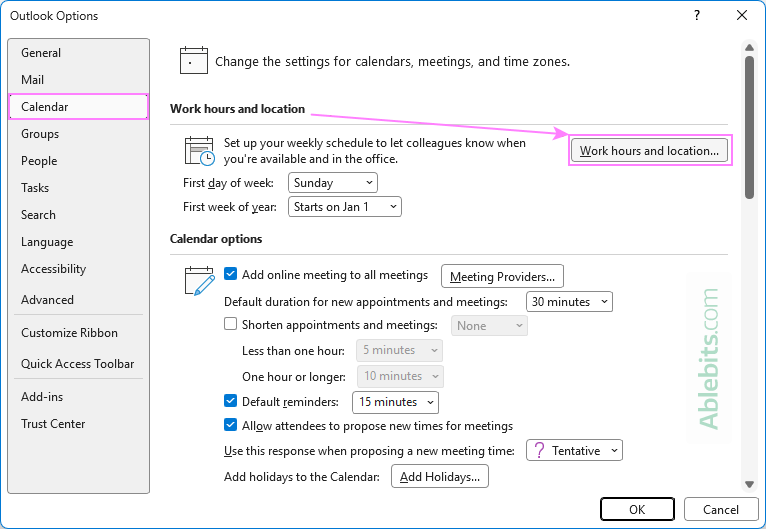
- Go to the File tab > Options > Calendar.
- Click the Work hours and location button.
- In the Work hours and location dialog, review your current work schedule.
- Select your working days and set your start and end times as needed.
- Click Save.
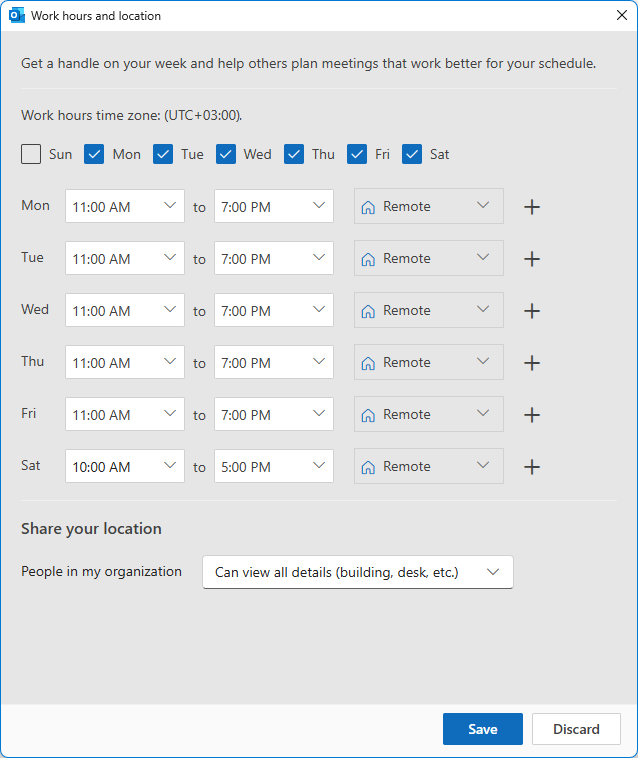
From now on, the Work Week view will display only the days and hours you've set as your working schedule.
Change time scale in Outlook calendar
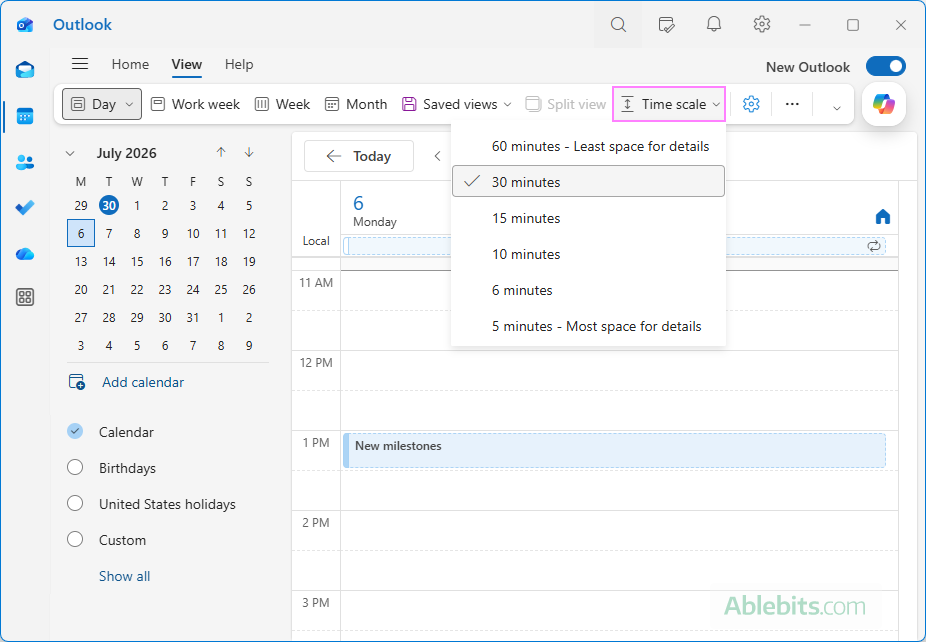
By default, Outlook uses 30-minute time slots for the Day and Week calendar views. If it is too broad or too narrow for your workflow, you can adjust the time scale. For example, if your schedule is packed with short meetings, switching to 15, 10, or even 5-minute intervals makes it much easier to plan your day.
To change the time scale:
- Open Calendar.
- On the View tab, click Time Scale.
- Select the interval you want, such as 60, 30, 15, 10, 6, or 5 minutes.
The new time interval takes effect immediately and applies to the Day, Work Week, and Week views.
Tip. The time scale can also be changed from the calendar view settings.
How to reset Outlook calendar view
If you make changes that you later decide you don't like, you can easily restore the current view to its original settings in classic Outlook (365 2016). For this, on the View tab, in the Current View group, click Reset View.
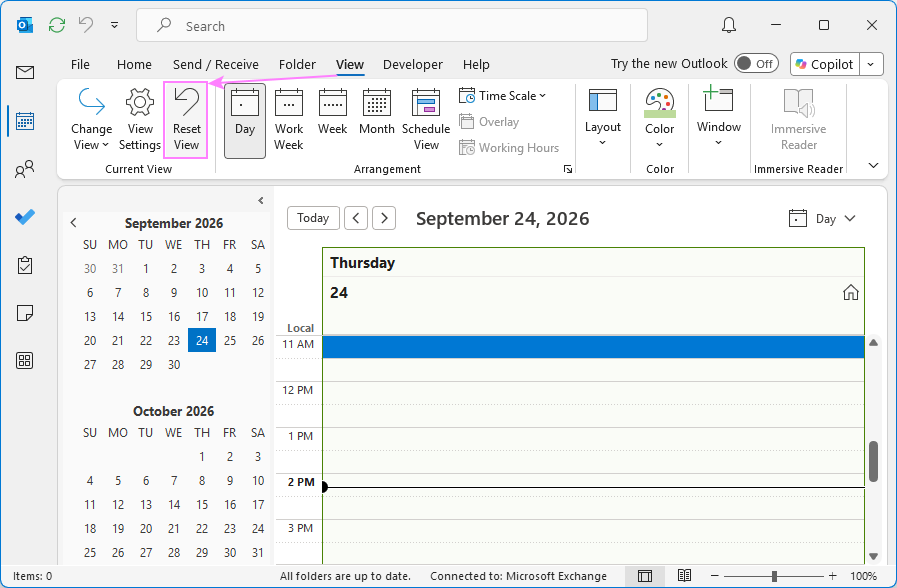
The reset affects only the current view. Any custom views you've created are left unchanged.
The new Outlook and Outlook on the web do not have a dedicated Reset View command.
How to add calendar to Outlook view
If you want to keep upcoming meetings and appointments in sight while working in Outlook, you can add a small calendar pane to the right side of the window. This is handy when you are reading email or checking tasks but still want your schedule nearby.
Show calendar on the right in new Outlook and web
In the new Outlook and Outlook on the web, you can use the My Day pane to keep your calendar visible.
- Click the My Day icon in the upper-right corner of the Outlook window.
- The My Day pane appears on the right side of the window with the Calendar tab selected. It shows a date picker for the current month, with your upcoming meetings and appointments listed below.
- To change how events are displayed, click the More options button (three dots) in the upper-right corner of the pane, and choose either Agenda or Day view.
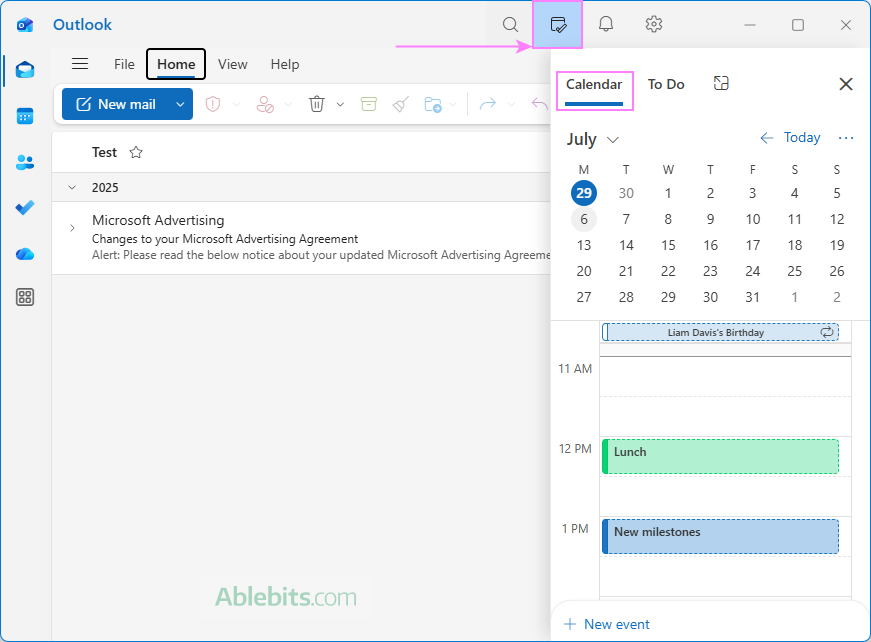
Once opened, the My Day pane stays visible across all Outlook modules, including Calendar, Mail, People, and To Do. To hide it, click the Close button (X) at the top of the pane.
Show calendar on the right in classic Outlook (365 – 2016)
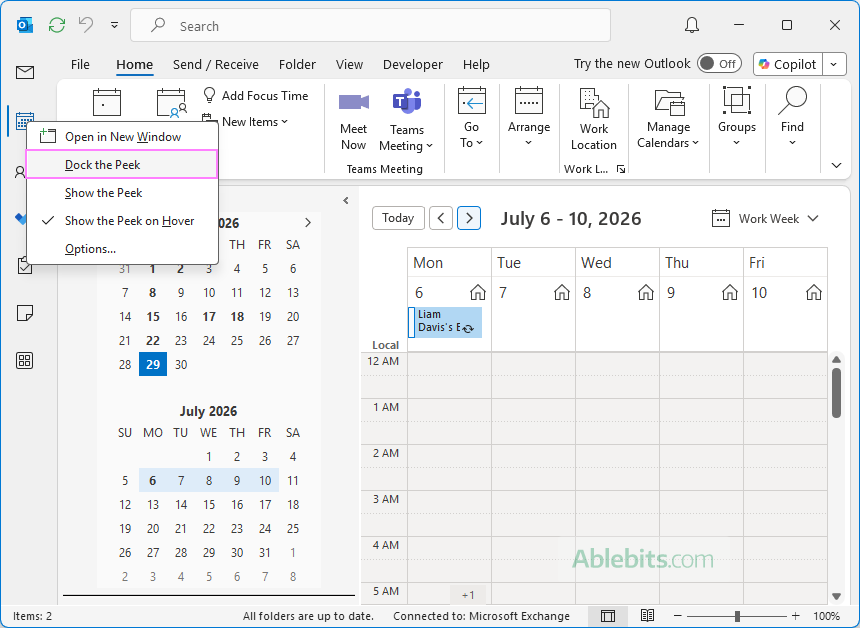
In classic Outlook, you can pin the calendar to the right side of the window by docking the Calendar Peek or turning on the Calendar tab of the To-Do Bar.
There are 2 ways to do this:
- Right-click the Calendar icon on the navigation bar, then select Dock the Peek.
- On the View tab, in the Layout group, click To-Do Bar > Calendar.
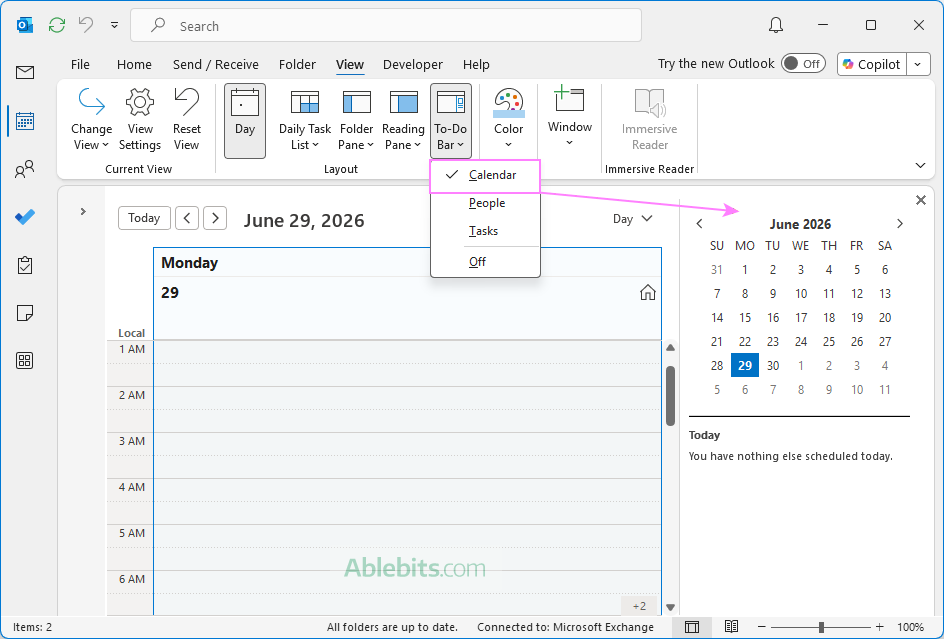
Either way, a calendar pane opens on the right side of the Outlook window. It shows a small monthly date picker at the top and your upcoming meetings and appointments below it.
To close the calendar pane, click the Close button (X) at the top of it.
In classic Outlook, this setting applies only to the current view. For example, if you dock the Calendar Peek in Mail and then switch to Tasks, the calendar pane does not appear there automatically. You'll need to turn on the Calendar pane separately in each view.
More options for customizing Outlook calendar views
You've already seen many ways to customize your calendar view, but Outlook has a few more tricks up its sleeve 😊
Customize Outlook calendar layout
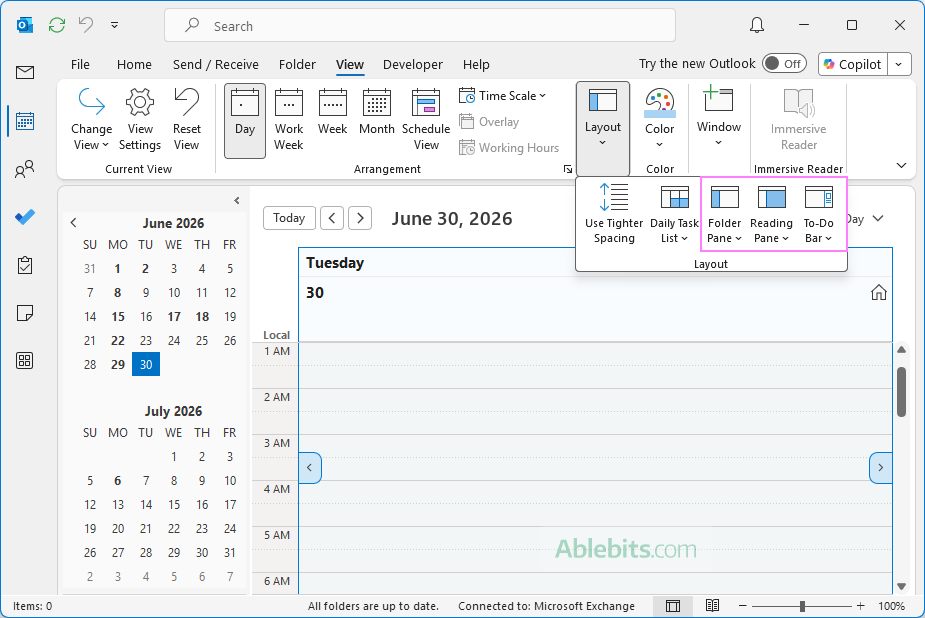
Classic Outlook (365 – 2016) lets you show or hide several interface elements to customize the calendar layout. On the View tab, in the Layout group, configure these settings:
- Folder Pane – show, minimize or hide the folder pane on the left to make more room for your calendar.
- Reading Pane – choose whether the Reading Pane appears on the right, at the bottom, or is turned off. While mainly used in Mail, you can also enable it in calendar views to preview meeting details without opening the event.
- To-Do Bar – display your upcoming appointments, tasks or favorite people in a pane on the right side of the Outlook window for quick access.
View multiple time zones
If you regularly work with colleagues or customers in different parts of the world, you can set up the Outlook calendar to display two or more time zones side by side.
To learn how it works, visit How to add multiple time zones to Outlook calendar.
Show tasks in the Outlook calendar
Outlook calendar can also display your tasks alongside your meetings and appointments, giving you a single place to keep track of both your schedule and your to-do list.
For detailed instructions, see How to add tasks to Outlook calendar.
As you've seen, Outlook gives you plenty of ways to organize your calendar. Which one is the best? Probably the one that lets you find your next meeting before it starts 😊 Luckily, switching views only takes a click or two, so you can always change your mind later.