In this article, we'll explore the maximum attachment size limits in Outlook and a few simple ways to work around them.
Email attachments are a convenient way to share files quickly, but size limits can get in the way, especially when you're sending large images, detailed reports, or presentation decks. Understanding these limits and knowing how to work around them can help you avoid errors and get your files where they need to go.
Outlook max attachment size limits
The default attachment size limit in Outlook depends on the version you're using and the type of email account connected.
- Outlook for Microsoft 365: The default maximum size is 35 MB per email (including attachments), which can be raised up to 150 MB by an administrator. For more details, see Outlook 365 message limits.
- Outlook 2024 – 2013: The default limit is 20 MB per email. Older versions like Outlook 2010 or 2007 may have smaller limits, typically 10 MB or less.
- Exchange accounts (on-premises or hybrid): The max attachment size is 10 MB.
- Outlook.com (free personal accounts): Supports attachments up to 25 MB.
- Outlook on the web (work or school accounts): Allows attachments up to 25 MB.
Additional notes:
- In most cases, the limit applies to the entire message, not just attachments. That includes signatures, formatting, and embedded images.
- Even if Outlook lets you send a large file, the recipient's mail server may reject it if their system has lower thresholds or their service provider doesn't support it.
- Message size can grow as it travels between servers. Encoding methods like Base64 or MIME (common when sending from on-prem Exchange to the cloud) can significantly enlarge the email. That's why size limits apply after encoding. Messages sent entirely within Microsoft 365 usually avoid this, so they tend to stay closer to the original size. Additionally, email size may grow slightly as each server along the route adds technical details (like timestamps and server info) to the message header.
What happens when Outlook attachment size limit is exceeded?
When you try to send an email with attachments that exceed the allowed size, Outlook stops the message from being sent and displays an error. The exact behavior depends on your version of Outlook and the type of account you're using.
- In desktop Outlook versions, you might be prompted to upload the file to a shared location and send a link instead of attaching the file directly.
- If you're using an Exchange or Microsoft 365 account, the message might fail due to server-side restrictions, even if Outlook itself doesn't warn you right away.
Examples of error messages you might see:
The file you're attaching is bigger than the server allows. Try putting the file in a shared location and sending a link instead.

The attachment size exceeds the allowable limit.
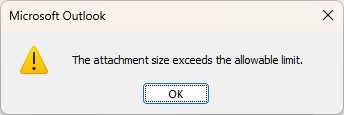
These messages appear as soon as you attach the file or when you try to send the email, depending on how your Outlook and server settings are configured.
How to increase attachment size limit in Outlook
If you're using the desktop version of Outlook 2024 – 2010, you can increase the attachment size limit by editing the Windows Registry.
Note. Be cautious when editing the registry, as mistakes can affect your system. Back up your registry first or consult IT support if needed.
Here are the steps to increase the max attachment size in Outlook:
- Close Outlook completely before making changes.
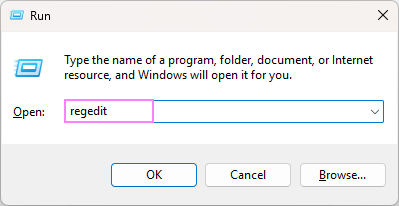
- Open the Registry Editor. Press Windows + R, type regedit, and press Enter.
-
Navigate to the following key. Depending on your Outlook version, go to one of these registry keys:
Outlook 365 / 2024 / 2021 / 2019 / 2016:
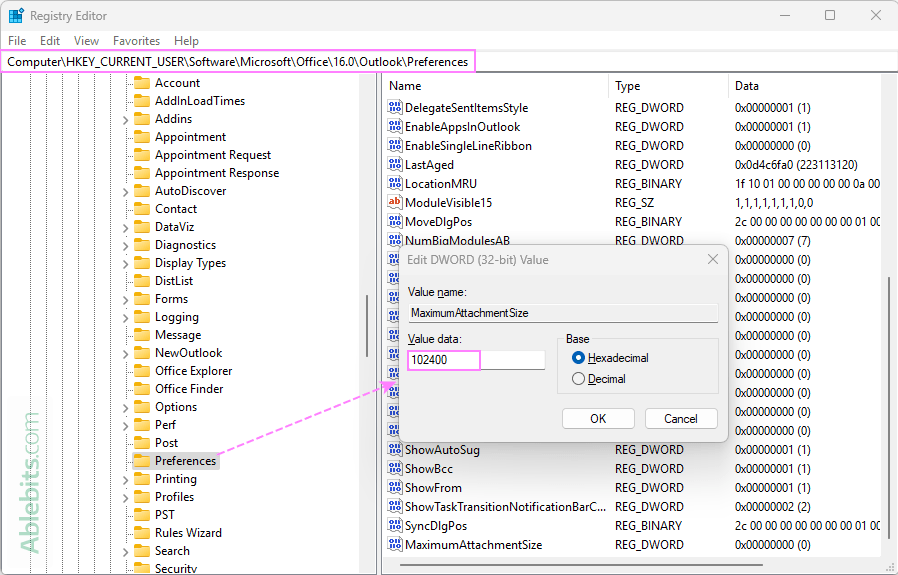
HKEY_CURRENT_USER\Software\Microsoft\Office\16.0\Outlook\Preferences
Outlook 2013:
HKEY_CURRENT_USER\Software\Microsoft\Office\15.0\Outlook\Preferences
Outlook 2010:
HKEY_CURRENT_USER\Software\Microsoft\Office\14.0\Outlook\Preferences
- Set MaximumAttachmentSize value. Look for a value named MaximumAttachmentSize:
- If it exists, double-click it and enter your new attachment size limit in kilobytes (KB). For example, you can enter 51200 for 50 MB or 102400 for 100 MB.
- If the value doesn't exist, create it in this way:
- Right-click on the Preferences folder.
- Select New > DWORD (32-bit) Value.
- Name it MaximumAttachmentSize.
- Double-click the newly created value, enter the desired limit in KB, then click OK.
- Close the Registry Editor. Once you've made your changes, close the editor.
- Reopen Outlook.
Outlook will now use the new size limit you set, assuming the server allows it.
Important note. This method raises Outlook's internal limit, but it doesn't override restrictions set by your mail server. If you're using a Microsoft 365 or Exchange account, you'll need to contact your IT department or administrator if you still can't send large attachments after this change.
How to increase attachment size in Outlook 365
In Outlook for Microsoft 365, attachment size limits are controlled by the mail server, not the Outlook app itself. This means only an administrator with access to the Microsoft 365 Admin Center can change them.
Default mail size limits in Outlook 365:
- Maximum send size - 35 MB
- Maximum receive size - 36 MB
If you try to send a message larger than these limits, Outlook will block it, and you'll likely receive a delivery failure notification.
Here's how you can increase the attachment size limit in Microsoft 365 (admin steps):
- Sign in to Microsoft 365 Admin Center. Go to admin.microsoft.com and log in with your admin credentials.
- Access Exchange Admin Center. In the left pane, click Show all and select Exchange.
- Select the mailbox(es). Go to Recipients > Mailboxes and choose the user mailbox or multiple mailboxes that you want to adjust the mail limit for.
- Change message size restrictions. In the top menu, click on Mailflow, then choose Message Size Restrictions.
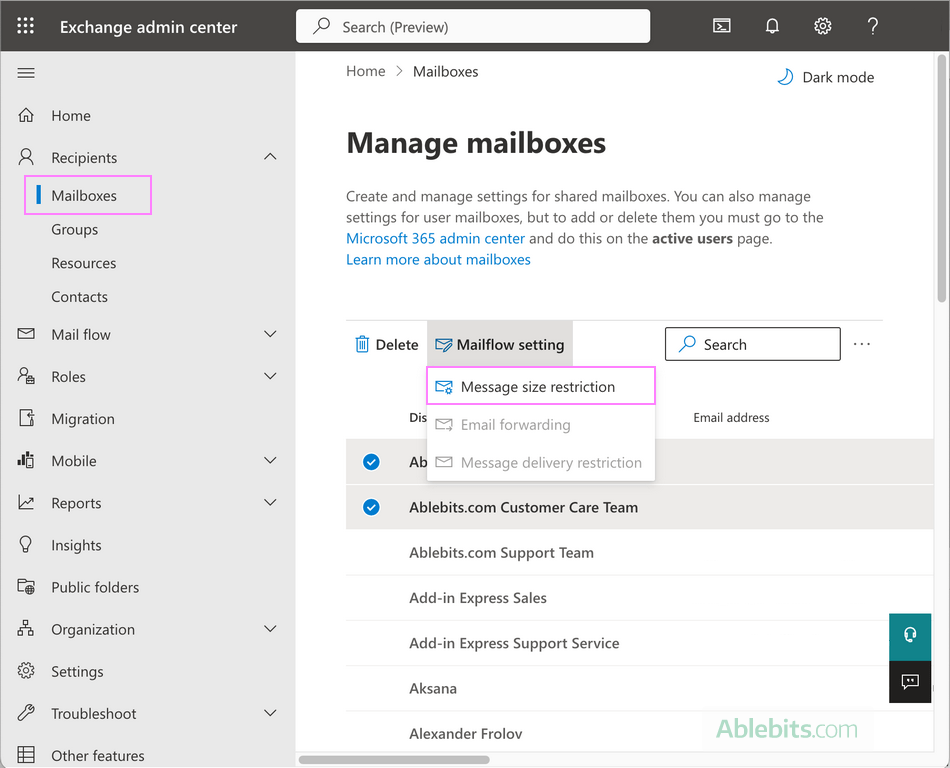
- Set the new size limits. In the panel that opens on the right, enter new values for Sent messages maximum size and Received messages maximum size. The input must be in kilobytes, with a permitted range between 0 and 153600 KB (150 MB). Values outside this range won't be accepted.

- Save your changes. Click Save to apply the new limits.
After updating the settings, users will be able to send and receive larger attachments internally (within your Office 365 environment) and externally (as long as the receiving server supports large messages too).
Notes:
- The size limit applies to the entire email, not just individual attachments. This includes the message body, embedded images, signatures, and all attached files combined.
- The recipient's mail server also needs to support large messages – if not, delivery may still fail even after raising the limit on your end.
How to change max file attachment size in Outlook Exchange
If you're using Outlook with an on-premises Exchange Server account, the email size limit is determined by the Exchange server. By default, the maximum message size is 10 MB, which includes the message body and all attachments.
The message size limit is controlled by the Exchange server’s Transport Settings properties. An administrator can raise it up to 150 MB by adjusting the Maximum send size and Maximum receive size values.
For full details, refer to Microsoft's official documentation on:
How to check maximum attachment size in Outlook
If you're unsure what your current attachment limit is, there are a few ways to check it depending on how your Outlook is configured. You can look up the settings that define how large your email attachments can be through the Windows Registry, admin portals, or PowerShell.
Check max attachment size in registry (for Outlook 2024 – 2010)
If you're using the Outlook desktop app on Windows, a specific value in the Windows Registry determines the threshold:
- Open the Registry Editor and navigate to:
HKEY_CURRENT_USER\Software\Microsoft\Office\{version}\Outlook\Preferences
- Look for a value named MaximumAttachmentSize:
- If it's missing, Outlook uses the default attachment limit (20 MB per email).
- If it's present, it defines the maximum attachment size in kilobytes.
Check max email size in Microsoft 365 Admin settings
If you're using Outlook with a Microsoft 365 subscription, attachment size is controlled at the server level. Admins can check limits in two main places:
- Message size restrictions. Check per-user mail limits in the Exchange Admin Center by opening Mailflow settings > Message Size Restrictions for a particular mailbox.
- Mail flow rules. Go to Microsoft 365 Admin Center > Show All > Exchange > Mail Flow > Rules. And look for any custom rules that might limit attachment or message size.
Check attachment limits in on-premises Exchange
For an on-premises Exchange Server, IT admins can check the server-wide message size limits using the Exchange Management Shell:
HKEY_CURRENT_USER\Software\Microsoft\Office\{version}\Outlook\Preferences MaximumAttachmentSize
This command returns the current maximum send and receive limits set on the server in KB.
Tip. If you're in a corporate environment and don't have admin access, ask your IT department for the specific attachment limit for your account. They can confirm whether any policies or rules are in place that might override the default settings.
How to reduce email attachment size in Outlook
If your file exceeds Outlook's attachment size limit, reducing the file size is often the simplest solution to avoid failed delivery errors. Here are a few effective ways to make your emails smaller before sending.
Use cloud storage for large files
Instead of attaching oversized files directly to your email, upload them to a cloud service like OneDrive, Dropbox, or Google Drive. Then, copy the shareable link and paste it into your message.
In Outlook 365, attaching a file from OneDrive gives you a choice to share a link or attach as copy.
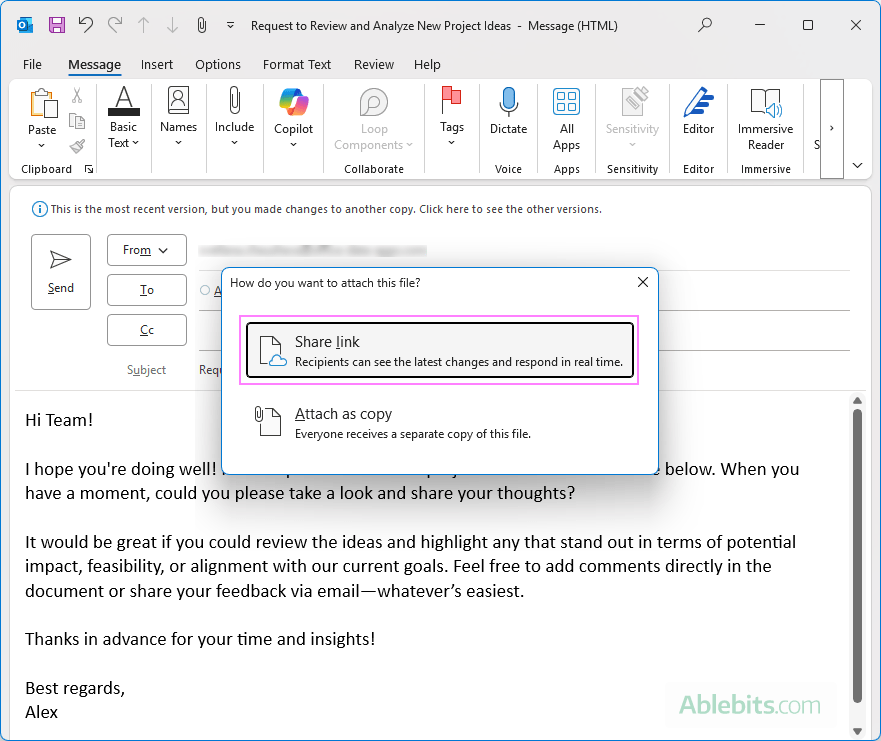
The new Outlook defaults to inserting a link for OneDrive files, which you can change to an attached copy if preferred.
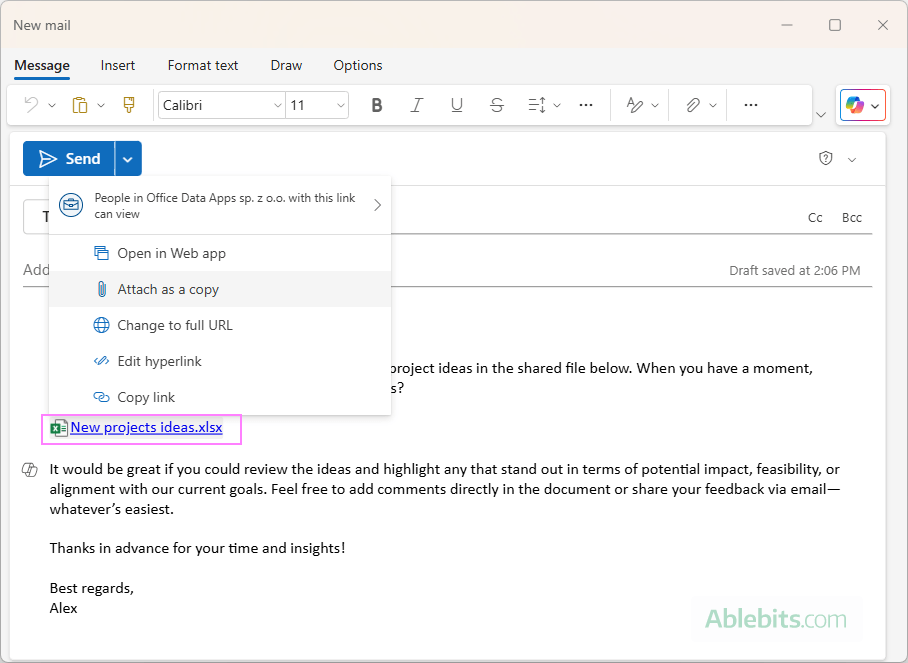
This method helps you stay within Outlook size limits and avoids sending bulky attachments. It also makes collaboration easier by ensuring everyone is working with the same file, rather than juggling multiple copies in different email threads.
Compress large files before sending
Zipping a file can reduce its size by about 20%; for text-based files, the reduction can be two to three times greater. It's a quick, straightforward way to shrink large documents or folders to fit within Outlook's attachment limits.
To compress a file, right-click it in File Explorer, select Compress to, and then choose ZIP file or a similar option.
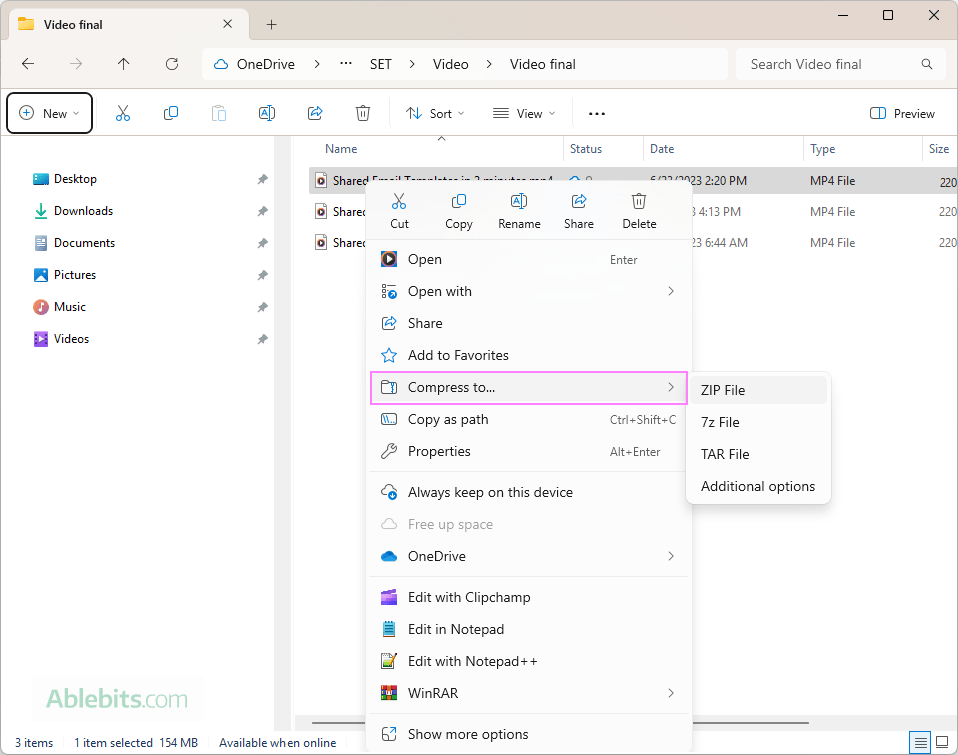
This creates a .zip version of the file, which you can attach to your email. It's an easy workaround that often solves the issue without needing to remove or resize content.
Resize large images before attaching
High-resolution images, especially from smartphones or digital cameras, can be several megabytes each and quickly push your email over the threshold. To reduce their size, open the image in an app like Paint or Photos, resize it to smaller dimensions, and save a new version for emailing.
Note. Resizing an embedded picture using the sizing handles or the Size option on the Outlook ribbon only changes how it appears in the message – it adjusts the display size, not the actual file size. This means the overall size of your email remains the same, and the it could still exceed Outlook's limits.
Reduce image size automatically (in classic Outlook)
To avoid email size issues when sending large image files, classic Outlook includes an option to automatically resize attached images before sending.
Here's how to use it:
- Attach one or more images to your email.
- Click File > Info.
- Under Image Attachments, check the option Resize large images when I send this message.
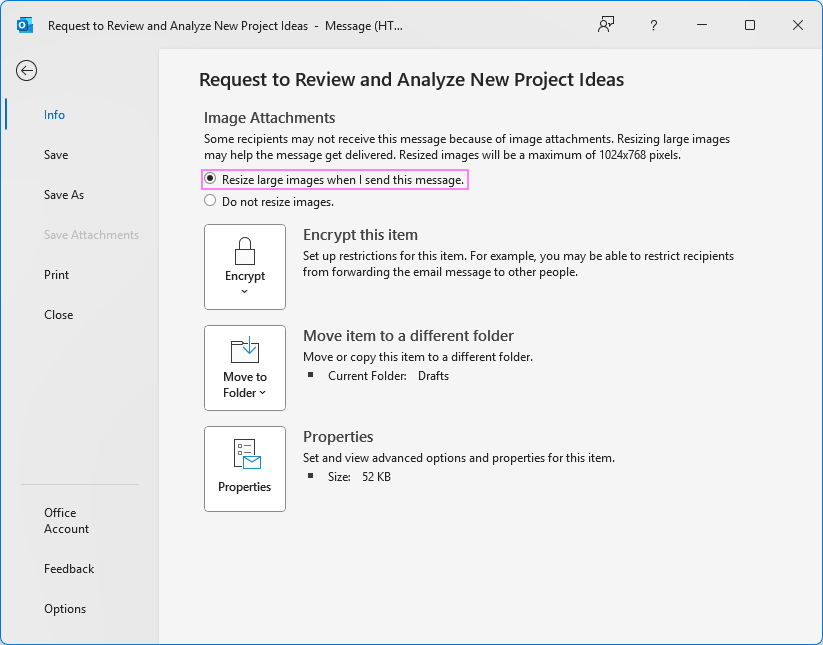
- Click the Back button to return to your message, then click Send.
Outlook will automatically reduce the image file size, helping you stay within the attachment limits without needing to edit the images manually.
Split large files into smaller pieces
If compression doesn't reduce the file size enough, another option is to split the file into smaller pieces using file splitting tools (like 7-Zip) and send each part in a separate email.
However, keep in mind that this method comes with several drawbacks:
- Splitting can sometimes affect the integrity of certain file types.
- It's time-consuming – you'll need to manually split, send, and track multiple messages.
- It puts extra work on the recipient, who must reassemble the files to access the content.
This approach is best used as a last resort when other options (such as cloud storage) aren't available.
Save files in more compact formats
Before attaching a file, consider converting it to a more size-efficient format. Here are a few examples:
- Save high-quality images in lighter formats like JPEG XL, AVIF, or WebP instead of heavier ones like TIFF, RAW, HEIC, or HEIF. These modern formats offer excellent visual quality at much smaller file sizes.
- Convert Word documents with many embedded images to PDF. Microsoft Word preserve images in their original size, while PDF shrinks them during export.
- Export your presentations to compressed formats or save them as PDF if no animations or interactivity are needed.
These format changes can significantly reduce file size without a major loss in quality when sharing visual or media-heavy content.
Remove unnecessary email content
Even small details in your message can add up:
- Delete old or irrelevant attachments from the email thread.
- Use smaller image files for logos or screenshots in your message body.
- Instead of embedding images directly, consider hosting them on an external service or cloud storage and inserting them as image links. This keeps your emails lighter and still visually consistent.
- Simplify your email signature if it contains large images, icons, or banners. These elements can add unexpected weight to every message you send.
Every bit helps keep the total size down, increasing the chance that your email goes through without hitting any limits.
Dealing with Outlook's attachment size limits can feel like a hassle. But with a few smart adjustments, you can keep your emails moving without a hitch. Pick what works best for you and send with confidence 😊
 by
by