In this guide you’ll learn how to create, edit, delete, and share your filters in Gmail. You’ll also discover how to manage your mailbox using filters: sort by unread status, filter by one or multiple senders, organize by date, and improve your spam filter as well.
Read this article to learn all the important information about Gmail filters and how they can help you stop wasting time manually sorting your inbox. Here you’ll find everything from creating your first rule to advanced tricks for managing spam, sorting by subject or sender, and sharing your automated setups. I hope you find this guide useful 🙂.
How to filter emails in Gmail
A filter in Gmail is a rule that automatically sorts your emails according to predefined criteria. Simply put, you set the parameters, such as keywords or particular email addresses, and tell Gmail what to do with messages if they match them.
For example, you can add a rule to automatically archive all your online purchases in a specially created for this purpose label. In this case, you’ll be able to find any information about your orders later without problems.
In fact, you can configure the whole network of different filters to avoid manual email sorting and increase your productivity at times 💫.
Create a filter in Gmail
But before we go there and create advanced organization of your inbox, we need to learn how to create a filter. In Gmail, there are three main ways to set up a rule.
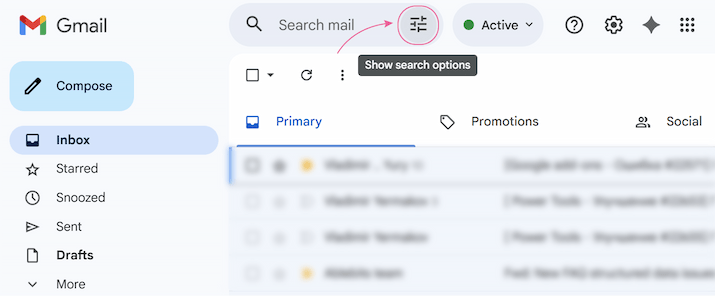
Way 1: Use the search bar
Adding a filter with the Search bar is the most straightforward method:
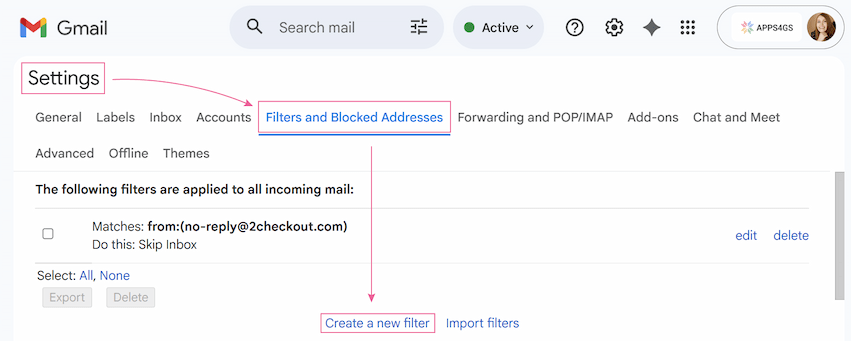
Way 2: Set up a filter in Gmail settings
You can also add a filter from your settings. It’s the best place to go if you want to edit, delete, or create new filters all in one place. To do so, follow these steps:
Way 3: Add a rule from an existing email
Setting the filter from an existing email is the fastest way to create a filter for a certain sender:
- Open an email from that sender.
- Click the three-dot icon on the right side.
- Select Filter messages like these.
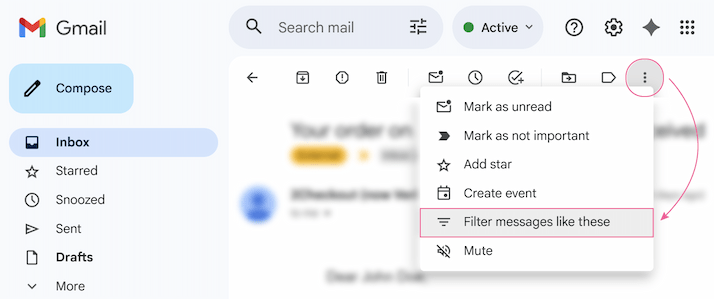
- The pop-up with criteria settings will appear as before, but in this case, the From field will be automatically filled with the sender's address.
- The following steps are the same: define the action and click Create filter.
Gmail filter settings
With any of the three ways, to create a rule, you must set the conditions and select the action. Let's examine those conditions and actions in more detail.
Filter criteria
When you make a filter, you first have to set the conditions. These tell Gmail what to look for in an email.
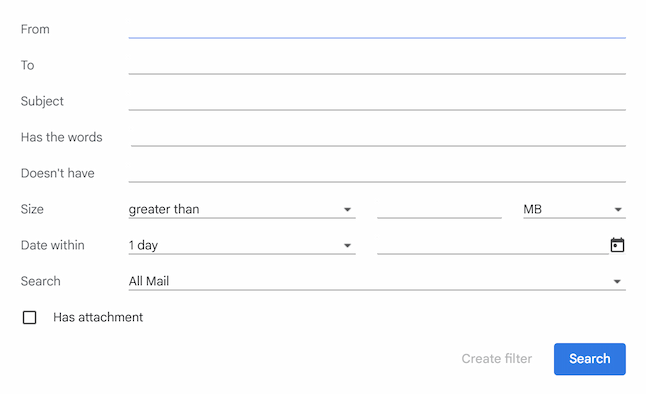
Let’s have a closer look at each of the condition fields:
- From: With this criterion, you can set up a filter for certain senders or even entire domains.
- To: With this field, you can add a filter according to the recipient's email address.
- Subject: Here you can specify keywords or phrases for the subject line.
- Has the words: Whatever you enter here will be searched in the message body - a word, phrase, or sentence.
- Doesn't have: In this field, you can write specific words to exclude messages that may contain them. It’s a perfect option to narrow down a broad filter.
- Size: Use this condition to find emails larger or smaller than a specific size.
- Date within: Here you can indicate a time frame.
Note: If you fill out this field, the Create filter button will be disabled. This happens because filters only run on new incoming messages, while this criterion is for searching your existing mail.
- Search: This isn't a criteria field for filters, but a dropdown menu that tells Gmail where to look.
- Has attachment: A checkbox to sort out all emails that contain at least one attached file.
You can specify only one criterion or several depending on your needs.
Tip: Try to combine multiple criteria to prevent important emails from being mistakenly archived or deleted.
Note: When you use multiple fields, such as From and Subject, Gmail automatically treats it as the email must match ALL indicated criteria.
Moreover, you can even use special characters within a field for more precise results:
- (): Group terms together, just like in mathematics.
- OR or { }: Broaden the rule to filter emails that match at least one of your listed criteria.
For example:- From:(email_address@company.com OR another_address@company.com) to filter emails from the first or the second address.
- From:{email_address@company.com another_address@company.com} - this does the exact same thing as the OR example, just with less typing.
- " ": Filter for emails with an exact word or phrase.
For example: Has words:"new update" to filter only emails that contain this precise wording "new update". - -: Create a Gmail filter that does not include certain senders or keywords.
For example: From:amazon.com -order_update@amazon.com to filter emails from Amazon, except those from the order update address.
Once all conditions are identified, it’s time to set actions for messages that meet them 👉.
Filter actions
After the first time you click Create filter, a new pop-up with listed actions will appear. These actions tell Gmail what to do with any email that matches your criteria.
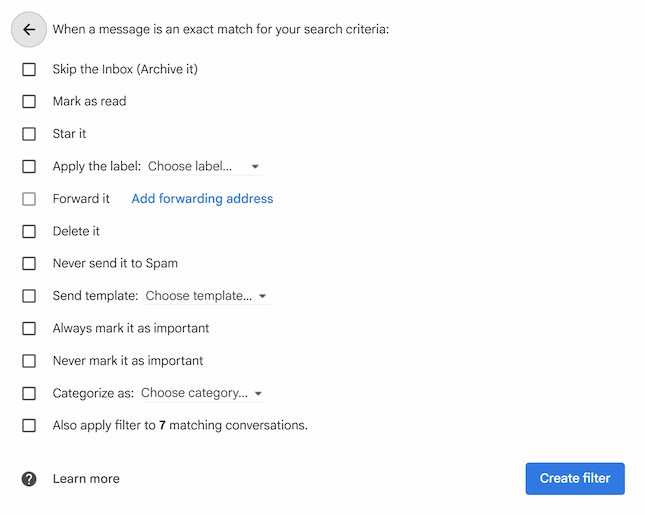
Let’s analyze them separately:
- Skip the Inbox (Archive it): If you select this action, the messages that match the criteria will bypass your main inbox automatically. But don’t worry, they aren’t deleted, just filed away in All Mail.
- Mark as read: Select this action to flag all filtered messages as "read" as soon as they are received.
- Star it: Automatically adds a star to the email. Why use it? Find the answer in this article.
- Apply the label: When you choose this action, it automatically applies a selected label to the emails.
- Forward it: This action sends a copy to another email address.
Note: You must first add and verify the email address you want to forward to. Use the Add forwarding address button right in the filter settings.
- Delete it: If you select this action, all the emails that match the criteria will go directly to the Trash.
Note: Emails in the Trash are permanently deleted after 30 days.
- Never send it to Spam: This action ensures that your messages are never accidentally filtered as spam.
- Send template: With this action, when an email arrives, it will be automatically replied to with one of your saved Gmail templates.
Note: You must enable templates in your Gmail settings first. Learn how in this article.
- Always mark it as important: Use it to add an "important" marker to the emails and help train Gmail to recognize what matters to you.
- Never mark it as important: As the opposite of the above action, this stops Gmail from automatically marking the email as important.
- Categorize as: Forces the email into one of your main inbox tabs, like Primary or Promotions.
- Also apply filter to N matching conversations: After you've set your conditions and actions, this checkbox allows you to run your new filter on all the existing emails in your mailbox that match the criteria.
As with the criteria, you can select several actions at once. The main principle when choosing several actions is that they do not contradict each other ☝️.
How Gmail filters work
When I was writing this article, I checked the Gmail documentation to understand how filters work: what Gmail does when there are conflicts between filters, and whether there is a specific order in which Gmail filters are applied. Unfortunately, there are no user guides other than some rather vague answers on support.google.com.
So I tried to work out some kind of sequence through trial and error. And... I didn't find any strict sequence 🥲. But no matter – I have some conclusions for you, dear reader!
When an email matches multiple filters, Gmail runs all the filters that match an incoming email, not just the first one. The order of your filters in the settings list generally doesn't matter.
For example, I added two filters with the same criteria. The first filter was set to delete such messages and the second filter was set to forward them automatically. And it didn’t matter in what order these filters were arranged; in both cases, messages were forwarded and then sent to the Trash folder.
However, when I was combining actions within a single filter, I encountered an issue. I checked both actions: Delete it and Send template (Delete it is listed first in the filter action pop-up). As a result, the filter deleted the email first, and the Send template action failed because the email was already gone. In this case, I recommend creating two separate filters to process the emails correctly.
The bottom line is that while Gmail processes separate filters easily, it follows a hidden internal logic for actions. It is always better to test complex combinations first to make sure they work as expected before leaving them to run on autopilot.
How to remove or edit a filter in Gmail
Everything doesn't work the first time, and you may need to edit or delete the filter you made to find the perfect solution for you.
To remove a filter, follow these steps:
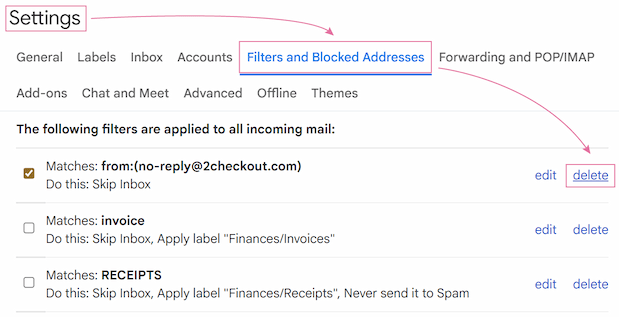
- Go to Settings > See all settings.
- Open the Filters and Blocked Addresses tab.
- Find your target filter. There will be hints with two parameters: Matches (your criteria) and Do this (selected actions).
- Click Delete and confirm the deletion.
To edit your existing filters, the steps are almost the same:
- Go to Settings > See all settings > Filters and Blocked Addresses.
- Find the needed filter and click Edit.
- Your filter settings will appear in the pop-up window. Change your criteria (if needed) and click Continue.
- The action window will open next. Make all the necessary changes and click Update filter.
How to share Gmail filter: Export & Import
There is no Share button for filters in Gmail, but you can easily Export and Import them.
To Export your filter settings, you’ll need to:
- Go to Settings > See all settings.
- On the Filters and Blocked Addresses tab, click the checkbox next to the filter you want to share.
- Click Export.
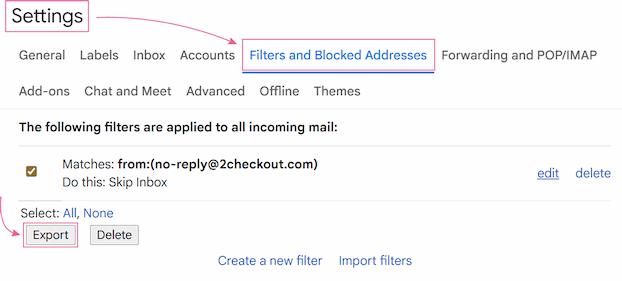
A file with your filter rules will be saved to your computer, so you can send it to anyone.
To Import the rule, you’ll need to:
- Go to Settings > See all settings > Filters and Blocked Addresses.
- Click Import filters.
- A new section Import Filters will appear. Click Choose File and select the previously saved filter.
- After uploading press Open File > Create Filters.
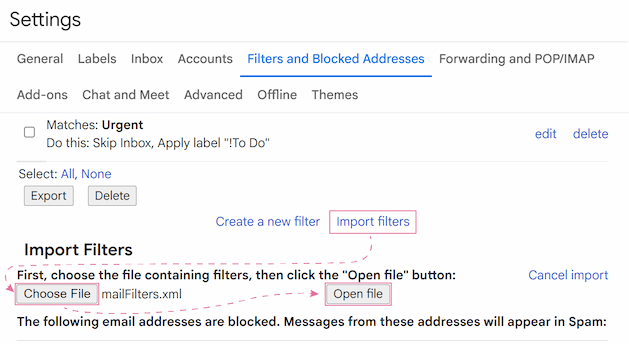
That’s it! Now your rules can be applied by another person.
Best practices with Gmail filters: use cases
Well, we've learned how to create, edit, and delete filters. But why all this fuss with filters? 🤷♀️
If you use your mailbox quite often, and in the modern digital world it’s most likely, checking your inbox may take a lot of time. Here is where filters can really help you out! In the section below I’ll describe the most useful cases.
How to filter unread emails in Gmail
If you just need a one-time search, all you have to do is type is:unread in the Search bar.
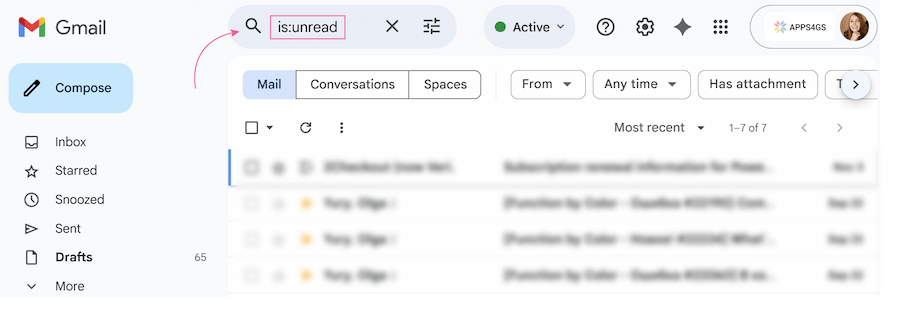
You can add any other operators to narrow down your search, for example, you can type is:unread from: John in:inbox to search only for incoming unread emails from John.
But in fact, there are more options to filter your incoming unread emails without manual work.
You can customize your inbox setting to show you unread email first, to do so you’ll need to:
- Go to Settings > See all settings.
- Open the Inbox tab and find the Inbox type section.
- Click on the dropdown and select Unread first.
- Confirm changes by clicking Save Changes at the bottom of the setting page.
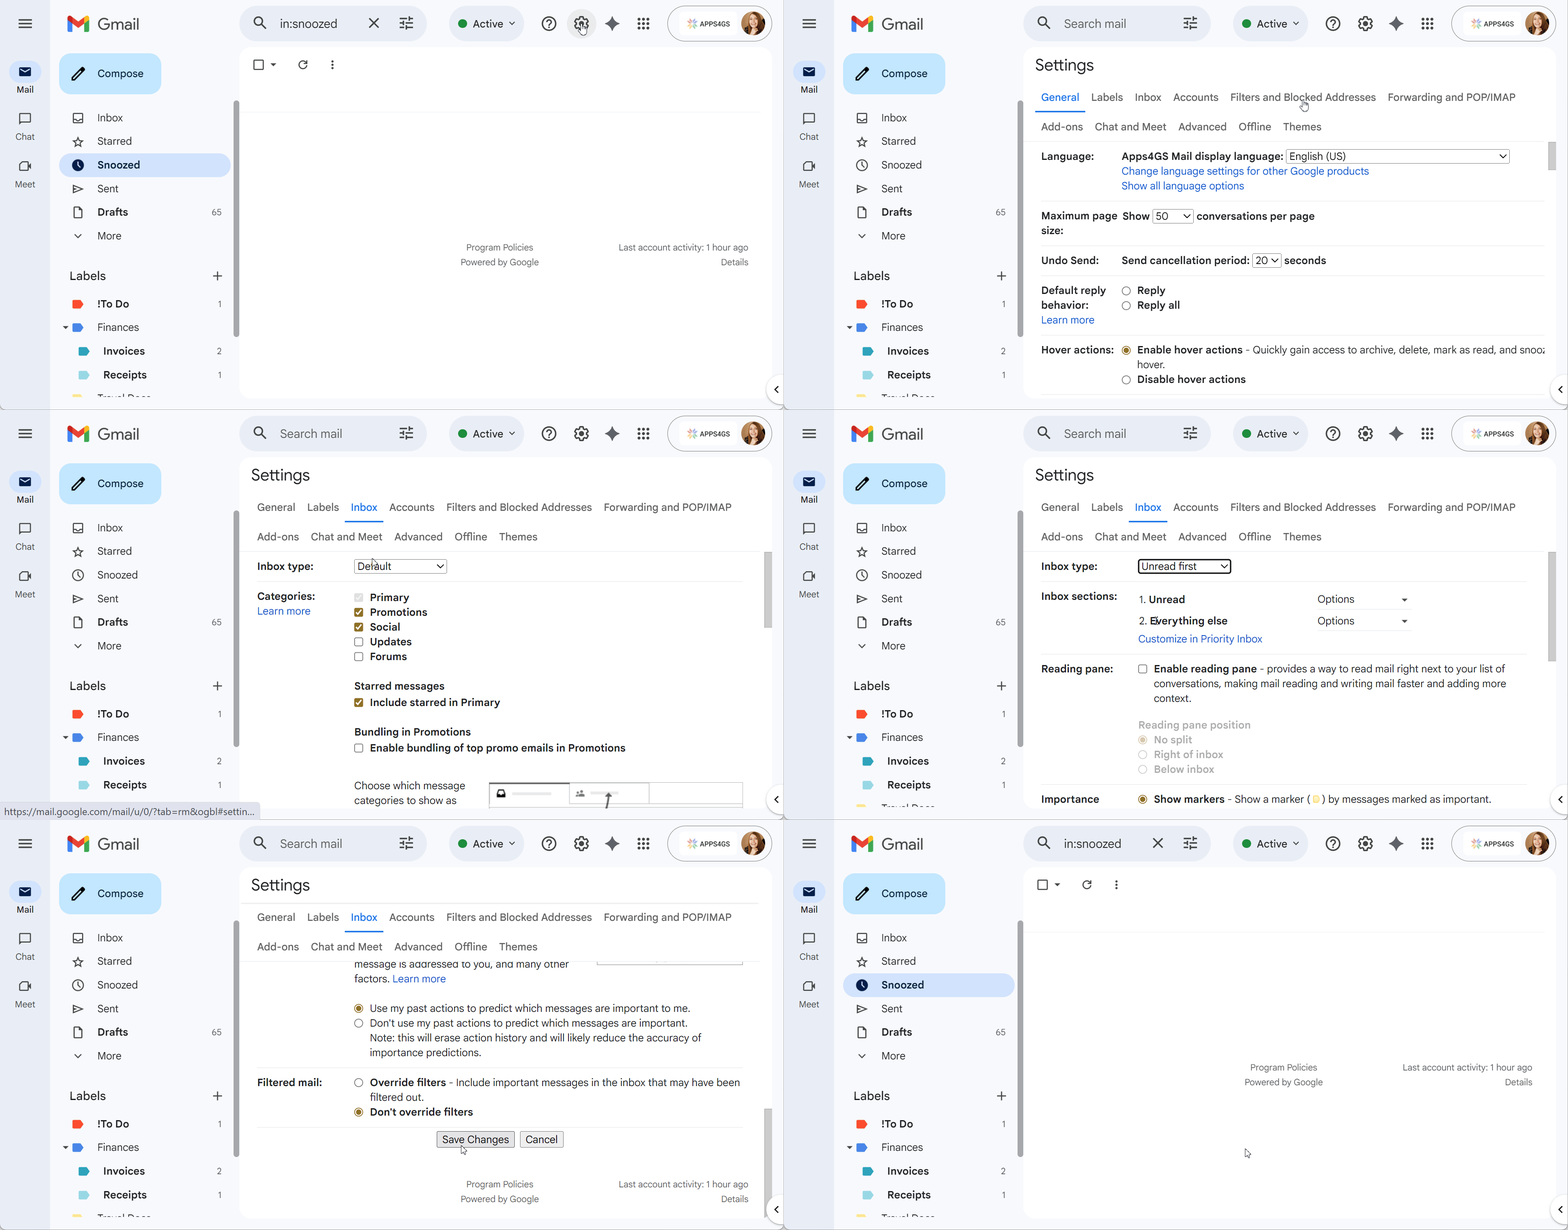
From now on all unread emails will be on the top of your inbox.
Why you can't automatically label unread emails (and what to do instead)
Unfortunately, there is no option to create a folder in Gmail that automatically collects all your unread emails. That happens because "Unread" is a temporary state, not a fixed criterion which you can add to the filter.
You might find other articles claiming you can create such a folder, but this is only partially true. Even though you could create a filter that applies an "Unread" label to all new messages, filters need a trigger. There’s only one trigger for filters in Gmail - an incoming message. Reading an email isn't a trigger, so Gmail has no way to automatically remove that label once you've read the email. And very soon, your "Unread" folder would just become a folder filled with all kinds of different emails, both read and unread.
But who's stopping us from creating a button to automatically filter unread messages as you click it? No one 😎!
To create an easy access to unread messages, follow these instructions:
- Go to Gmail, type is:unread in the Search bar and press Enter.
- After the search, your browser’s address bar will show a new URL with an ending like #search/is%3Aunread.
- Click the star icon in the address bar (or any other Bookmark button your browser uses).

- In the pop-up, give a name to your bookmark such as Unread Mail or any other.
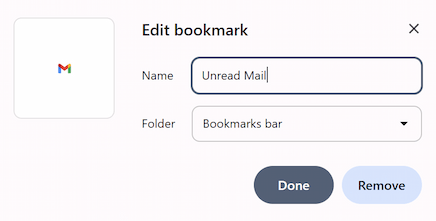
- Save it to your Bookmarks bar.
Whenever you need to check your unread messages just click this bookmark!

How to manage Gmail spam filter
The spam filter in Gmail runs automatically and you can’t just turn it off. But you can train it to your liking.
To customize the spam filter, you can use several different options.
Option 1: Report spam
Whenever you receive a spam message, flag it as Spam:
- Open the email you want the filter to recognize as Spam.
- Click the Report spam button.

- Your email will be moved to a Spam folder and in the future Gmail will sort out such emails to Spam automatically.
Option 2: Mark good emails as not spam
If Gmail automatic filters fail and accidentally send a good email to Spam, retrain them:
- Go to a Spam folder and open the email.
- Click the Report not spam button.

- Your email will be returned to the inbox and Gmail will know that this type of email shouldn’t be marked as Spam.
Option 3: Set filter to never send specific emails to Spam
To make sure that certain messages will never land in Spam, create a special filter:
- Open Gmail filter creation settings using any of the ways from the previous chapter.
- Type the most precise criteria for such emails.
- On the action pop-up, check the Never send it to Spam box.
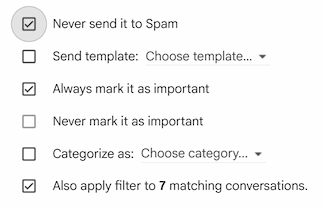
Note: You can also check Always mark it as important to organize it.
- Click Create filter.
That way you can organize a whole "whitelist" of specific emails and train your Gmail spam filter to your needs. Moreover, you can even automate priority in Gmail, learn how in this article.
How to filter by a single sender or multiple email addresses
This is the easiest filter to set up. If you need to create a filter for just one sender, add a filter from an existing email.
To create a filter for several different people, you’ll need to use an operator:
- Open the Create filter pop-up using whichever method from the previous section you prefer.
- In the From: field, type the target email addresses, separating them with the word OR.
Example: From:(angrboda@jotunheim.com OR freya@vanaheim.com OR odin@asgard.com). - Click Create filter.
After setting the criteria according to email addresses, you can apply any action to these emails.
How to filter by an entire domain
You can also filter all emails from a specific company or domain:
- Open the Create filter pop-up.
- In the From: field, just type the domain name starting with the @ symbol.
Example: @jotunheim.com - Click Create filter.
This will catch every email from that domain (e.g., loki@jotunheim.com, angrboda@jotunheim.com, etc.). Just apply an action, and your new filter will be set!
How to filter emails by subject in Gmail
Sometimes you need to organize your emails by a specific topic (maybe you’re working on the project and want to sort all emails about the theme in one folder) or automatically file routine messages such as "Invoices".
To filter Gmail by subject contains, you'll need to:
- Open the Create filter pop-up with the criteria list.
- In the Subject field, type the keyword or phrase you want to filter.
Tip: Use quotes to filter for the exact phrase.
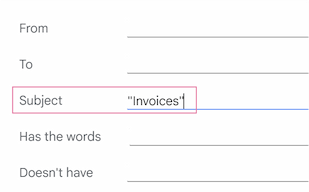
- And from here you can choose to sort out existing messages or create a filter to work with incoming emails:
- To find old mail: Click the Search button to see all existing emails with that subject.
- To filter new mail: Click Create filter. Then choose your actions (like Apply the label: "Invoices" or Skip the Inbox) and click Create filter again.
How to filter by date
In Gmail you can’t create a filter for incoming messages based on a future date 😞. However, you can search by date to find existing emails and then take action on them.
Use simple search operators:
- after:YYYY/MM/DD to find emails that arrived after a specific date.
- before:YYYY/MM/DD to sort out all emails before a specific date.
- older_than: or newer_than: to search emails based on a given time frame.
This way you can even filter Gmail emails to a particular year!
For example, to filter all emails from 2024 you should do the following:
- Go to Gmail.
- Type after:2024/01/01 before:2025/01/01 in the Search bar.
- Press Enter.
The next step is to take an action on them if needed:
- After the date search select all the filtered messages: click the Select checkbox at the top-left.
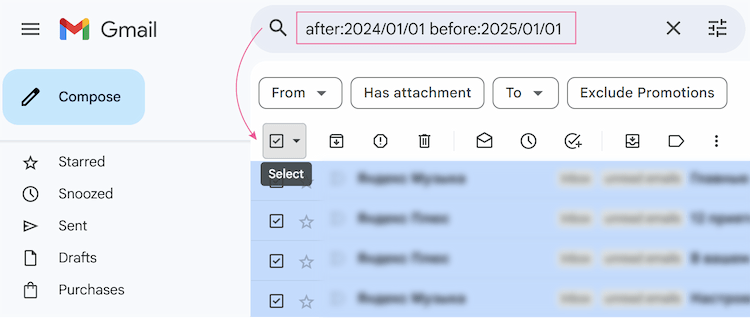
- Click one of the buttons at the top to apply an action to all of them at once.
How to filter emails by attachment size in Gmail
This is less of a filter for new mail and more of a "search and destroy" mission for old, large emails to free up space in your mailbox.
- Open the Create filter pop-up with criteria list.
- Check the box for Has attachment.
- In the Size field, choose greater than and enter a size (like 10 MB).
- Click the Search button (don't click Create filter as we are working with existing emails, not new).

Gmail will now show you every existing email in your account with an attachment larger than 10 MB. You can select them all and delete them to instantly reclaim space in your Google account.
How to create forwarding rule in Gmail
A forwarding rule automatically sends incoming emails that match your criteria to another email address. This can be extremely handy for sending receipts to your accountant or project updates to a colleague, for example.
To create an auto-forward filter in Gmail, follow these steps:
- Open your Create filter settings, set the conditions for the emails you want to redirect, and click Create filter.
- On the action list, check the Forward it to: box and choose the recipient from the dropdown list.

Note: You must verify the address first, or this list will be empty.
- Click Create filter again.
Gmail will now automatically forward every matching message to the chosen recipient.
How to automatically archive emails in Gmail
The best way to use the archive filter in Gmail is to set up autoarchiving.
Why can it be useful? The main point is to keep your inbox clean. You can create a filter so that all your flight tickets and hotel booking confirmations skip your inbox and are archived directly. This way, they don't clutter your daily view, but you can easily find them later when it's time to travel.
How to set up an auto-archive filter:
- Start creating a filter for the emails you want to archive (e.g., in the Has the words: field, type "booking confirmation").
- Click Create filter.
- On the action list, check the box for Skip the Inbox (Archive it).
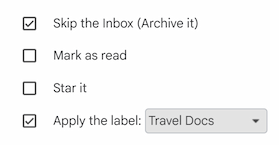
Tip: You can also check Apply the label: (e.g., "Travel Docs") so you’ll be able to easily find these emails later.
- Click Create filter again.
Tip: Learn how to find archived emails in this article.
Use filters to auto-label incoming emails
Better yet, we can go ahead and create separate "folders" for different emails and set Gmail to sort your emails there automatically!
More precisely, labels, as there are no folders in Gmail, but they act almost like folders. The main difference is that you can apply multiple labels to one email, which is handier when working with emails - one email can be both urgent and related to "Finances", for example.
The main key to automatically apply a label to emails is to check the Apply the label: box on the action list of the filter settings. That way, any incoming message that matches your filter will automatically get the label you chose, keeping your inbox perfectly organized.
We have a dedicated guide on how to set it up: create, color-code, and automatically apply Gmail labels. Check it out to build the perfect filing system!
You're now equipped to turn that chaotic inbox into a perfectly organized, automated machine. I hope this guide helps you save a ton of time and makes your email just a little less stressful ☺️.
FAQ
How to disable spam filters in Gmail?
Unfortunately, spam filters are a built-in feature in Gmail and you can’t just turn it off. However, if you think that the filters are too aggressive and you're missing important emails, you can retrain them and create a whitelist.
Where to find the Gmail filter editor?
Go to Gmail > Settings > See all settings > Filters and Blocked Addresses. Here you will be able to create, edit, delete, export, and import your filters.
How to filter emails to folders?
There is no such thing as folders in Gmail. But you can set your filter to apply a label instead (they act like folders in Gmail).
How do I apply a new filter to all my old, existing emails?
After you define your filter criteria, you will see a list of actions. At the very bottom of that list there is a box that says: Also apply filter to N matching conversations. Check this box to sort out your past emails that match the rule.
Why is my filter not working?
There are a few common reasons. It may be a typo, like a misspelled email or keyword. Sometimes the reason is a wrong field, when you put an email in the Has the words: field instead of the From:. Or you may have another filter that contradicts it. To monitor these reasons, go to Gmail > Settings > See all settings > Filters and Blocked Addresses and double-check your filters.
 by
by 