In this guide, you'll learn how to change Outlook views, create your own custom layouts, and reset everything back to default.
When you feel uncomfortable in your home, you renovate and redesign it to make it more pleasant for living. When you feel overwhelmed or limited in Outlook, you can change its default view to make it more convenient for your work. Outlook gives you plenty of flexibility to arrange emails, calendar, and tasks however you like, so everything feels easy and natural to use.
Note. This tutorial covers classic Outlook for Windows, not the new Outlook.
What are the different Outlook views?
Outlook comes with a few inbuilt views you can switch between, each changing the way your emails, tasks, and calendar events appear on screen. You can also create custom views tailored to your needs within each module.
Outlook views are folder-specific, so you can apply different settings to different folders.
Email views
For email items, Microsoft Outlook provides three ready-to-use views you can switch to right away:
- Compact view (default) – Shows a list of emails with essential details (sender, subject, and received time) and the Reading pane.
- Single view – Displays each message in one line and also shows the Reading pane.
- Preview view – Shows only a message list without the Reading pane.
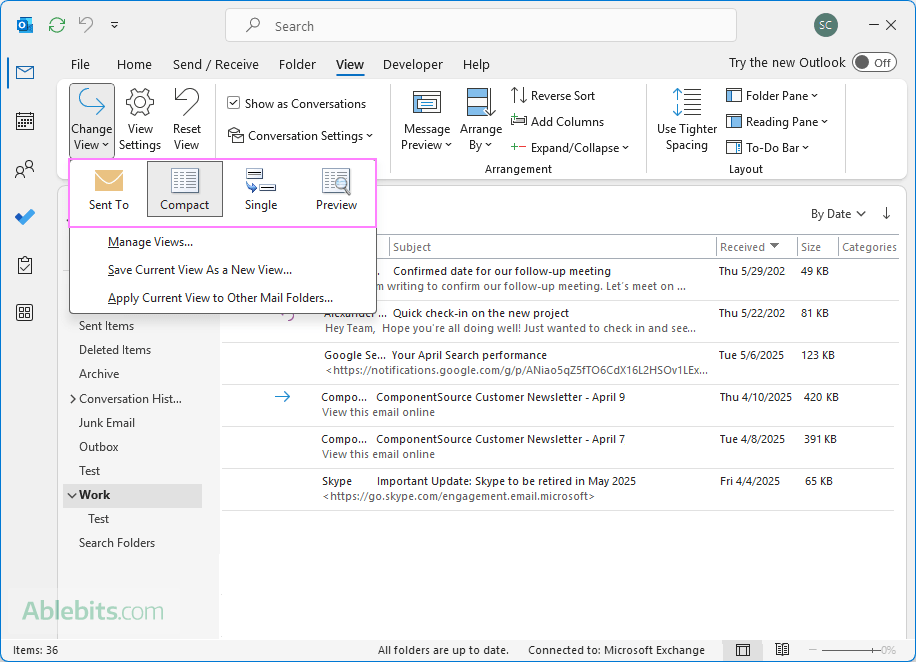
Technically, there isn't much difference between these views in the current version of Outlook, except showing or hiding the Reading pane, which you can do yourself with just a couple of clicks.
Calendar views
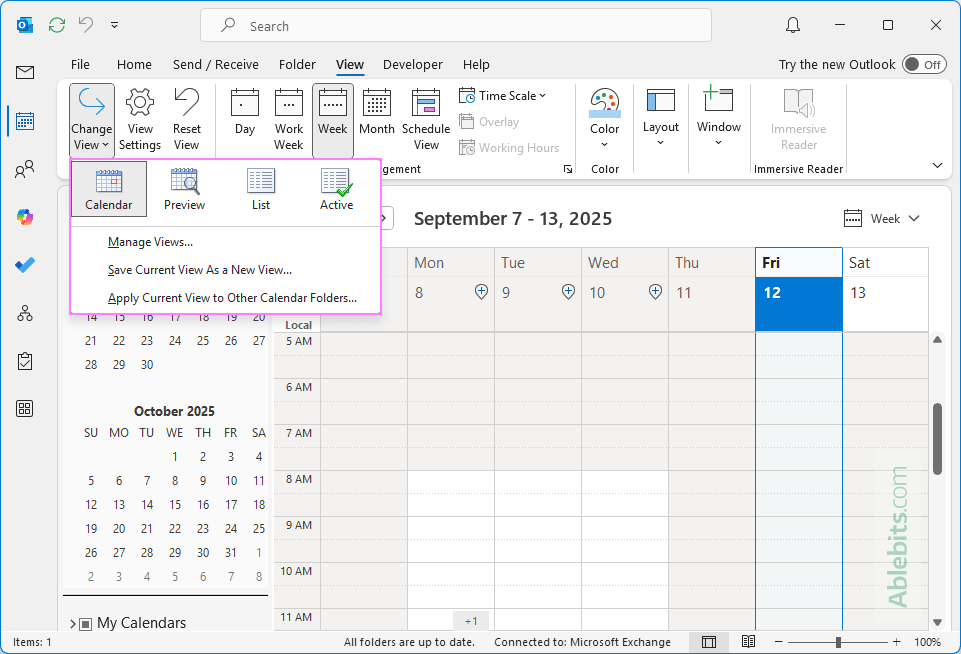
Outlook offers several ways to look at your calendar depending on how much detail you need. Preview, List, and Active views let you decide which items to display (all events or only active ones) and how to present them (in a calendar format or as a list). Additionally, the Day, Week, Work Week, and Month layouts help you quickly switch between detailed scheduling and big-picture planning.
Task views
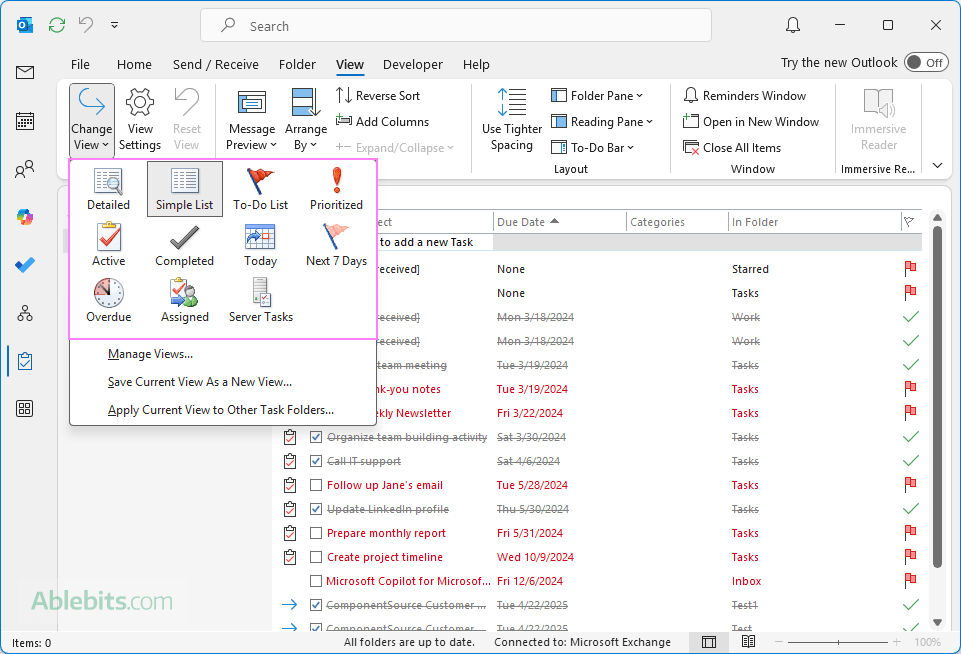
Tasks in Outlook can be presented as a simple, detailed or to-do list; grouped by priority, or filtered by categories such as active, completed, overdue, or assigned. You can also focus on tasks due today, within the next 7 days, or server-based tasks.
People (Contact) views
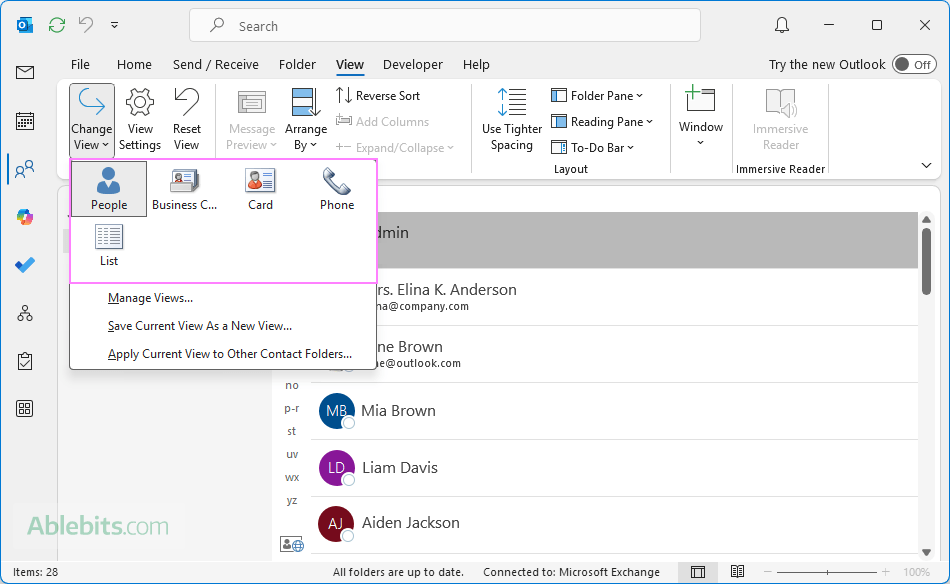
For contacts, Outlook provides several display options. You can stick with the default simple list of people, switch to a phone or detailed list, or choose a card view to see more visual information about each contact.
Why change your Outlook view?
Over time, your Outlook space can start to feel cluttered or hard to scan. Customizing the view can help create a more comfortable reading layout and spot important information quickly.
Besides switching between the built-in views, you can also fine-tune each one to your liking. Here are some common adjustments you might find useful:
- Columns in the message list – add or remove details like message size, categories, or flags.
- Message preview – choose how many lines of email content to show beneath the subject in the message list.
- Email sorting – arrange messages by date, sender, or subject.
- Reading (Preview) pane – position it on the right, at the bottom, or turn it off completely.
With these options, you can transform Outlook into a space that feels more intuitive to use. Below, we will look at each feature in more detail.
How to change (switch) Outlook views
Switching between different views in Outlook only takes a few clicks:
- In your Outlook app, go to the module you want to adjust – Mail, Calendar, People, or Tasks.
- On to the View tab, in the Current View group, click Change View.
- From the list of available options, pick your preferred view.
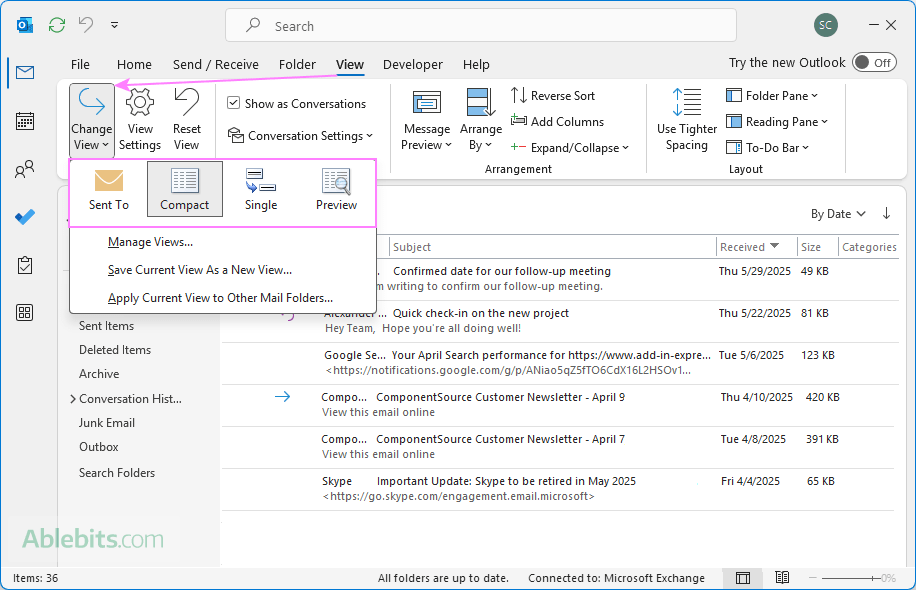
And that's it – your emails or other items will instantly appear in the new layout.
How to change Outlook view to your liking
The real strength of Outlook is that you are not limited to the predefined arrangements. You can customize them further to match your own preferences and workflow.
Add or remove columns to Outlook view
Sometimes the message list in Outlook shows information you don't really need, while leaving out details that would be more useful. In this case, you can remove irrelevant columns or add the ones important to you.
To manage the columns in the current view, follow these steps:
- Select the folder where you want to change the view, e.g. Inbox.
- Go to the View tab on the ribbon, and then either:
- In the Arrangement group, click Add Columns, or
- In the Current View group, click View Settings, then select Columns.
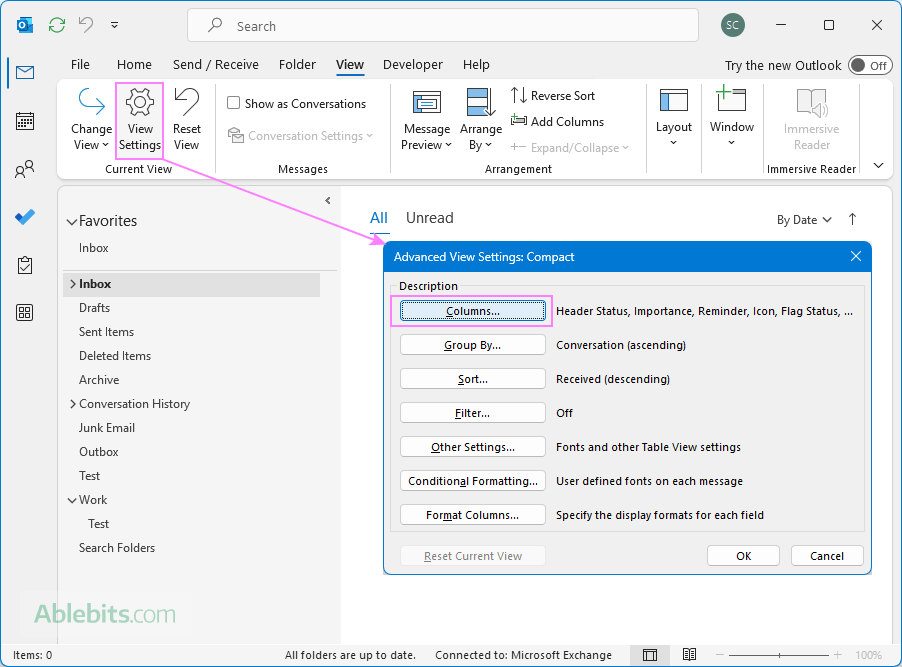
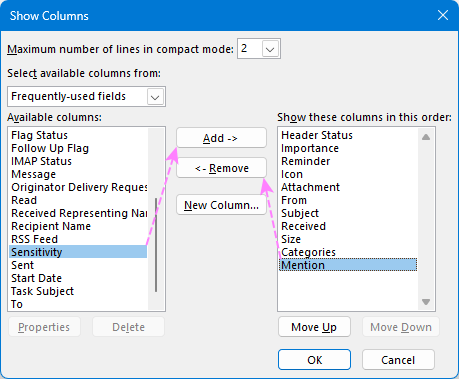
- In the Show Columns window that opens:
- To add a column, choose a name from the Available columns list on the left, then click Add.
- To remove a column, select it from the list on the right, then click Remove.
- To create a custom column, click the New Column button, enter a name, and choose the type and format of information you'd like it to display.
- Click OK to save your customization to the current Outlook view.
Tips:
- If you do not see the desired field under Available columns, use the Select available columns from drop-down at the top. This lets you choose from additional sets of columns beyond the default Frequently-used fields.
- You can also remove a column directly from the message list – just right-click the column header and choose Remove This Column from the context menu.
Reorder columns in Outlook view
By reordering columns, you can set up your email view so that the details you care about are always front and center. For example, you might want the Subject column to appear before From or bring Received closer to the left.
There are two ways to change the order of columns in Outlook: directly in the list view or through a special dialog.
Method 1: Rearrange columns by dragging
- Point to the header of the column you'd like to move.
- Click and hold, then drag the black rectangle left or right.
- Release the mouse when the column is in its new position.
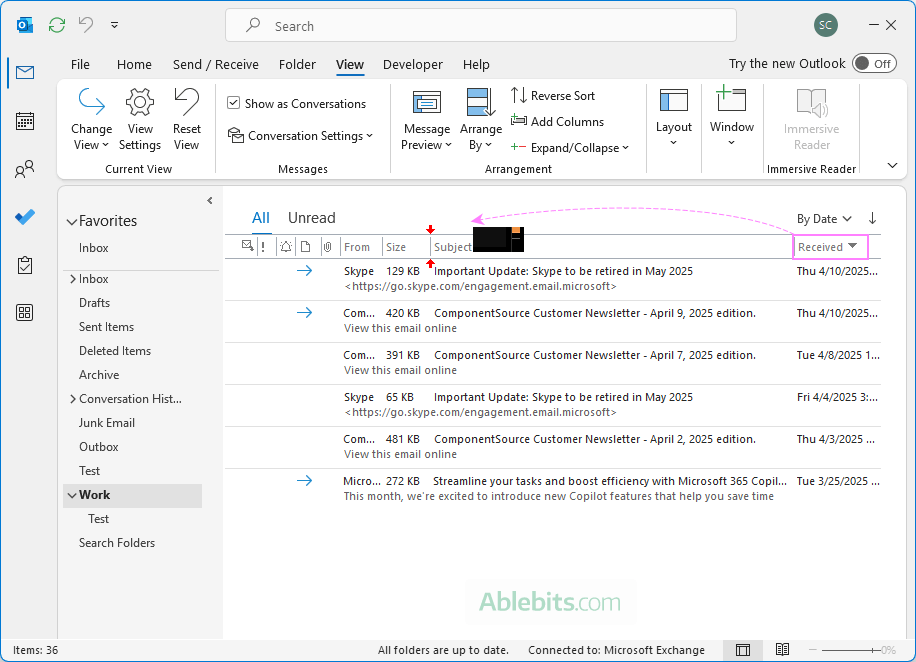
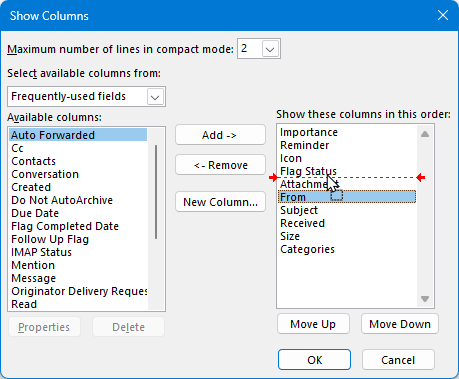
Method 2: Reorder columns in the Show Columns dialog
- On the View tab, in the Arrangement group, click Add Columns.
- In the Show Columns dialog, select the column you want to move under Show these columns in this order on the right, and drag it up or down in the list.
- Click OK to apply the new order.
Adjust column width in Outlook view
If your columns feel too cramped or take up more space than necessary, you can easily refine their width.
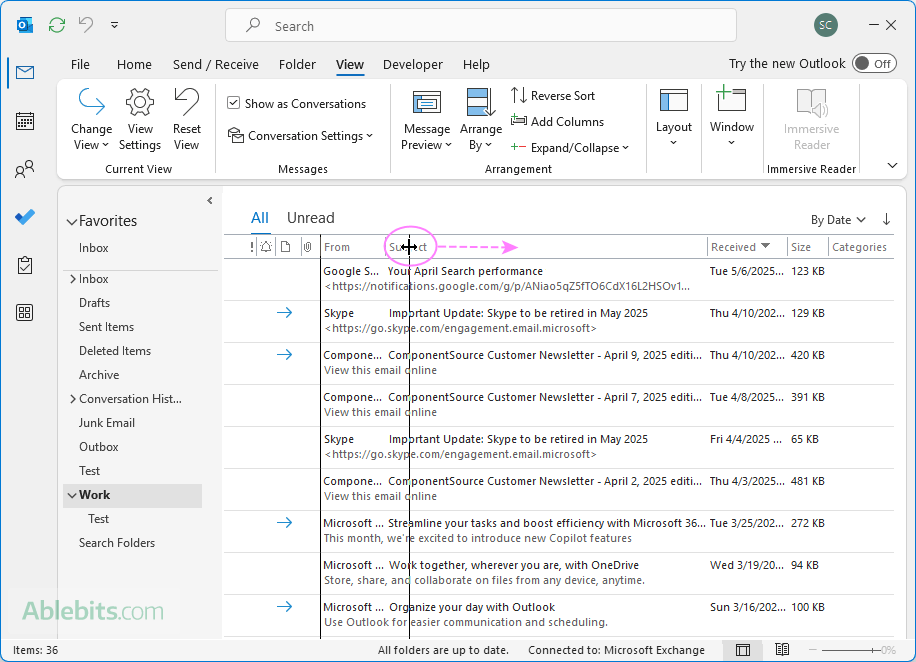
Method 1: Resize columns in the current view by dragging
- Move your mouse pointer to the border of a column header, either left or right side.
- When the cursor changes to a double-headed arrow, click and drag to make the column wider or narrower.
Method 2: Set column width in the Format Columns dialog
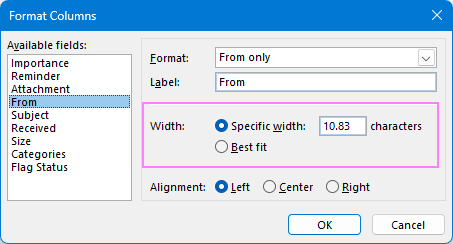
- On the View tab, in the Current View group, click View Settings.
- In the Advanced View Settings window, select Format Columns.
- Under Available columns, choose the one you want to adjust.
- Enter a fixed width in characters or select Best fit for automatic sizing.
- Click OK to save your changes, and then click it again on any open windows to apply them.
Configure email preview
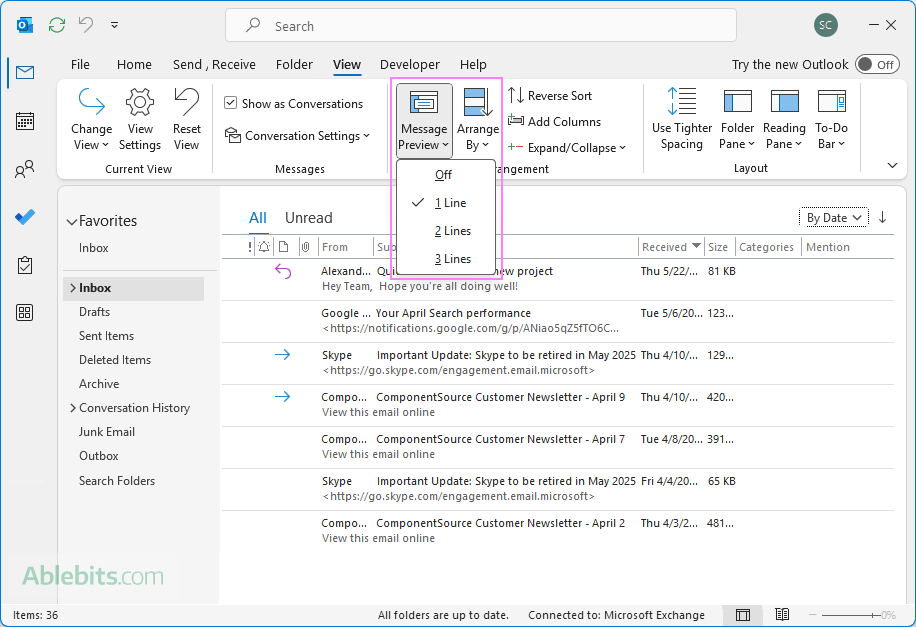
Outlook also lets you control how much of email's body text appears in the message list. You can keep the view very compact, showing only the subject, or add one to three lines of text for more context.
To edit the email preview setting, do this:
- On the View tab, in the Arrangement group, click Message Preview.
- From the drop-down menu, choose:
- Off – show only the subject line
- 1 Line, 2 Lines, or 3 Lines – to display that many lines of the email body beneath the subject.
- When prompted, specify whether to apply the setting to the current folder only or to all mailboxes.
Tip. If you're working on a smaller screen, turning off preview gives you room to see more messages at once. On larger screens, displaying 2 or 3 lines can help you decide which emails need attention without opening them.
Change spacing in mail list
If you want to fit more messages on the screen, you can reduce the amount of space between items in your mail list. This is especially handy when working on small displays.
To tweak the spacing:
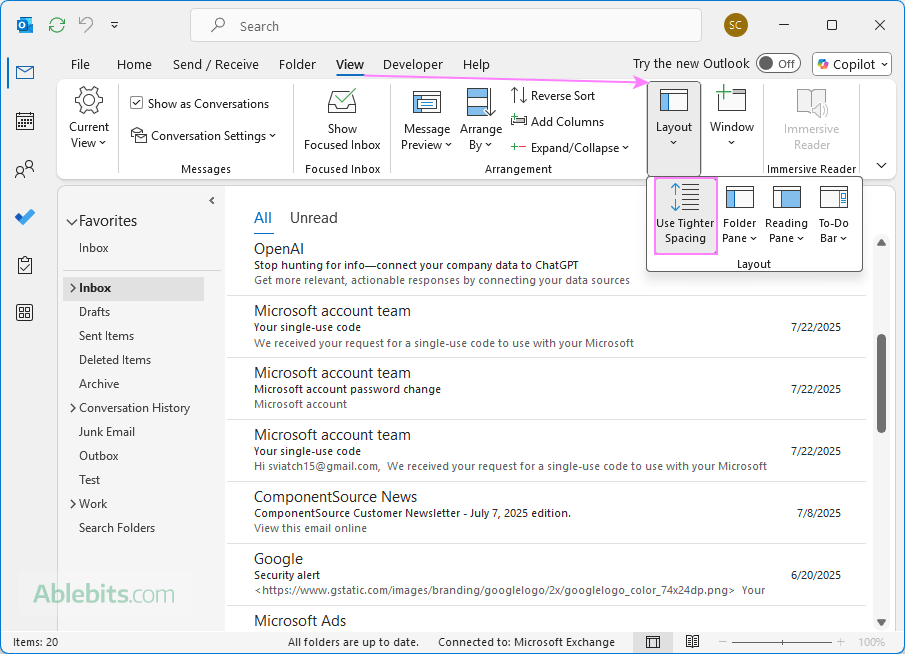
- Go to the View tab on the ribbon.
- In the Layout group, select Use Tighter Spacing.
Outlook will immediately update the message list with less space between items. You can switch back at any time by clicking the command again to toggle it off.
Customizing Outlook email views – additional options
Aside from the basic view adjustments described above, Outlook provides a few more options to personalize how your mail and folders are displayed. Below are some of the most commonly used features, with links to more detailed guides you can explore later.
Group emails by conversations
To follow discussions more easily, you can organize your folders by grouping related emails into conversation threads. On the View tab, check the Show as Conversations box.
Learn more in Group Outlook emails by conversations.
Sort emails
To view your messages in the order that works best for you, you can sort them by date, sender, subject, size, or other fields.
For detailed instructions, see How to sort emails in Outlook.
Enable or disable dark mode
Dark mode provides an alternative look that can reduce eye strain in low-light settings. You'll find this option under File > Office Account > Office Theme.
For step-by-step details, see How to change Outlook to dark theme.
Reposition the Reading pane
You can display the Reading pane to the right or below your message list or hide it entirely. It's also possible to change the font size within the pane and resize it. On the View tab, in the Layout group, click Reading Pane to choose the desired option.
Additional guidance is available in Customizing Outlook Reading pane.
Customize the Navigation bar
Rearrange the navigation bar by moving it and set which items to display and in what order, so it matches your preferred way of accessing mail, calendar, contacts, and other modules.
See the full instructions in Move Outlook Navigation bar to bottom or left.
Customize the Folder pane
Control how the folder list appears in your Outlook– minimize it for a cleaner view or expand for easier access to all folders. On the View tab, in the Layout group, use the Folder Pane options.
More information can be found in Outlook Folder pane guide.
Arrange folders
If you prefer your folders listed alphabetically or want to reorder them manually, Outlook lets you do both. Simply drag and drop folders to place them where you want.
Get full details in Sort folders alphabetically or in custom order.
Turn Focused Inbox on or off
Focused Inbox separates important mail from the rest. You can enable it or switch back to a single inbox view. In the View tab, select Show Focused Inbox to toggle the feature.
To explore this in depth, see Outlook Focused vs. Other Inbox.
Change font size and spacing
Adjust how text appears in the message list, as well as when reading or composing emails.
Further details are covered in How to change default font in Outlook.
Apply current view to other mailboxes and folders
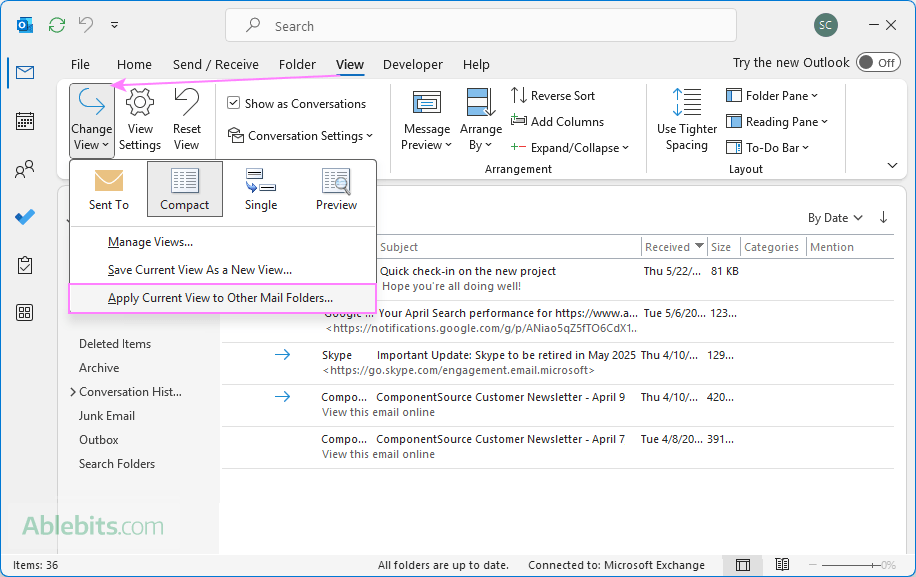
After customizing the layout of one folder, you may want the same arrangement in other folders without setting it up again. Outlook allows you to copy your current view and apply it across multiple folders in just a few steps:
- On the View tab, in the Current View group, click Change View > Apply Current View to Other Mail Folders.
- In the Apply View dialog box, select the folders where you want the view applied.
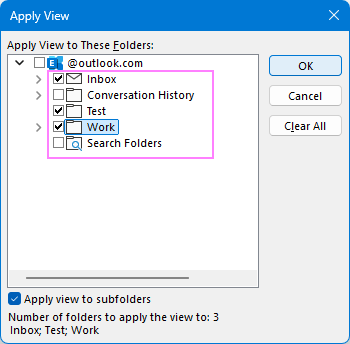
- To include subfolders, check the box Apply view to subfolders at the bottom.
- Click OK to confirm.
Save current view in Outlook
If you've built a view you love, you don't have to redo it every time. To save the current view, the steps are:
- With your custom settings applied, go to the View tab > Current View group.
- Click Change View > Save Current View As a New View.
- Give your view a name.
- Choose whether you want this view available to just the current folder or to all mail folders.
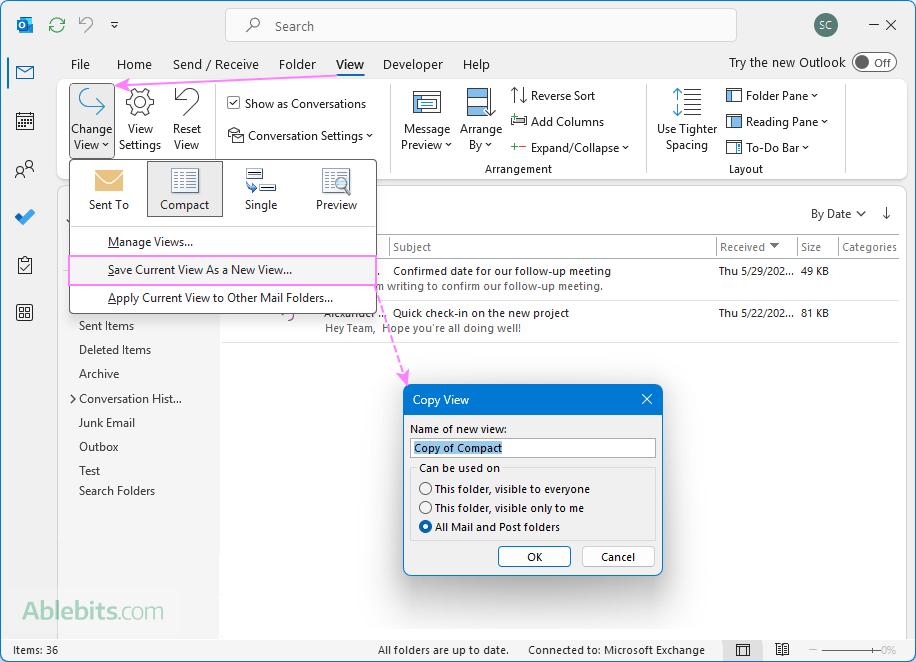
Once your new custom view is saved, you can adjust its layout and fine-tune the settings without affecting the original view. Anytime you want to apply this view, simply select it under Change View.
Create custom view in Outlook
If none of the built-in Outlook views match the way you prefer to see your mail, you can design your own. A custom view lets you configure exactly which columns appear, and how messages are grouped, sorted, or filtered.
- On the View tab, click Change View > Manage Views.
- In the Manage All Views dialog box, click New.
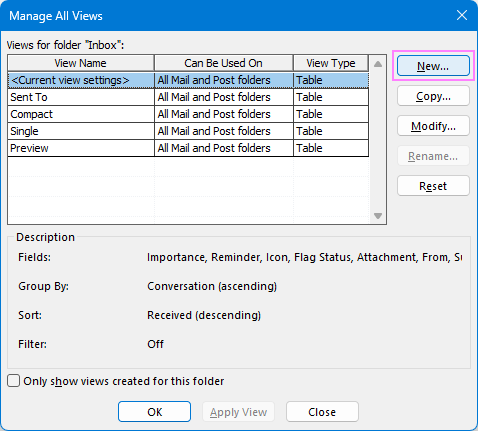
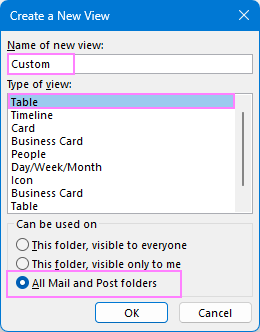
- In the Create a New View dialog:
- Enter a name for your new view.
- Choose the view type (table is the most suitable for email views).
- Decide which folders this view can be used on – the current one or all folders.
- Click OK.
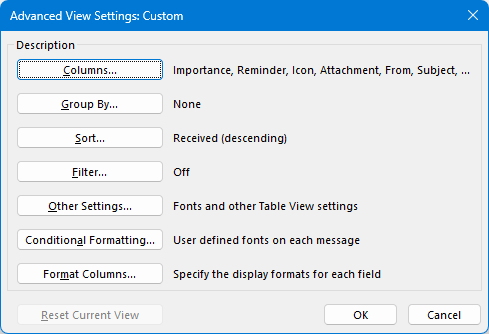
- In the Advanced View Settings dialog box, configure any of the available options. When you're done, click OK.
- Columns – choose which details to show in the message list like From, Subject or Received.
- Group by – decide how to group your emails, e.g. by conversation, category or flag status.
- Sort – define how to sort items in the message list.
- Filter – show only certain types of messages, such as unread or flagged.
- Conditional Formatting – create rules to color-code your emails.
- Format Columns – adjust formatting, width, and alignment.
- Other Settings – change fonts for column headings and rows, grid line styles, and more.
- Back in the Manage All Views dialog box, click either:
- Apply View to use it right away, or
- OK to save the view for later.
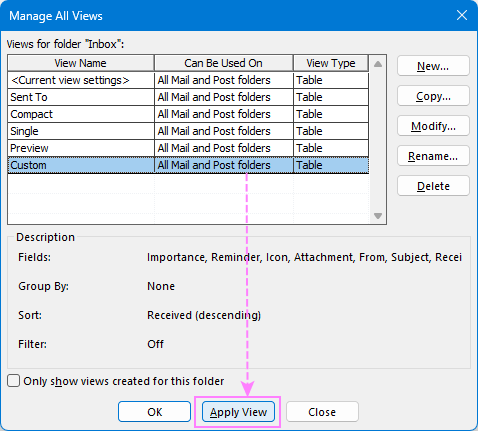
Once a custom view is saved, it will appear under Change View, alongside Outlook's predefined views.
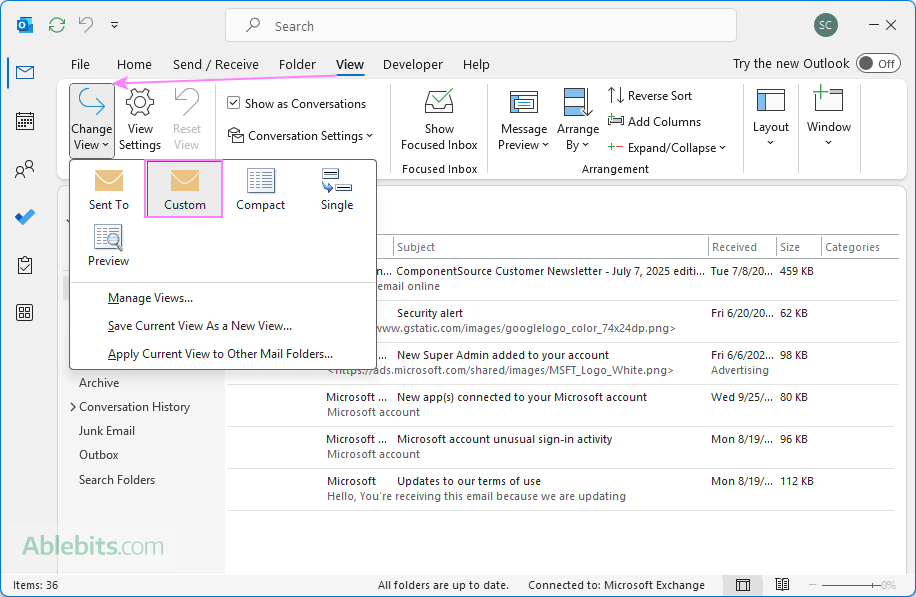
Tip. Instead of setting up a new view from the ground up, you can save time by copying an existing one that's already close to what you want. For this, in the Manage All Views dialog, select <Current view settings> and click Copy to create a duplicate view.
Modify Outlook view
Once you've created a custom view, you might want to tweak it to better fit your work style. You can also customize any of Outlook's predefined views.
Here's how to modify a view:
- On the View tab, click Change View > Manage Views.
- Select the target view and click Modify.
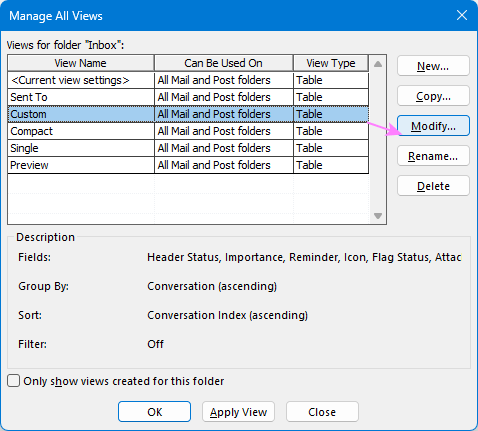
- The Advanced View Settings dialog box opens, where you can adjust column order, size, or formatting, set grouping preferences, change sorting and filtering options, etc.
- When finished, click OK to save your changes.
Tip. To modify the current view, you can select View Settings on the View tab. This lets you access the Advanced View Settings dialog directly.
Reset Outlook view
If your customizations become messy or confusing, you can quickly return to the original layout by resetting the view.
- Select the folder whose view you want to reset.
- On the View tab, in the Current View group, click Reset View.
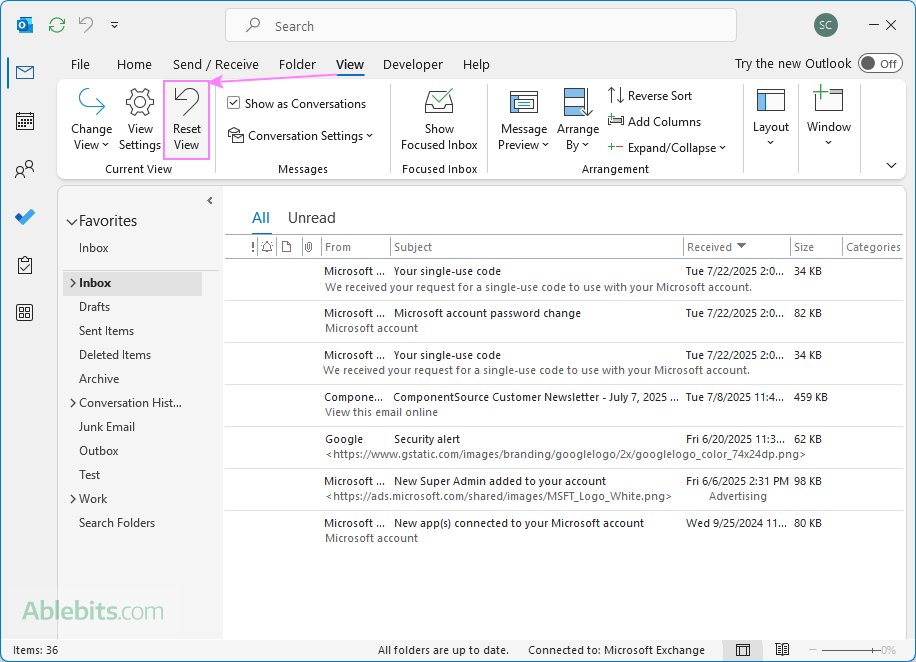
This action restores the folder to its default layout.
Notes:
- Resetting a view removes most of your modifications, such as rearranged columns, Reading pane placement, or font size adjustments. However, some settings, for example, Focused Inbox or Tighter Spacing, are controlled separately, and you will have to revert them using their own settings.
- If the Reset View option is inactive (grayed out), it means the current view has no customizations to reset.
Delete custom view
If you no longer need a custom view, you can quickly remove it in this way:
- On the View tab, choose Change View.
- Right-click the custom view, and then click Delete.
- In the dialog that pops up, click Yes to confirm deletion.
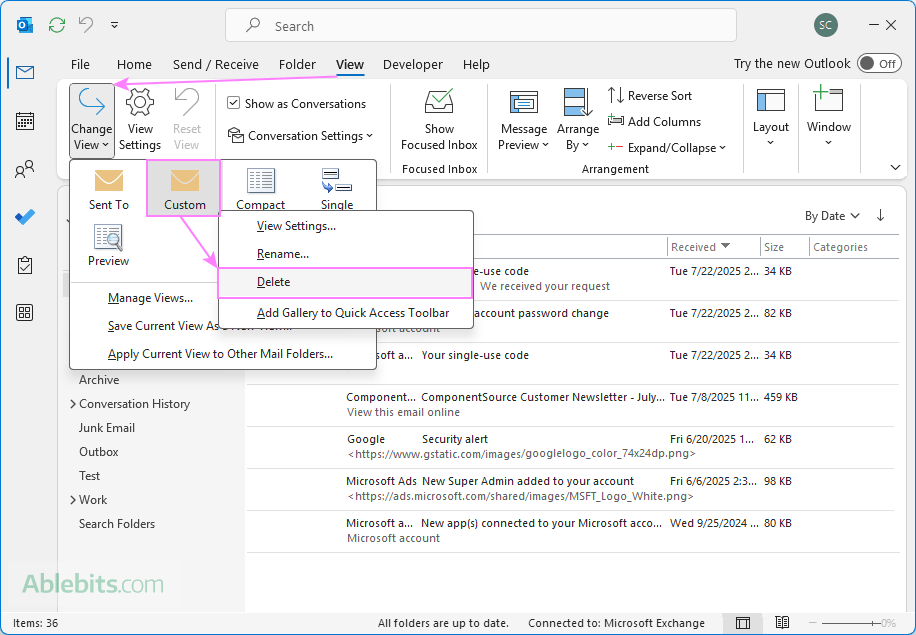
You can also delete custom views using the Manage All Views dialog, which is accessible via Change View > Manage Views.
Note. You can only delete views that you created yourself. Predefined Outlook views cannot be removed, even if you've modified their settings.
In conclusion, views in Outlook are a bit like outfits – you can switch them up, tailor to your style, or return to the default look anytime. Explore, adjust, and refine until you find the balance that works best for you.
 by
by
4 comments
Hello, moving my email (outlook) from win10 to new laptop - win11. In the email part I have the folders ribbon down the left side with the list of emails on the right and a preview pane below the emails list. I want and have my emails listed with oldest at top. My problem is whenever I open outlook the "active -highlighted line" always defaults to the top -ie oldest email. I haven't been able to locate a way to change that so that it defaults to the newest email - (ie the bottom one). Is there a way to do that? Thanks.
Thanks so much, this was very instructive.
I have a follow up question.
Every time I add a new email folder (I have plenty of folders for mail going back 20 years) the default view is "Compact". I never use the compact view and would like all new folders to default to either "Preview" or one of my custom views.
Going back a few years the default was preview. Since it changed to compact I have not been able to change it back. I have searched for solutions on the web for a long time.
Hello Per,
Thank you for your comment. To our best knowledge there is no setting in Outlook to set a different default view. However, there is a quick way to set your preferred view for all folders:
1. Change the current view to "Preview" or your custom view for any single folder, say, Inbox.
2. On the View tab, click Change View > Apply Current View to Other Mail Folders.
For more details, please see the "Apply current view to other mailboxes and folders" section in this tutorial.
Hope this helps.
Hi,
Thanks for your reply.
I found a solution. There seems to be no way of making any other layout than "Compact" as the default layout. So I made a copy of the "Compact" layout in case I ever want to use it. I then modified the "Compact" layout as follows: Under "Other Settings" change "Reading Pane" to "Right" (instead of "off"). That is all that is needed.
Cheers