In this guide, you'll learn how to add and manage priority in Gmail. I'll tell you how to send a high priority email so it gets a fast response. Then, I'll show you how to use Importance Markers, colored stars, and custom labels to sort your mail. Finally, you'll learn how to automate your priority system by creating filters in Gmail.
Confused because you can't find the "High Priority" button in Gmail? You're not alone, because Gmail works differently than other email clients. Read this article to understand the difference and how you can use it for your benefit.
How to send emails with high importance in Gmail
If you were working before with Microsoft Outlook, you could have marked your outgoing emails as important or high priority more than once. However, Gmail does not have a "High Priority" flag for sending emails. There is no exclamation mark, no red alert, no pop-up. Nada 🤷♀️.
Yeah, it may sound depressing, but let’s be honest: if there were a possibility to mark your messages as "HIGHLY URGENT - NEED YOUR ANSWER ASAP", spammers all around the world would use it so intensely that Gmail would have to roll it back as fast as possible. Moreover, statistically, people don’t take priority flags seriously even within Outlook, as they prefer to decide for themselves what is urgent and what can wait.
That’s why Gmail looks at email importance from a different angle, as it gives you an option to select which emails are important to you so you can organize your own inbox.
However, you can use several handy alternatives to set priority in Gmail while sending email.
Method 1: Indicate urgency within the subject line
Your subject line is the simplest way to flag your message for immediate attention, as it’s the first thing recipients see. Write some of these phrases at the beginning of the subject to highlight your email as time-sensitive:
- URGENT
- TIME SENSITIVE
- IMPORTANT
- ACTION REQUIRED
Be direct and precise without any fuzziness: clear reason for urgency, response deadline, possible outcomes.
Method 2: Draw attention to email key points
If you need an urgent answer, make it easier for your recipient to understand your request with a rapid scan of the message body. The less time it takes to process the information, the more likely you will receive a response sooner.
To improve readability, you can use text formatting:
- Specify the deadlines and urgency at the beginning.
- Bold or underline key tasks.
- Use bright colors to point out specific information.
- Separate your main ideas, use checklists and emojis.
- Organize text in short paragraphs.
- Avoid excessive formatting with multiple exclamation marks, or other spam-like elements.
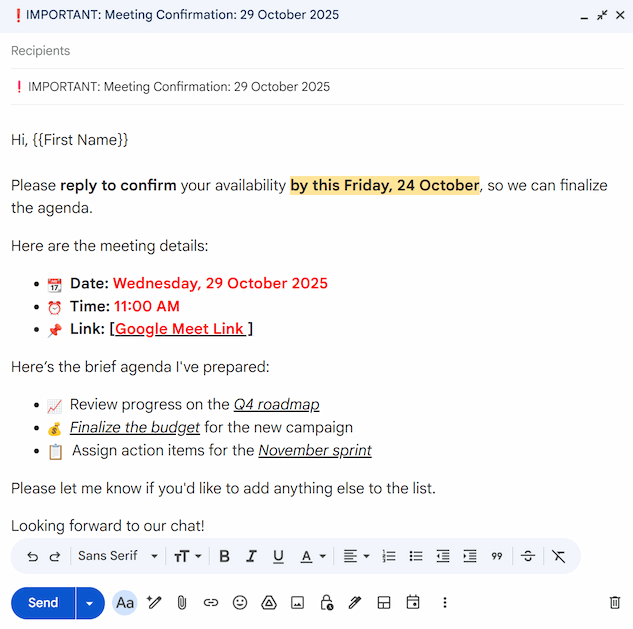
Following these recommendations, you’ll manage to convey the message clearly, and chances are, the answer will not take long.
But let’s face it: if you need a response like yesterday, you can go ahead and write your message in all-caps and make it red, but the best option is to just call the recipients. A quick call is always the fastest way to confirm they got it and know it's a high priority matter 😉.
How to set email priority in Gmail inbox
As I mentioned before, Gmail's focus is on your inbox and marking priorities there, rather than on outgoing emails. And it gives you several different options to classify your messages.
How to add high importance in Gmail
While Gmail doesn’t allow you to send high priority emails, you can flag the messages as important to manage your own inbox. With this, you can sort your messages by the importance level to see what matters most and deal with it accordingly.
To enable high priority email in Gmail, you’ll need to:
- Go to Gmail > Settings > See all settings.
- On the Inbox tab, find the Importance markers section.
- Check the box Show markers to mark messages as important.
- Check Use my past actions to predict which messages are important.
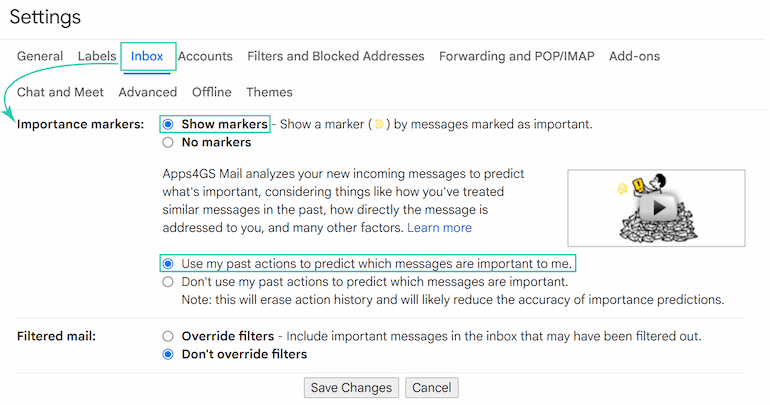
- Click Save changes at the bottom of the page.
- After you turn on the Importance markers, you'll see yellow arrow icons next to your emails.
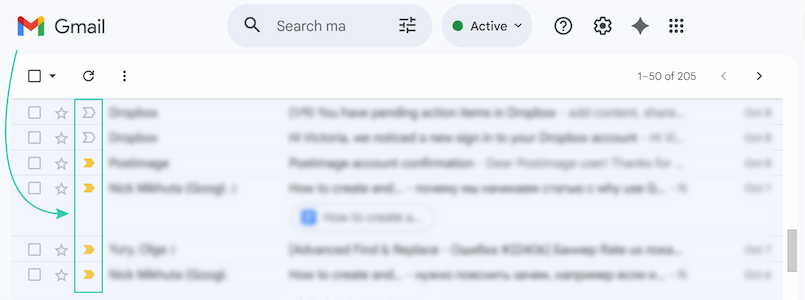
Note: This setting works only within your mailbox, the recipients won't see any difference on their end.
Gmail will automatically mark messages with a yellow arrow if it predicts they are important to you. So, how does Gmail decide what's important? It looks at a few different things, like:
- Who you email and how often.
- Which emails you open and reply to.
- What keywords are used in the emails you read.
- Which emails you star, archive, or delete.
Tip: To learn why an email was marked as important, hover over the importance marker.

But you can also flag an email as Important manually:
- Open your mailbox in Gmail.
- Hover over the empty marker of the small arrow next to a message.
- Click the arrow to turn it yellow (or click a yellow one to unmark it).
Tip: Type is:important in the search bar to find all emails marked as Important.
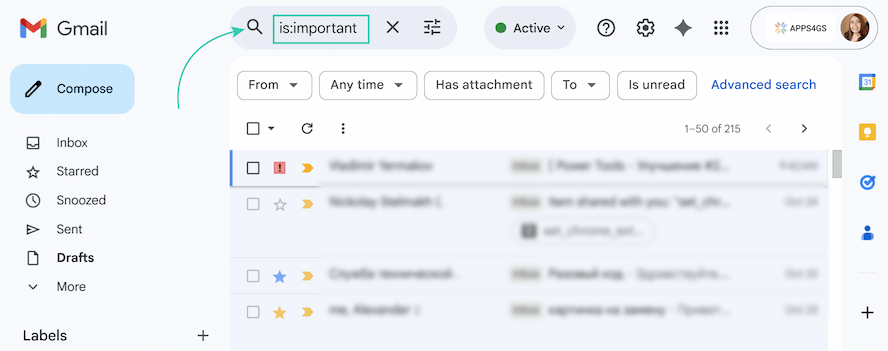
Now that you've enabled Importance Markers, you can tell Gmail to automatically sort your inbox for you.
To sort the inbox according to the importance markers, just follow the process:
- Go to Gmail > Settings > See all settings.
- On the Inbox tab, find the Inbox type section.
- Select Important first or Priority Inbox from the drop-down menu.
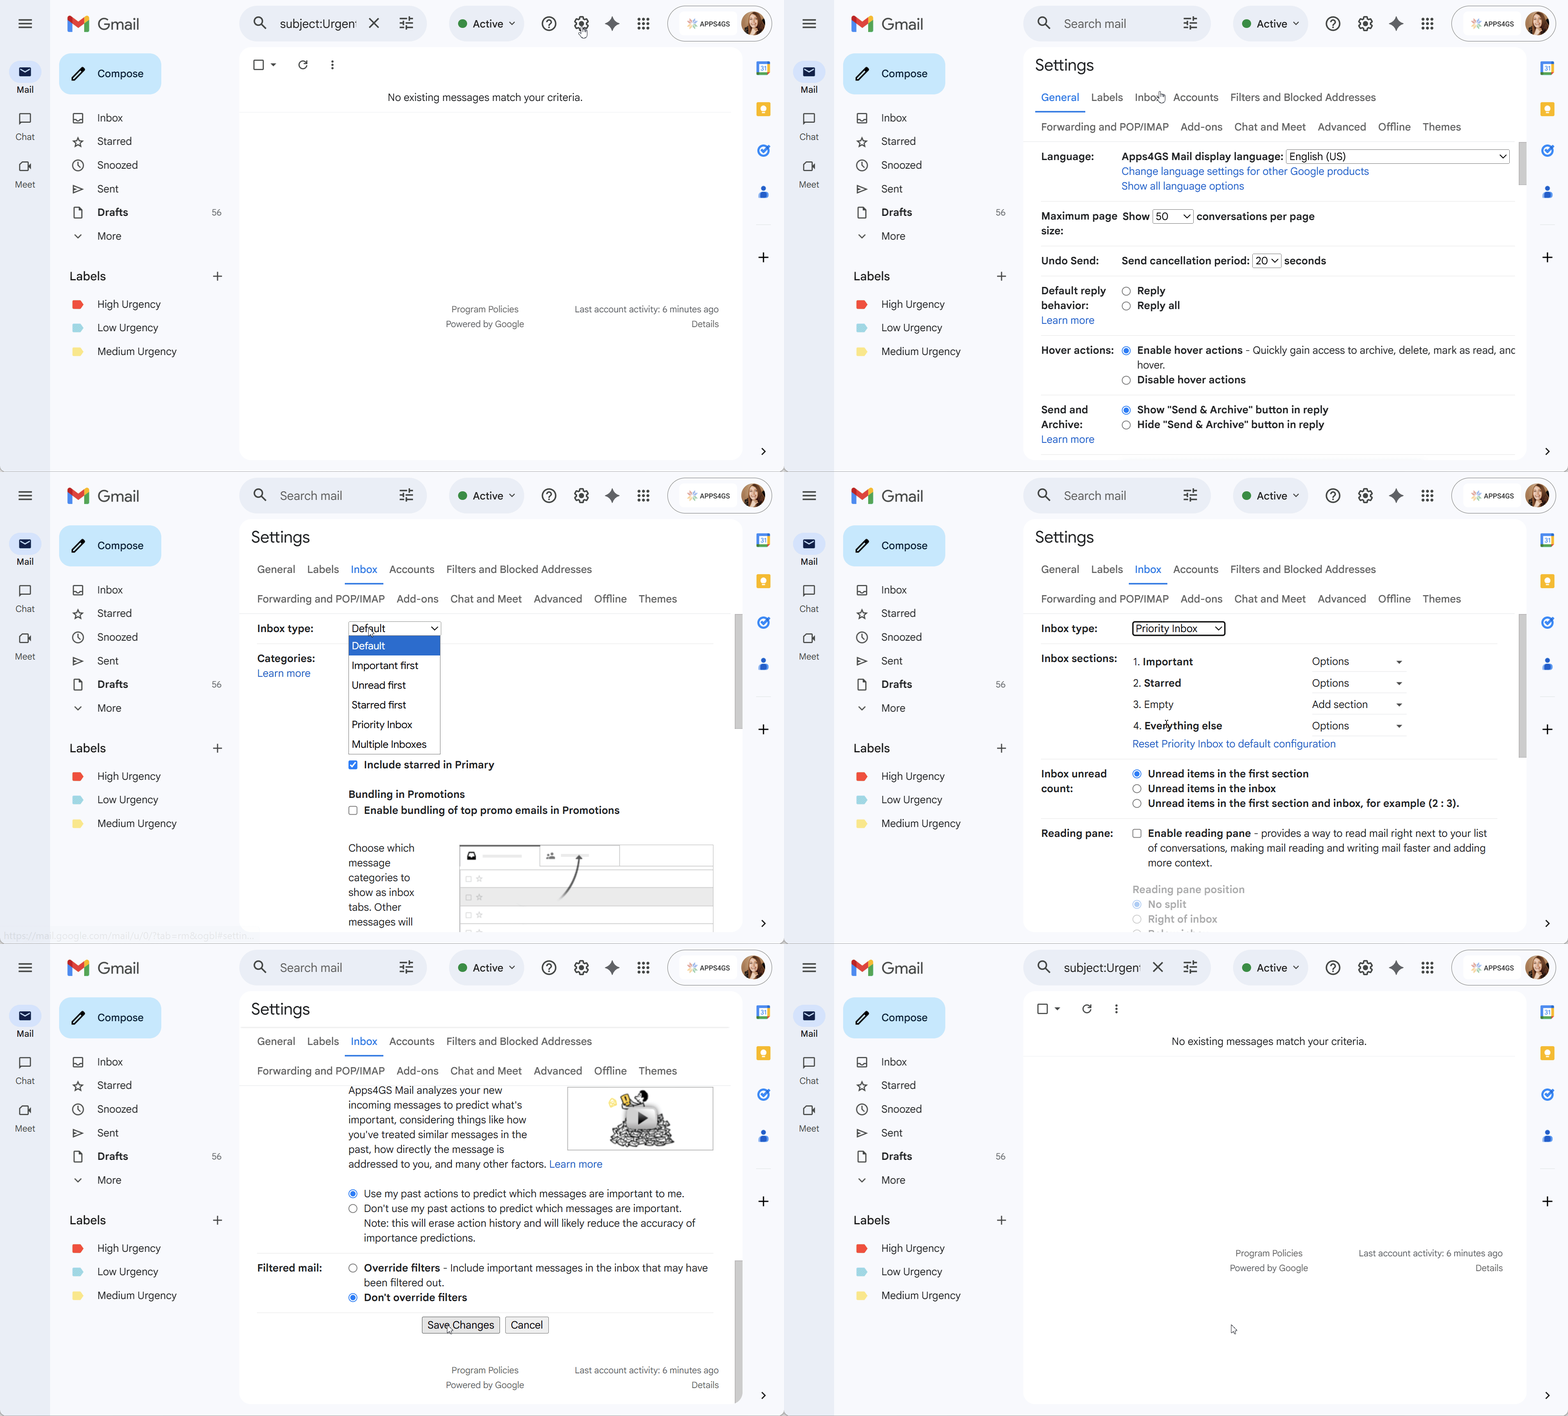
The Important first option will automatically put all your important and unread messages at the top. If you choose Priority Inbox, there will be important and starred messages first and you’ll be able to manage the options within the sections.
In addition to mailbox organization, with the high priority feature you can reduce digital noise and won't miss what's important. How? Turn on the right notification setting!
To get only important email notifications, you’ll need to:
- Open Gmail, go to Settings > See all settings.
- On the General tab, scroll down to the Desktop notifications section.
- Check the Important mail notifications on box.
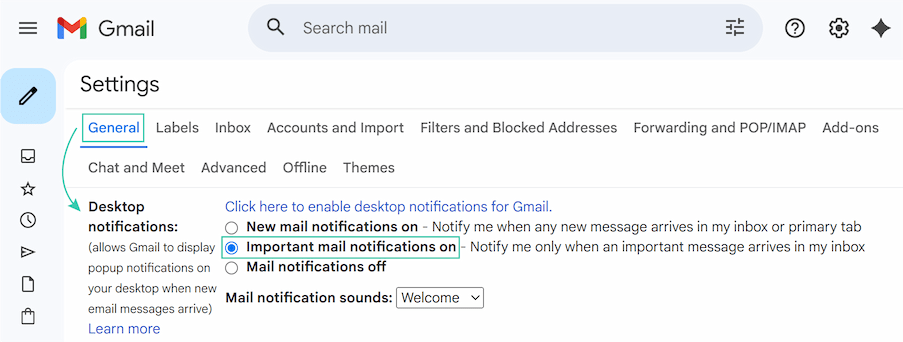
- At the bottom of the page, click Save Changes.
Instead of your phone buzzing for every single newsletter, ad, or social media update, you’ll get a notification only when an important message arrives in the inbox. But frankly speaking, Gmail isn't always as good as it thinks it is, and you can overlook an important message because it can easily miss an automatic importance indication. But good news - there are other cool options to organize your inbox properly 👉.
Using stars in Gmail to mark priority
I'm sure that while you were looking for the arrows indicating important emails, you already saw the stars next to them. And yes, they are there for a reason, and you can freely use them to organize your mailbox. What is the difference between starred and important emails? Importance markers are applied (mostly) automatically by Gmail based on your habits, while stars are 100% under your manual control.
Tip: Use stars for what you need to do, while letting importance markers show you what you need to see.
To mark your email with a star, follow these steps:
- Go to the Gmail inbox.
- Hover over the empty star outline to the left of the sender's name on the target email.
- Just click that star. It will instantly turn yellow. (To unmark it, click the star one more time).
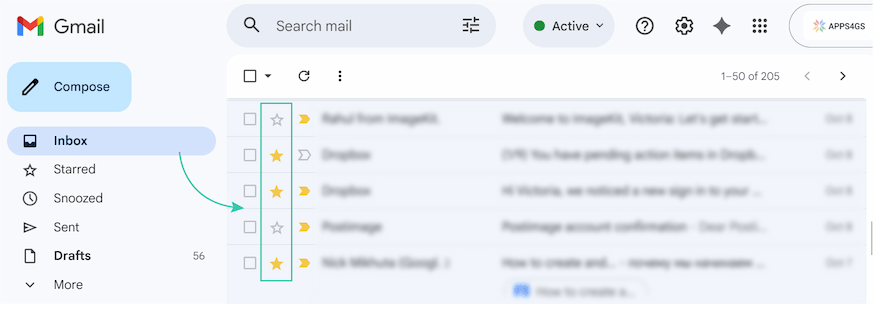
That's it! The email is now "starred."
Tip: You can find all your starred messages in one place by clicking the Starred label in your Gmail sidebar
But the best part with stars is that you can customize them and use stars of different colors for different urgency levels.
To enable different Gmail stars options, follow this step-by-step guide:
- Go to Gmail > Settings > See all settings.
- On the General tab, scroll down to the Stars section.
- You’ll see two options here: In use and Not in use. By default, there is only a single yellow star in use. To add other colored stars (or icons, like the exclamation mark) drag them from the Not in use list up to the In use one.
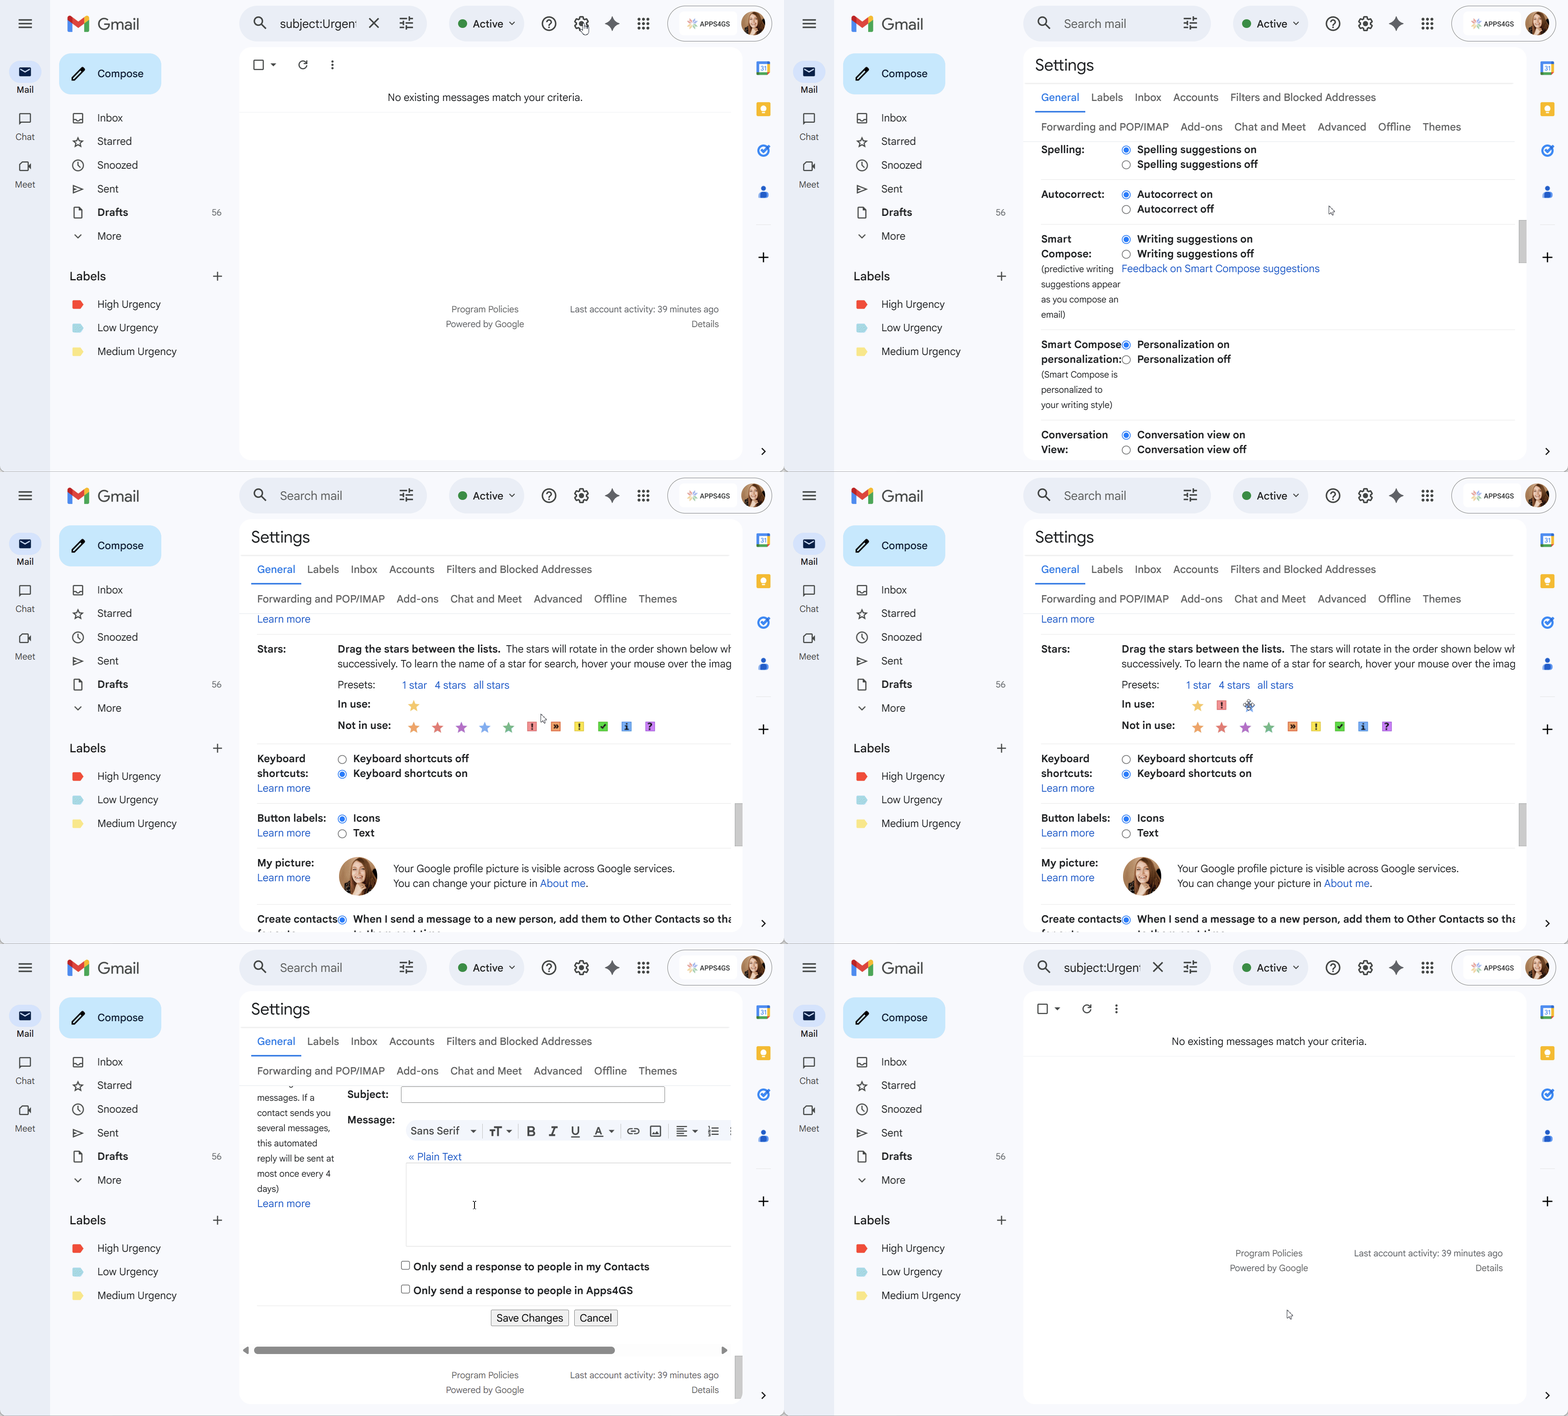
Tip: You can also drag them to change the order they will appear in.
- Click Save changes at the bottom of the page.
Now, go back to your inbox. When you click the star icon next to an email, you cycle through all the icons you added before.
Note: You can have an email that is both starred and important. For example, Gmail might mark an email from your boss as important, and you might also star it to remind yourself to write a reply later.
Use different stars and icons according to the urgency:
- Red exclamation: Do as soon as possible.
- Yellow star: Important but not urgent.
- Blue star: Awaiting response.
Creating a specific label for urgent emails
One more option to organize your mailbox is using labels. In Gmail, labels serve almost as folders, but have an important difference - one email can be located in several labels simultaneously. One email can be marked, for example, as Urgent and Waiting for response at the same time.
Tip: Not sure how to create or color-code a new label? Check out our comprehensive guide on Gmail labels.
To manage high-priority emails, simply create a new label named "Urgent" (or "High Priority") and apply it to relevant messages. You can color-code it: click the three-dot menu on that label to give it a specific color. As an advanced option, create several labels and sort your inbox by different urgency levels.
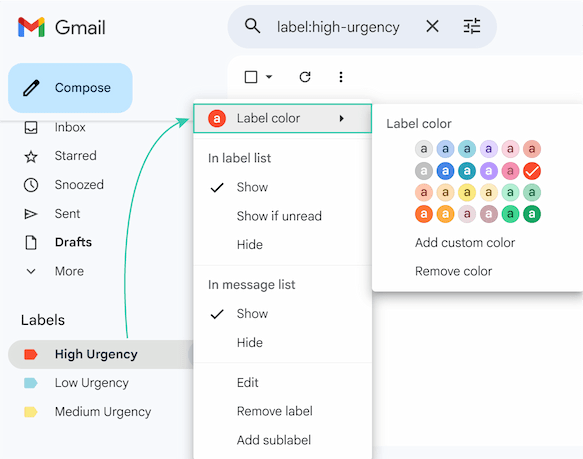
Tip: Want to archive less important emails? Learn how in this article.
Automate priority in Gmail by creating filters
But is there a way to automatically add a star or label to incoming messages? Yes, you can do it with Gmail's Filter function.
To do this, you simply need to create a new rule (if you aren't sure how, check our step-by-step guide on how to create a filter in Gmail).
Once you have the filter window open, use these settings to manage priority:
- Set your criteria. For example, in the From field you can type the email addresses of important senders. Or you can set criteria based on the subject line and include certain words and phrases like Urgent or Important.
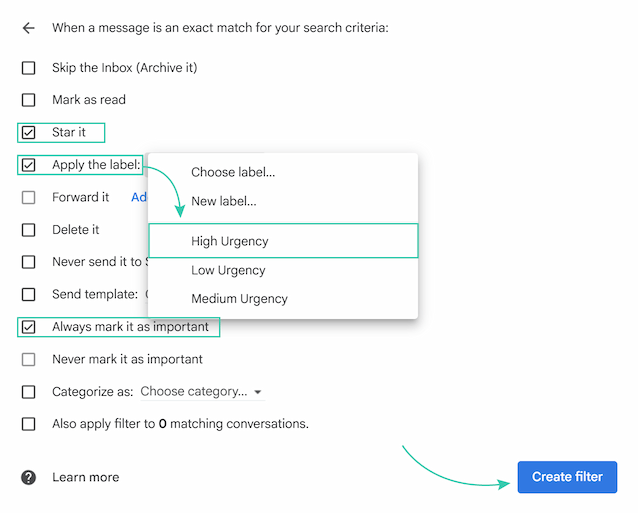
- Choose your actions. When selecting what to do with the messages, choose one of the following:
- To add a label: Check Apply the label and select your target label from the dropdown menu.
- To add a star: Check Star it. This will add your default star (usually the yellow one, or the first one in your list).
- To mark as important: Check Always mark it as important.
Now you know how to effectively manage priority in Gmail. If something is still unclear, write a comment, and I’ll try to answer all your questions ☺️.
FAQ
How do I send a high-priority email in Gmail?
You can't add an official High Priority flag like in Outlook. The best and most effective way to send an urgent email is to clearly state the urgency in the subject line. Start your subject with a tag like [URGENT], [ACTION REQUIRED], or [RESPONSE NEEDED].
What’s the difference between the yellow arrow (Importance marker) and the star?
Importance markers are usually set automatically by Gmail’s AI according to your usual behavior. The star markers, in contrast, are completely manual.
Why are some of the emails already marked as Important?
That is Gmail's Importance marker AI at work. It's automatically predicting which messages are important to you based on your habits and marks them with yellow arrows.
Will the recipient see if I mark an email as important in Gmail?
No. Stars, labels, and importance markers are 100% private to your own inbox. No one else can see how you organize your email.
How to turn off high priority email in Gmail?
Go to Settings > See all settings. On the Inbox tab, find the Importance markers section and select No markers. Don’t forget to click Save Changes at the bottom.
How to mark a sender as high priority in Gmail?
The best way is to create a Filter so that all new emails from that person are automatically marked.
 by
by