In this guide, you’ll learn how to make a newsletter using AI helpers. I’ll show you how to use AI to create the content, generate HTML code for consistent formatting, insert the code into Gmail, and send your newsletters to your future readers.
You don’t need to be a coder to write a professional HTML newsletter anymore. All you really need is a good AI helper. I've tried it myself, and I'll show you the simple steps that worked for me.
Don’t worry, the process is quite easy: I have a humanities brain and I’ve managed! 😅
AI newsletter generator - is it necessary?
Before we start creating our newsletter, I need to clarify why we're taking this specific approach. Nowadays there are a lot of AI newsletter generators available. An AI generator can prepare the whole message for you based on the topics or any information you give.
And while it’s a cool tool that can save you a certain amount of time and effort, it has its cons:
- Lack of originality and personality. One could argue whether AI has its own personality: if it’s ready to cry with us over existential problems or take over the world tomorrow. Who knows? But the fact is, there is still room for improvement in the originality of its products.
- Possible inaccuracy of information. If AI can’t find credible sources, it’ll generate them itself. There is no problem for it to rewrite history or reinvent something. AI can also use outdated information and with absolute certainty provide it as a well-known fact.
- Risk of plagiarism. AI can write really good content for your newsletters, but did it take notes on where it learned everything? It can stitch together sentences and ideas from the training data, passing off someone else’s unique text as its own brilliant thought. There's a fine line between inspiration and intellectual theft, and you may face the consequences.
That’s why I’ll describe in this article newsletter creation without AI generators, so you are in control, using AI as a powerful assistant, not an autopilot. You’ll learn how to use standard AI helpers and your own creativity and judgment to generate perfect newsletters.
Creating an AI HTML newsletter from scratch
While you could simply ask AI to generate a newsletter on the theme, you’ll most likely get a rather dull and robotic result. Moreover, simply pasting AI text into an email can break on different devices. Unlike a plain text email or a copied document, HTML gives you complete design control and prevents format breaking.
Therefore, our goal is to have the AI write the HTML code for our newsletter, which we can then send in Gmail. Let’s begin! 🚀
Part 1. Get started
Before starting to work with AI, you need to get prepared:
Step 1: Gather inspiration & plan your design
- Find examples of newsletters you like. Check your own inbox. Which emails do you actually open and read? Why?
- Look for newsletters from your direct competitors and leaders in your field. Analyze what works best for them.
- Find design examples and save them for future reference. You can make a visual map with screenshots and notes.
Step 2: Write your content
Write your text in any text editor like Google Docs or Notepad. Don’t shy away from using the AI powers:
- Ask AI to do research (but don’t forget to fact-check important information!).
- Brainstorm new ideas with AI. You can give it some documents (be careful with corporate information), comments, or any texts to gather relevant content for your newsletter. Ask it to pick out the most important updates and rearrange them logically.
- Use AI to improve your subject line. Your newsletter subject line needs to stand out to get opens.
- Run your newsletter by an AI to catch errors and improve clarity. But it's better not to use the entire AI-improved text. Just take the best parts and correct the mistakes, or your newsletter might lose its originality and start to sound robotic.
After the mockup of your future newsletter is ready, structure the content. It will be easier for the AI to write your letter correctly if you give it distinct structure from header to footer.
Step 3: Organize your images and hyperlinks
- Images: Save the images you want to use in your computer’s folder. Give them distinctive names for easy search.
- Links: List all the links you will need in your future newsletter.
Part 2. How to write HTML code for Gmail email
Now that we’ve got everything prepared, it’s time to generate the code for your newsletter 💻.
Step 4: Choose your AI
Tools like ChatGPT or Gemini handle this task perfectly. As I said before, there are also specialized AI newsletter generators. But for this guide, any major AI will work well if you’re focusing on the most important skill: writing a good prompt. That’s why let’s jump straight to the next step.
Step 5: Generate raw HTML code with AI
Now you need to compose a detailed prompt for an AI. It’s not enough just to ask for a newsletter, as the result most likely will not be what you expect.
Here’s a checklist of what your prompt should include:
- Set the goal: Tell the AI what we're writing and what is the main task, identify the AI role (e.g., you are a marketing expert…).
- Specify the topic & key points: State the core topic and key messages that must be included.
- Define the tone: Specify the voice of your newsletter. Do you need to sound more formal or want to set a friendly tone?
- Provide the structure: Try to give a specific description of every part of the newsletter section by section.
- Give technical instructions: Mention key details like HTML format and mobile responsiveness.
Example of the prompt:
Act as an expert email marketer and front-end developer. Create a clean, mobile-responsive and dark-mode compatible HTML code for our weekly newsletter using inline CSS:
Header:
- Text: Newsletter
- Style: Center-aligned, dark green color, Serif font, font-size 24.
Introduction:
- Text: Hi {{First Name}},
Hope you're having a productive start to autumn! We've been busy creating new guides and enhancing our tools to boost your productivity. Here’s what’s new this month... - Style: Dark-gray color, Georgia font, font-size 12.
- ...
After you give the AI your prompt, it will generate a single block of HTML code for you.
But frankly speaking, generating a proper prompt for the AI may take quite a while. You can replace part of the prompt with an image, if you have pictures of how you want your newsletter to look like. Modern AI models can "see" and interpret images you upload. All you need is to combine your visual reference with a clear text prompt that tells the AI what to do with it.
Here’s how you can structure your prompt with pictures:
- Upload your image: Start by uploading the screenshot of your newsletter mockup
- Tell the AI exactly what you want: Give instructions to use your image as a reference, what to keep and what to change.
- Add your text content: Just like before, write the text for each section.
It would be even easier if you previously composed your newsletter in Google Docs or Canva.
Tip: You can learn how to do it in the previous article.
With the picture of the already created newsletter, you can upload a screenshot of it and ask the AI to write the code. In this case, the image simplifies the design part of the prompt significantly and the AI would be able to write the most precise code without any difficulties.
The raw HTML code of your newsletter is ready 😎.
Part 3: Edit your code
As you may have already noticed, the code is working well, but there are placeholders for links and images inside the code. It needs a few manual edits to be ready.
Don't worry, even if the code is just a bunch of incomprehensible words and punctuation marks to you, you can do it 💪.
Step 6: Host your images online
Emails can't display images from your computer - they need a public web link (URL) for each one.
There are several options to get a public link for the image:
- From your own or a corporate website, if your company has one.
- From Google Drive. But this option does not work well with email HTML code, as its standard links aren't direct image URLs, and its Embed feature uses <iframe> code that will not work well with Gmail.
- Using an image hosting service where you can upload an image and get a direct link.
While writing this article, I tried several different hosts. I liked one that gives you clear links suitable for quick insertion: Postimage. However, the ability to embed images in email on this platform is a paid feature.
I managed to get a free link from the hosting service ImageKit. It’s quite easy:
- Sign up or log into your account.
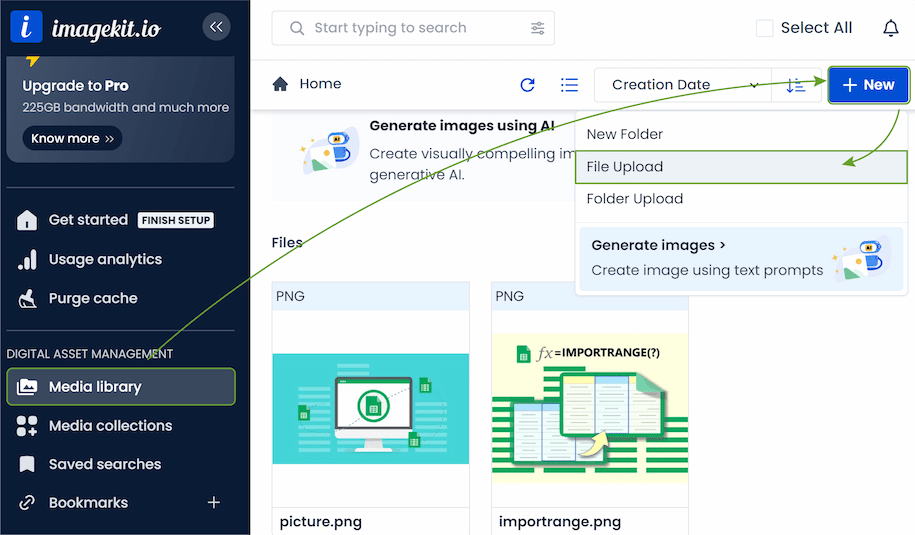
- Upload your pictures by going to Media library > New > File upload.

- Get a link by clicking on the picture and selecting the Copy URL option. You’ll get something like this:
https://ik.imagekit.io/49ihrr9ip/picture.png?updatedAt=175991733922 - You only need the part of the link before the question mark (?):
https://ik.imagekit.io/49ihrr9ip/picture.png
Do this for each image and paste your URLs into a text file for the next step 👉.
Step 7: Add your image URLs and links to the HTML Code
Once you have the links, the next step is to insert them into the code. You can ask the AI to do it, or do it yourself. In fact, it’s like a find-and-replace step mostly.
To add image URLs to the code, follow these steps:
- Copy your AI-created code.
- Paste the code into a simple text editor (like Notepad on Windows or TextEdit on Mac).
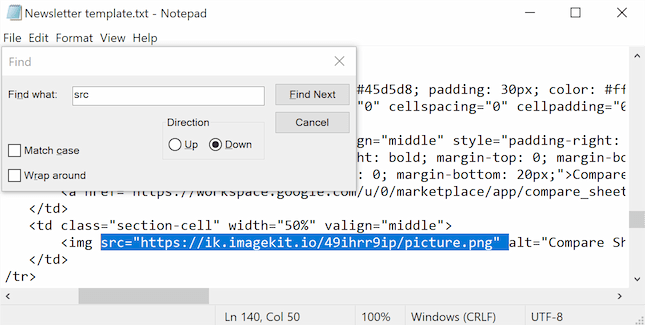
- Press Ctrl + F (or Cmd + F on Mac) and search for src= to find where the images are.
- Paste your links between the quotation marks. For example:
- Before:
src="#" - After:
src="https://ik.imagekit.io/49ihrr9ip/picture.png"

Tip: To know which image to insert and where, just read the alt text. It's a description of the supposed picture from the AI.
- Before:
Your images for the newsletter are ready. If there are any links in your newsletter (like for buttons), you can ask the AI to insert the right ones, or add them in a similar way to the images.
To insert links to the HTML code, you’ll need to:
- Open the code in a text editor.
- Press Ctrl + F (or Cmd + F on Mac) and search for href=.
- Paste your link inside the quotation marks:
- Before:
<a href="#">Read more</a> - After:
<a href="https://www.ablebits.com/office-addins-blog/importrange-function-in-google-sheets/">Read more</a>
- Before:
Believe it or not, the hardest part is over! 🎉
Your newsletter code is ready. Let’s move to the next step: inserting your HTML code into Gmail.
Paste HTML into Gmail
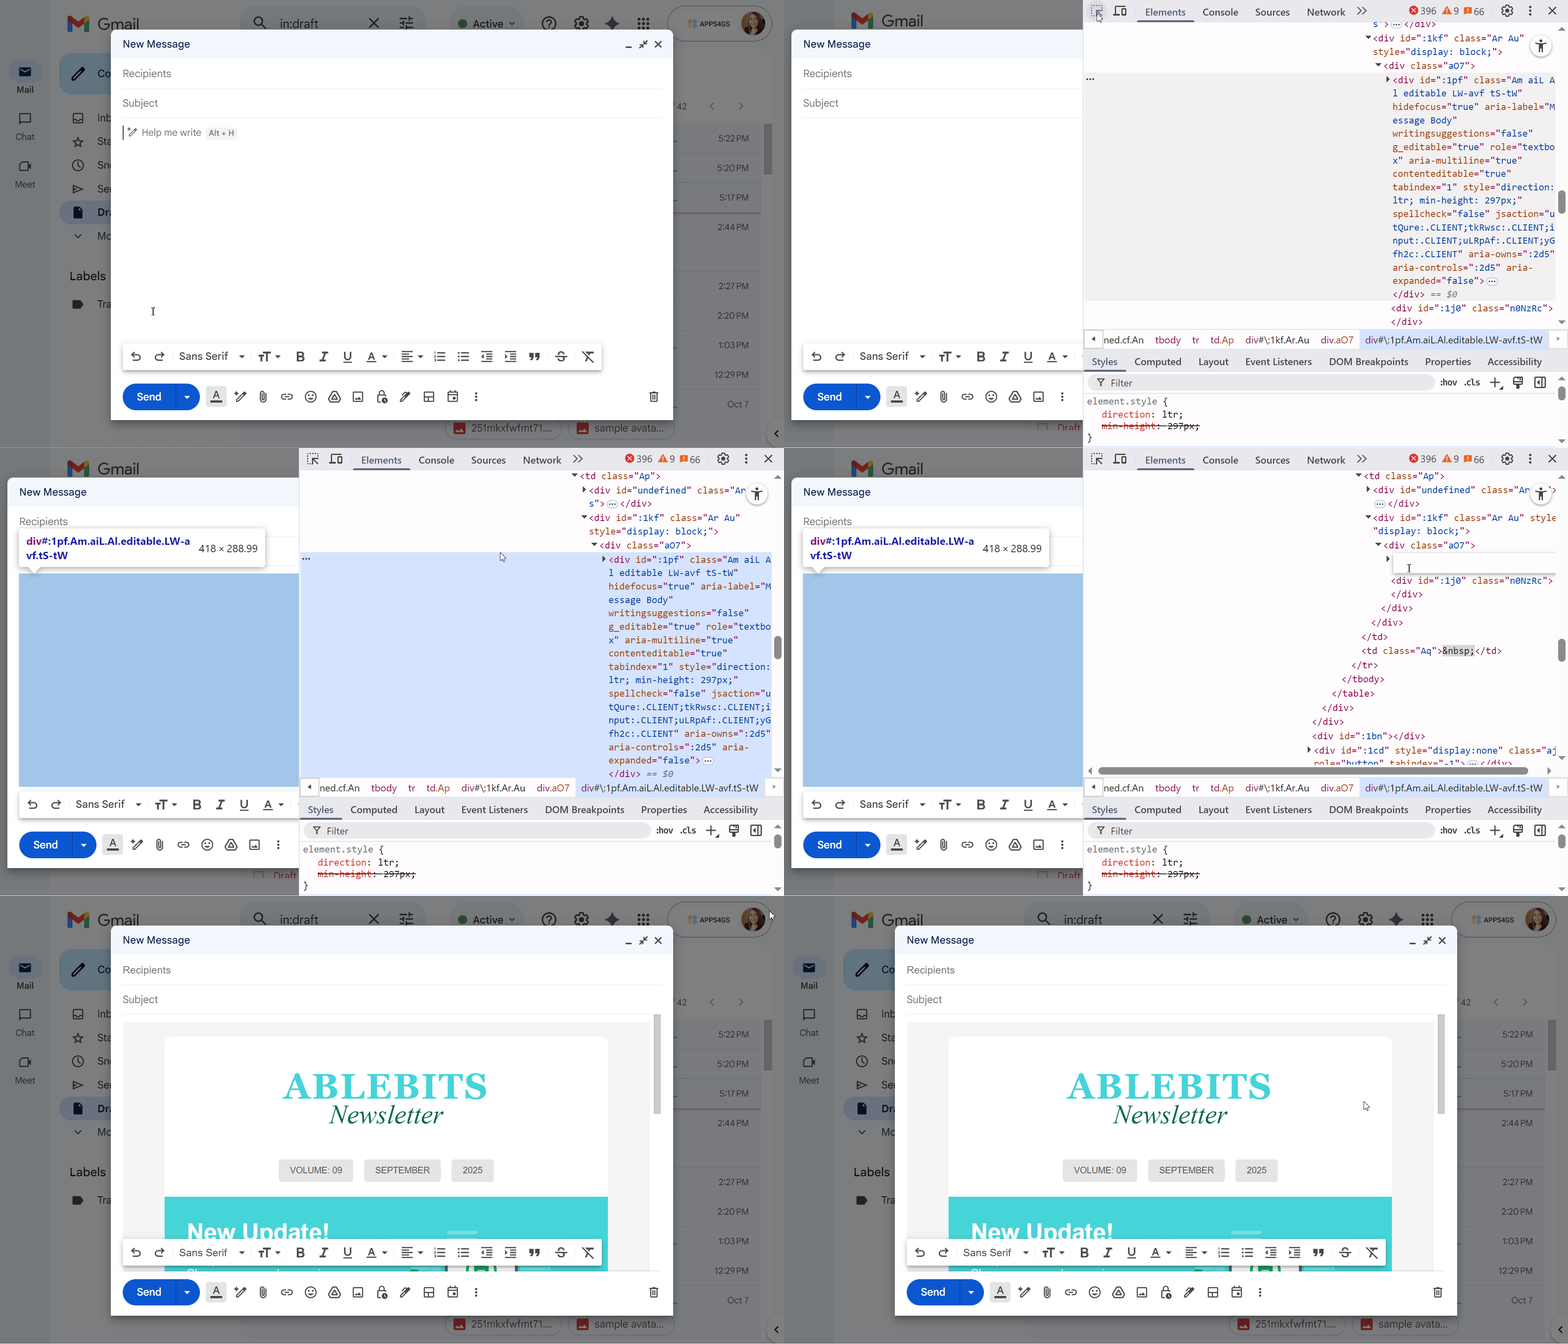
Unfortunately, Gmail doesn’t have any HTML editor or a simple "Insert HTML" button. But there are several options to overcome this issue, for example, you can use browser developer tools:

We cover how to do this in detail in another one of our articles.
Your newsletter will appear in the message body. Now you can just add the subject line and recipients and hit Send to start your campaign.
Step 9: Send newsletters with a professional tool Easy Mail Merge
If you send newsletters regularly and have a huge list of readers, you may need to personalize your newsletters and track statistics to measure campaign success. Consider a dedicated tool built for this purpose.
Tip: Learn how to mass send newsletters with Gmail’s built-in tools in this article.
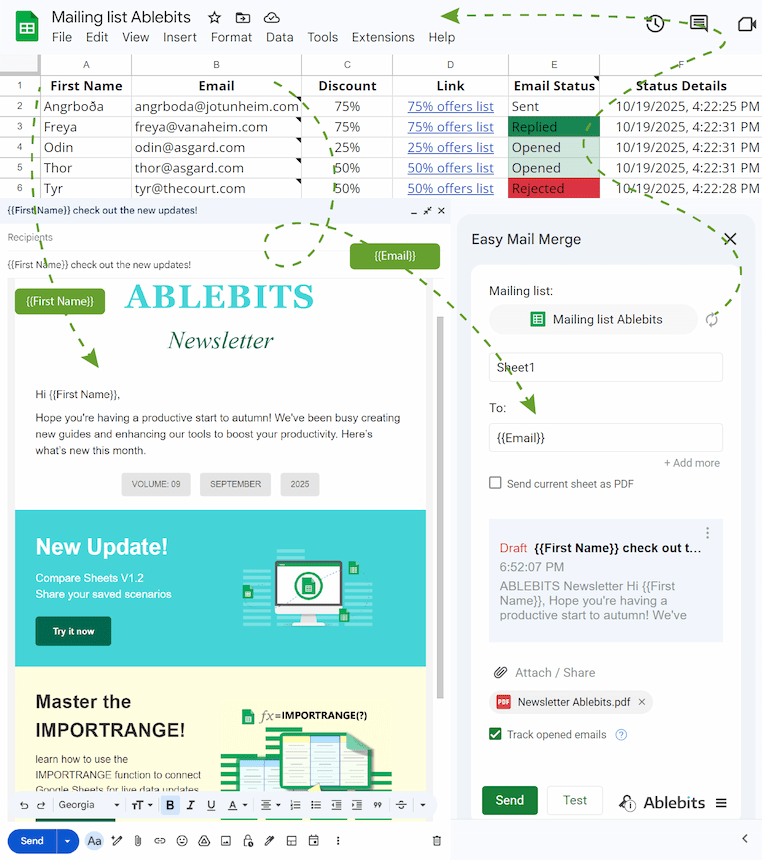
Easy Mail Merge is a perfect tool for sending tailored mass emails. You just need to save your newsletter as a draft in Gmail and prepare your future readers' information in Google Sheets. You may include email addresses, first and last names, dates, time, any other information, which can be used for personalization.
To send with Easy Mail Merge, just follow these steps:
- Create your newsletter and save it as a draft in Gmail. Use placeholders to personalize each email.
- Prepare your contact list in a Google Sheet with all the information for personalization.
- Install and run the Easy Mail Merge add-on.
- In the add-on's settings, find and select your previously created newsletter draft.
- Send a final test to yourself, then send it to your entire list with one click!
Note: Using Easy Mail Merge, you can get clear statistics on your mailing success. The add-on automatically adds two columns to your mailing list with delivery details. You can also track opens of your emails.

May your new newsletter-building skills lead to emails your readers can't wait to open 💌.
 by
by