Add watermark to Excel worksheets
The Watermark add-in for Excel makes the process of inserting text and picture watermarks into your spreadsheets really simple and straightforward. Here you'll find the instructions on how to create, add, edit, and remove watermarks in your Excel files.
How to use the Watermark tool
Start the tool
Run the add-in by clicking the Watermarks icon in the Manage group on the Ablebits Data tab:

Insert default watermarks
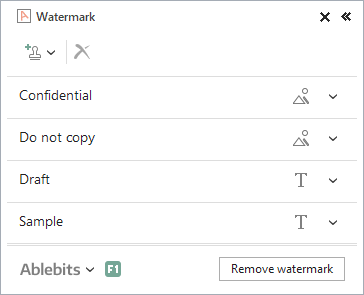
Once the add-in is running, you'll see its pane with several predefined watermarks: Confidential, Do not copy, Draft, and Sample:

The first two are picture watermarks, while the last two are textual. You can expand the group with any existing mark, edit the way it looks, and click the Insert button to place it into your sheet.
Create and insert custom watermark
You can also create a watermark in Excel from scratch:
- Click the New watermark icon and choose to create either New Text Watermark or New Picture Watermark. Once picked, it will appear as another group at the bottom of the list of watermarks on the add-in pane.
- Specify a name for the new item in the Watermark name field:

- Configure the settings of the new watermark:
- If you choose to create a text watermark, enter your text in the Watermark text field and define its font, size, and color. Select the Diagonal checkbox to place your watermark text across the page.
- If you decide to add a picture watermark, click Browse to find the necessary image on your PC. Select the Transparent checkbox if you want to make your watermark less noticeable.
Once the watermark is chosen and its settings are adjusted, click the Insert button to add the watermark to your Excel worksheet.
How to work with watermarks
Edit your watermarks
You can easily edit a watermark by expanding it in the list and changing its settings.
Depending on the watermark type (picture or text), you'll be offered to edit different settings:
- If you choose to modify a picture watermark, you'll be able to select another image for it. It will also be possible to make the watermark transparent.
Note. If you change a default watermark picture, the name of the default watermark will be changed into the name of the image.
- If you decide to change a text watermark, you'll be offered to enter its name and text, pick a font, its size, and color. Also, you'll be able to place it diagonally if you want.
Remove your watermarks
You can delete a watermark from the list by clicking the Delete watermark icon at the top of the pane.
To remove a watermark from your Excel file, click the Remove watermark button at the bottom of the pane.
Responses
I just updated the the latest version of the Ultimate Suite. When I click on the Watermark tool and click INSERT, I get a Microsoft.NET Framework popup that says "Unhandled exception has occurred in a component in your application. If you click Continue, the application will ignore this error and attempt to continue. Paremeter is not valid"
Can someone tell me what this is or what I'm doing wrong?
Hello Amy,
I am sorry to hear that you've encountered the problem using our add-in. I've just send you an email requesting more details of the issue. Please provide us with the requested information and we'll do our best to help you. Thank you.
Hello.
I've inserted a watermark, but cannot manipulate where it appears on the page. I would like it to appear diagonally, which it does, but it is not centered on the page. How do I alter the location of the watermark?
Thank you.
Hello Risa,
Thank you for the comment.
I am afraid, you can't alter the location of the watermark. However, you can choose it to be diagonal or horizontal by checking or unchecking the corresponding box. I am sorry I can not assist you better.
Post a comment
Seen by everyone, do not publish license keys and sensitive personal info!