This tutorial will teach you a few simple tricks to delete multiple empty rows in Excel safely without losing a single bit of information.
Blank rows in Excel is a problem we all face once in a while, especially when combining data from different sources or importing information from somewhere else. Empty lines can cause a lot of havoc to your worksheets on different levels and deleting them manually can be a time-consuming and error-prone process. In this article, you will learn a few simple and reliable methods to remove blanks in your worksheets.
How NOT to remove blank lines in Excel
There are a few different ways to delete empty lines in Excel, but surprisingly many online resources stick with the most dangerous one, namely Find & Select > Go To Special > Blanks.
What's wrong about this technique? It selects all blanks in a range, and consequently you will end up deleting all rows that contain as much as a single blank cell.
The below image shows the original table on the left and the resulting table on the right. And in the resulting table, all incomplete rows ae gone, even row 10 where only the date in column D was missing:
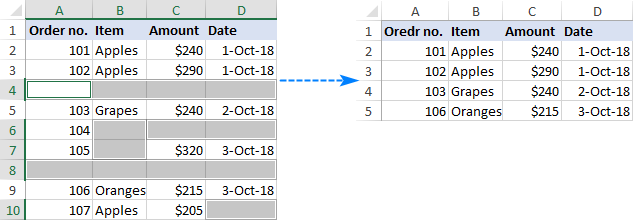
The bottom line: if you don't want to mess up your data, never delete empty rows by selecting blank cells. Instead, use one of the more considered approaches discussed below.
How to remove blank rows in Excel with VBA
Excel VBA can fix a lot of things, including multiple empty rows. The best thing about this approach is that it does not require any programming skills. Simply, grab one of the below codes and run it in your Excel (the instructions are here).
Macro 1. Delete blank lines in a selected range
This VBA code silently deletes all blank rows in a selected range, without showing any message or dialog box to the user.
Unlike the previous technique, the macro deletes a line if the entire row is empty. It relies on the worksheet function CountA to get the number of non-empty cells in each line, and then deletes rows with the zero count.
To give the user an opportunity to select the target range after running the macro, use this code:
Upon running, the macro shows the following input box, you select the target range, and click OK:
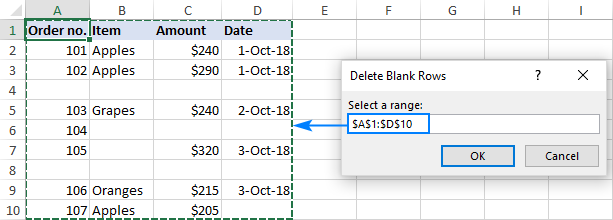
In a moment, all empty lines in the selected range will be eliminated and the remaining ones will shift up:

Macro 2. Delete all blank rows in Excel
To remove all blank rows on the active sheet, determine the last row of the used range (i.e. the row containing the last cell with data), and then go upwards deleting the lines for which CountA returns zero:
Macro 3. Delete row if cell is blank
With this macro, you can delete an entire row if a cell in the specified column is blank.
The following code checks column A for blanks. To delete rows based on another column, replace "A" with an appropriate letter.
As a matter of fact, the macro uses the Go To Special > Blanks feature, and you can achieve the same result by performing these steps manually.
Note. The macro deletes blank rows in the entire sheet, so please be very careful when using it. As a precaution, it may be wise to back up the worksheet before running this macro.
How to remove blank lines in Excel with VBA
To delete empty rows in Excel using a macro, you can either insert the VBA code into your own workbook or run a macro from our sample workbook.
Add a macro to your workbook
To insert a macro in your workbook, perform these steps:
- Open the worksheet where you want to delete blank rows.
- Press Alt + F11 to open the Visual Basic Editor.
- On the left pane, right-click ThisWorkbook, and then click Insert > Module.
- Paste the code in the Code window.
- Press F5 to run the macro.
For the detailed step-by-step instructions, please see How to insert and use VBA in Excel.
Run a macro from our sample workbook
Download our sample workbook with Macros to Delete Blank Rows and run one of the following macros from there:
DeleteBlankRows - removes empty rows in the currently selected range.
RemoveBlankLines - deletes blank rows and shifts up in a range that you select after running the macro.
DeleteAllEmptyRows - deletes all empty lines on the active sheet.
DeleteRowIfCellBlank - deletes a row if a cell in a specific column is blank.
To run the macro in your Excel, do the following:
- Open the downloaded workbook and enable the macros if prompted.
- Open your own workbook and navigate to the worksheet of interest.
- In your worksheet, press Alt + F8, select the macro, and click Run.
Formula to delete blank rows in Excel
In case you'd like to see what you are deleting, use the following formula to identify empty lines:
=IF(COUNTA(A2:D2)=0, "Blank", "Not blank")
Where A2 is the first and D2 is the last used cell of the first data row.
Enter this formula in E2 or any other blank column in row 2, and drag the fill handle to copy the formula down.
As the result, you will have "Blank" in empty rows and "Not blank" in the rows that contain at least one cell with data:

The formula's logic is obvious: you count non-empty cells with the COUNTA function and use the IF statement to return "Blank" for zero count, "Not Blank" otherwise.
In fact, you can do nicely without IF:
=COUNTA(A2:D2)=0
In this case, the formula will return TRUE for blank lines and FALSE for non-blank lines.
With the formula in place, carry out these steps to delete empty lines:
- Select any cell in the header row and click Sort & Filter > Filter on the Home tab, in the Formats This will add the filtering drop-down arrows to all header cells.
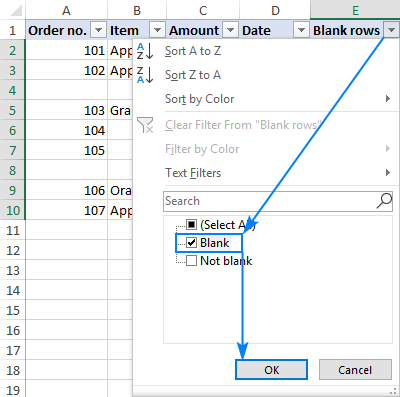
- Click the arrow in the formula column header, uncheck (Select All), select Blank and click OK:
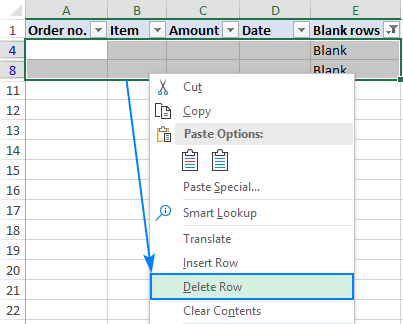
- Select all the filtered rows. For this, click on the first cell of the first filtered row and press Ctrl + Shift + End to extend the selection to the last cell of the last filtered row.
- Right-click the selection, choose Delete row from the context menu, and then confirm that you really want to delete entire rows:
- Remove the filter by pressing Ctrl + Shift + L. Or click Home tab > Sort & Filter > Filter.
- Delete the column with the formula since you do not need it any longer.
That's it! As the result, we have a clean table with no blank lines, but all the information preserved:

Tip. Instead of deleting empty lines, you can copy non-empty rows to somewhere else. To have it done, filter "Not blank" rows, select them and press Ctrl + C to copy. Then switch to another sheet, select the upper-left cell of the destination range and press Ctrl + V to paste.
How to remove empty lines in Excel with Power Query
In Excel 2016 and Excel 2019, there is one more way to delete empty rows - by using the Power Query feature. In Excel 2010 and Excel 2013, it can be downloaded as an add-in.
Important note! This method works with the following caveat: Power Query converts the source data into an Excel table and changes the formatting such as fill color, borders and some number formats. If the formatting of your original data is important to you, then you'd better choose some other way to remove blank rows in Excel.
- Select the range where you want to delete empty lines.
- Go to the Data tab > Get & Transform group and click From Table/Range. This will load your table to the Power Query Editor.

- On the Home tab of the Power Query Editor, click Remove Rows > Remove Blank Rows.
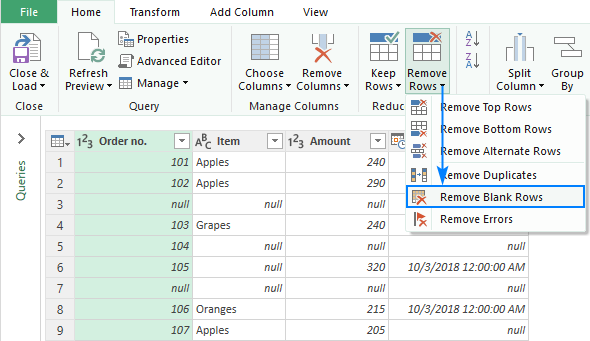
- Click the Close & Load This will load the resulting table to a new worksheet and close the Query Editor.
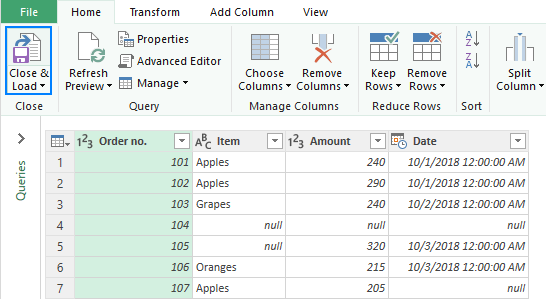
In the result of these manipulations, I got the following table without empty lines, but with a couple of nasty changes - the currency format is lost and the dates are displayed in the default format instead of the custom one:

If you are curious to learn other applications of this powerful feature, you can find more practical examples in this tutorial: Using Power Query in Excel.
How to delete rows if cell in a certain column is blank
In the beginning of this tutorial, we warned you against removing empty lines by selecting blanks. However, this method comes in handy if you want to delete rows based on blanks in a specific column.
As an example, let's remove all the rows where a cell in column A is empty:
- Select the key column, column A in our case.
- On the Home tab, click Find & Select > Go To Special. Or press F5 and click the Special… button.

- In the Go To Special dialog, select Blanks and click OK. This will select blank cells in the used range in column A.

- Right-click on any selected cell and choose Delete… from the context menu.
- In the Delete dialog box, choose Entire row and click OK.

Done! The rows that do not have a value in column A are no longer there:

The same result can be achieved by filtering blanks in the key column.
How to remove extra lines below data
Sometimes, the rows that look completely blank may actually contain some formats or non-printable characters. To check if the last cell with data is really the last used cell in your worksheet, press Ctrl + End. If this has taken you to a visually empty row below your data, in terms of Excel, that row is not blank. To remove such rows, do the following:
- Click the header of the first blank row below your data to select it.
- Press Ctrl + Shift + End. This will select all the lines that contain anything including formats, spaces and non-printing characters.
- Right-click the selection and choose Delete… > Entire row.

If you have a relatively small data set, you may want to get rid of all blank lines below your data, e.g. to make scrolling easier. Although, there is no way to delete unused rows in Excel, there is nothing that would prevent you from hiding them. Here's how:
- Select the row below the last row with data by clicking its header.
- Press Ctrl + Shift + Down arrow to extend the selection to the last row on the sheet.
- Press Ctrl + 9 to hide the selected rows. Or right-click the selection, and then click Hide.

To unhide the rows, press Ctrl + A to select the entire sheet, and then press Ctrl + Shift + 9 to make all the lines visible again.
In a similar fashion, you can hide unused blank columns to the right of your data. For the detailed steps, please see Hide unused rows in Excel so that only working area is visible.
Fastest way to remove empty rows in Excel
When reading the previous examples, didn't it feel like we were using a sledgehammer to crack a nut? Here, at Ablebits, we prefer not to make things more complex than they need to be. So, we took a step further and created a two-click route to delete empty rows in Excel.
With the Ultimate Suite added to your ribbon, here's how you can delete all empty rows in a worksheet:
- On the Ablebits Tools tab, in the Transform group, click Delete Blanks > Empty Rows:
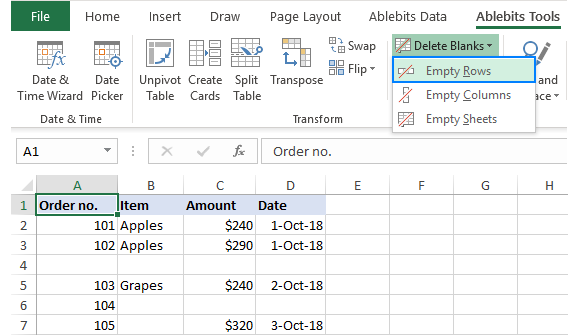
- The add-in will inform you that all empty rows are going to be removed from the active worksheet and ask to confirm. Click OK, and in a moment, all blank rows will be eliminated.

As shown in the screenshot below, we have only removed absolutely blank lines that do not have a single cell with data:

To find out more awesome features included with our Ultimate Suite for Excel, you are welcome to download a trial version.
I thank you for reading and hope to see you on our blog next week!
 by
by
26 comments
thanks for this. very helpful
My modification of the above code, for ActiveSheet:
Public Sub removeBlankRows()
Dim SourceRange As Range
Dim EntireRow As Range
Dim i As Long
Dim answer As String
On Error Resume Next
Set SourceRange = Application.InputBox( _
"Select a range:", "Delete Blank Rows", _
Application.Selection.Address, Type:=8)
answer = Application.InputBox("Remove all (Y) or only the inner rows (N)", "Delete Empty Columns", "Y")
If Not (SourceRange Is Nothing) Then
Application.ScreenUpdating = False
With SourceRange
For i = .Rows.Count To 1 Step -1
Set EntireRow = Range(Cells(.Row + i - 1, .Column), Cells(.Row + i - 1, .Column + .Columns.Count - 1))
If Application.WorksheetFunction.CountA(EntireRow) = 0 Then
If answer = "Y" Or answer = "y" Then
Rows(.Row + i - 1).EntireRow.Delete
Else
EntireRow.Delete
End If
End If
Next
End With
Application.ScreenUpdating = True
End If
End Sub
First of all, I really appreciate your articles, and have found great help in all that I have needed to use.
But I can get the find-all, select all, delete all method to work. IFF I first select the columns that I wish to find blanks in.
When I first select only the column I want to find blanks in, then use the find all method, that selects only the rows which are blank in the column selected. Blanks anywhere else are ignored. Then select all the items from the list of found items. This selects them all in the excel sheet (note only selecting the fields in the single or multiple columns initially chosen. Then you can use delete and select whole rows to remove all the unwanted rows without touching any row that has blanks elsewhere.
Maybe I am just lucky as I am using a very simple 9000 row spreadsheet with just plain data. But it works for me with Microsoft Office Standard 2019 on Windows 11. Please feel free to contact me if I am not making perfect sense, or if you have other questions.
Taking MAcro 3. To delete entire row base don a single blank cell... Would it not surely be much better to atleast find the last row first, then delet any necessary rows from the resulting range? So if I have 100 Rows, it would first find row 100, then work upwards to delete the rows where there is a blank cell as specified? Taking it away from the entire sheet?
I don't know how to do this
This is amazing! Thank you!
Hi,
I struggle with the first Marco1 step.
Where do I insert the code?
How do I put it into Excel?
Hi Theo,
Please read the "How to remove blank lines in Excel with VBA" section of this tutorial. Or see a detailed step-by-step guide with screenshots: How to insert and run VBA code in Excel.
Hi,
This macro doesn't seem to work properly when it is included as part of another macro as shown:
***************************************************************************************
Sub Macro2()
Range("O20").Select
Selection.Copy
Range("K9").Select
ActiveSheet.Paste
Range("K9").Select
Range(Selection, Selection.End(xlDown)).Select
ActiveSheet.Paste
Columns("K:K").Select
Application.CutCopyMode = False
Selection.Copy
Selection.PasteSpecial Paste:=xlPasteValues, Operation:=xlNone, SkipBlanks _
:=False, Transpose:=False
Application.CutCopyMode = False
On Error Resume Next
Columns("K").SpecialCells(xlCellTypeBlanks).EntireRow.Delete
End Sub
***********************************************************************************
I have a sheet full of data and the first part of this looks at the first column (out of 9) and takes every 10th item in the first column and puts it into column "k". The part of the macro that's supposed to delete all the rows that have nothing in column k doesn't work properly. If I manually enter data in column K and then just run the second part of this macro, it does what it is supposed to. Any ideas? Thanks in advance. Mike
NICE POST,VERY HELPFULL FOR ME
After racking my brains on how to remove blank rows from my spreadsheet for ages, and receiving multiple 'End' messages, I found the solution on here easily. Works like a dream. Thanks.
Hi,
My requirement is to delete entire row if a cell is blank.
I used Macro3 method which was worked to me.
But i have to delete entire row if a cell is blank in two columns.
So i repeated the code and replaced the range with respective column titles.
But i am getting an error. If both the columns has blanks in a same row.
How do i rectify it?
The error message was "cannot use that command on overlapping selections"
Svetlana Cheusheva
You are my HERO!
The macros and methods are very helpful.
Thanks from the bottom of my heart!
Ms Svetlana,
This macro (delete all blank rows) works like a sweet dream
Thanks a lot
Hi,
I am having an issue using these methods. The CountA function counts if there is a formula in a cell. For example in one column i have an =iferror('Value,"") with a lookup function from another sheet. As such it does not delete any rows as all are counting as having something in them.
I have attempted to use VBA to replace the formula in a column with values with the below, but CountA is still counting it until i go in the cell and then press enter?
With Range("1:2")
.Cells.Copy
.Cells.PasteSpecial xlPasteValues
.Cells(1).Select
End With
Application.CutCopyMode = False
With the VBA solution, why delete the rows one at a time in the loop? Build a range using union then do 1 delete at the end of the entire range.
Doing it 1 row at a time especially considering you haven't set calculation to manual is going to take ages on large formula centric sheets.
Taking the suggestion of building a union, then executing one delete at the end, here is a solution I built:
Sub fncDelete_Blank_Rows()
Dim rngBlank As Range
Dim rngUsed As Range
Dim rngRow As Range
Set rngUsed = Sheet9.UsedRange
'Sheet9.UsedRange.Select
For Each rngRow In rngUsed.Rows
If Application.WorksheetFunction.CountA(rngRow.Cells) = 0 Then
If rngBlank Is Nothing Then
Set rngBlank = rngRow
Else
Set rngBlank = Application.Union(rngBlank, rngRow)
End If
Else
Set rngBlank = Nothing
End If
Next rngRow
If Not rngBlank Is Nothing Then
' rngBlank.Select
rngBlank.EntireRow.Delete
End If
End Sub
Thanks for this Dan and Michael, the Union method is MUCH faster especially when thousands of rows of data are involved. My testing showed every 1000 records took about 22.5 seconds with deleting in the loop vs single digit seconds when deleting with the union. So a dataset of 50000 rows of data took almost 20 minutes regardless of how many actual blank rows there were and the same dataset took just over 2 seconds with the Union method.
My use case was to look for an entire row containing blank values and I found that the "CountA" function isn't the best at getting empty rows that contain blanks (like when you paste as values blank formulas) so I adapted it to use the "CountBlank" formula instead and compare it to the number of columns in the range.
I just replaced this:
If Application.WorksheetFunction.CountA(rngRow.Cells) = 0 Then
With this:
If rngRow.Columns.Count - Application.CountBlank(rngRow.Cells) = 0
Thanks again and thanks to Svetlana Cheusheva for sparking this!
-Jeremiah
Please replace the Zero value after the equal sign to put within quotes to identify the null value as follows:
If Application.WorksheetFunction.CountA(rngRow.Cells) = "0" Then
Hello,
Amazing post!!!, very useful, thank you very much for your help.
These solutions take ages to run, and they freeze, if you have one million blank rows.
My macro has to dynamically removes the blanks from PivotFields if present, ignore if not present. Is that possible?
Hi,
Thanks for the amazing post. How I can delete the rows with full blank cell of a "specific worksheet".
Best Regards
Very helpful. Thank you!
Hi,
I have a data in which there are multiple blank rows and multiple headings next to each blank rows. I want to get rid of the those multiple blank rows and headings. I want to get it automated using VBA. I have tried few tricks but was not able to get the desired result. If you can help me out.
Is this a valid method?
Filter what you wanted to delete, and select all rows.
Find & Select > Go to Special > Visible Cells Only
Right click and delete.
Hi Sahil,
I would advise to never use this method unless you want to delete all the rows that contain at least one blank cell. For the detailed explanation, please check out How NOT to delete blank rows in Excel.