How to manage columns in Excel
If you work with tables that have numerous columns, you might want to easily change their order without copying and pasting each column separately. The Column Manager tool creates a list of all columns so that you can easily navigate, autofit, and drag them.
Before you start
We strongly recommend creating a backup copy of your sheet. After moving or deleting columns, you won't be able to undo the changes.
Start Column Manager
Open the worksheet that contains the columns you want to manage. To start the add-in, click the Column Manager icon on the Ablebits Data tab, in the Manage group:

Manage your Excel columns
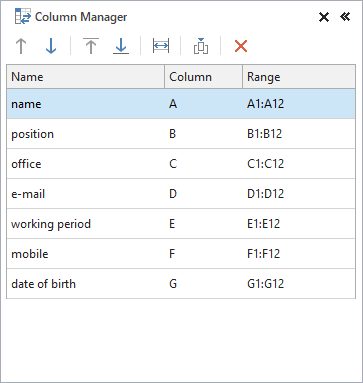
You can see the Column Manager pane with the list of columns in the selected table. Here you'll find your column headers under Name, Excel column letters under Column, and range addresses under Range:

- To select a column in your table, click it in the list.
- To change the column order in your table, drag the columns to the needed position in the list.
- Alternatively, you can move the column(s) by selecting them in the add-in pane and using the Ctrl+Up arrow or Ctrl+Down arrow shortcuts.
- To make a column the first one or the last one in your table, select it in the add-in pane and use the Ctrl+Home and Ctrl+End shortcuts accordingly.
- To autofit your columns, select them in the add-in pane and press the Ctrl+Right arrow keyboard shortcut.
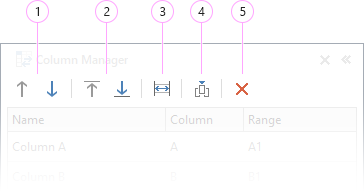
Besides, you can use the icons at the top of the pane:

- To move the column(s) to the left or to the right, select the column(s) of interest and click the Move Up or Move Down icon.
- To move the column(s) to the far left or to the far right in your table, select them and use the Move to Top or Move to Bottom icon.
- You can make the column width automatically fit its longest entry by clicking the Auto Fit icon.
- If you need to add a column, select an existing one in the add-in pane or in the worksheet and click the Insert icon. The new column will appear to the right of the initially selected one.
- To remove a column, click on it in the add-in pane or in your worksheet and click the Delete icon.
Responses
Hi,
Why do the actual names (headers) of columns not show up in Column Manager on some sheets? Those sheets that I have with very large numbers of columns do not reflect a name, and those are the ones I need it most.
Hello Court,
Thank you for contacting us.
For us to be able to help you better, please send us a sample of your workbook to support@ablebits.com, so we could look into it and see how your data is arranged.
Please don't worry if you have confidential information there, we never disclose the data we get from our customers and delete it as soon as the problem is resolved. Or you can replace any important information with some irrelevant data, just keep the format.
We'll do our best to solve the issue.
I need to select multiple items from a excel drop down list. And not allow duplicates. Have read watched a couple videos and still can't make it work.
Hello Larry,
Thank you for your comment.
I'm sorry, but your task is not entirely clear. Could you please describe it in more detail? If you send us a small sample workbook with your source data and the result you expect to get to support@ablebits.com, it will help us understand it better and find the solution for you. Thank you.
How can you copy and paste every other row in Excel.
Hello Albert,
Thank you for contacting us.
We have some useful tutorials on how to copy and move sheets in Excel or enter the same data (formula) into all selected cells at a time on our blog. Maybe you'll find this information helpful.
If however, this is not exactly what you need, please describe your task in more detail and we'll find a better solution for you. Thank you.
Post a comment
Seen by everyone, do not publish license keys and sensitive personal info!